This post may contain affiliate links. Please see my full disclosure for details.
Hi Bold Bakers!
This Malabar paratha is a rich, buttery, indulgent Indian flatbread. You’ll adore the crispy, crunchy layers that give way to a soft interior. You won’t believe how good these are and how easy they are to make!
Our culinary assistant, Ami, helped me out with this recipe — but this isn’t the paratha she grew up with. Ami says her mother used to make a healthy, whole wheat, layered paratha that was soft and delicious. Ami said that she thought that is what paratha was until she bought a premade packaged paratha and ate the buttery, flaky paratha that reminded her more of a croissant than what her mum had made her at home.
[ If you like Ami’s paratha, try her samosas! ]
She did her research and found out that it was a Malabar or Kerala paratha, and it’s a lot simpler to make than the Tawa paratha she’d had grown up eating. It may not be as healthy, but after one taste of this flaky flatbread, you may never look back. Indulge and enjoy every bite!

What Is Malabar Paratha?
Malabar paratha is one of the most popular flatbreads in South India, especially Kerala. It is thought to have originated from Sri Lanka and it first became popular in the ’60s but by the ’80s it was a staple in kitchens and restaurants everywhere in the area.
The crispy, buttery bread goes great with curries at dinner time, but it’s also delicious for breakfast, served just plain and fresh.
What You Need To Make Malabar Paratha
- Measuring cups and spoons
- Mixing bowls
- Pastry brush
- 10-inch skillet
- Wire rack

How To Make Malabar Paratha
I cannot wait for you to have one of these flatbreads fresh off the skillet. Here is how you make Malabar paratha (get all the measurements here):
- Combine the flour and salt in a large mixing bowl, then add the oil and rub it into the flour until evenly mixed.
- Pour the water into the flour mixture and stir until a dough is formed. Knead the dough for 5 minutes, then cover the bowl and set it aside for 1 hour.
- After the dough has rested, divide it into 8 equal portions.
- Working with one portion at a time, roll a portion out as thinly as possible on a floured surface, using more flour as needed to prevent sticking.
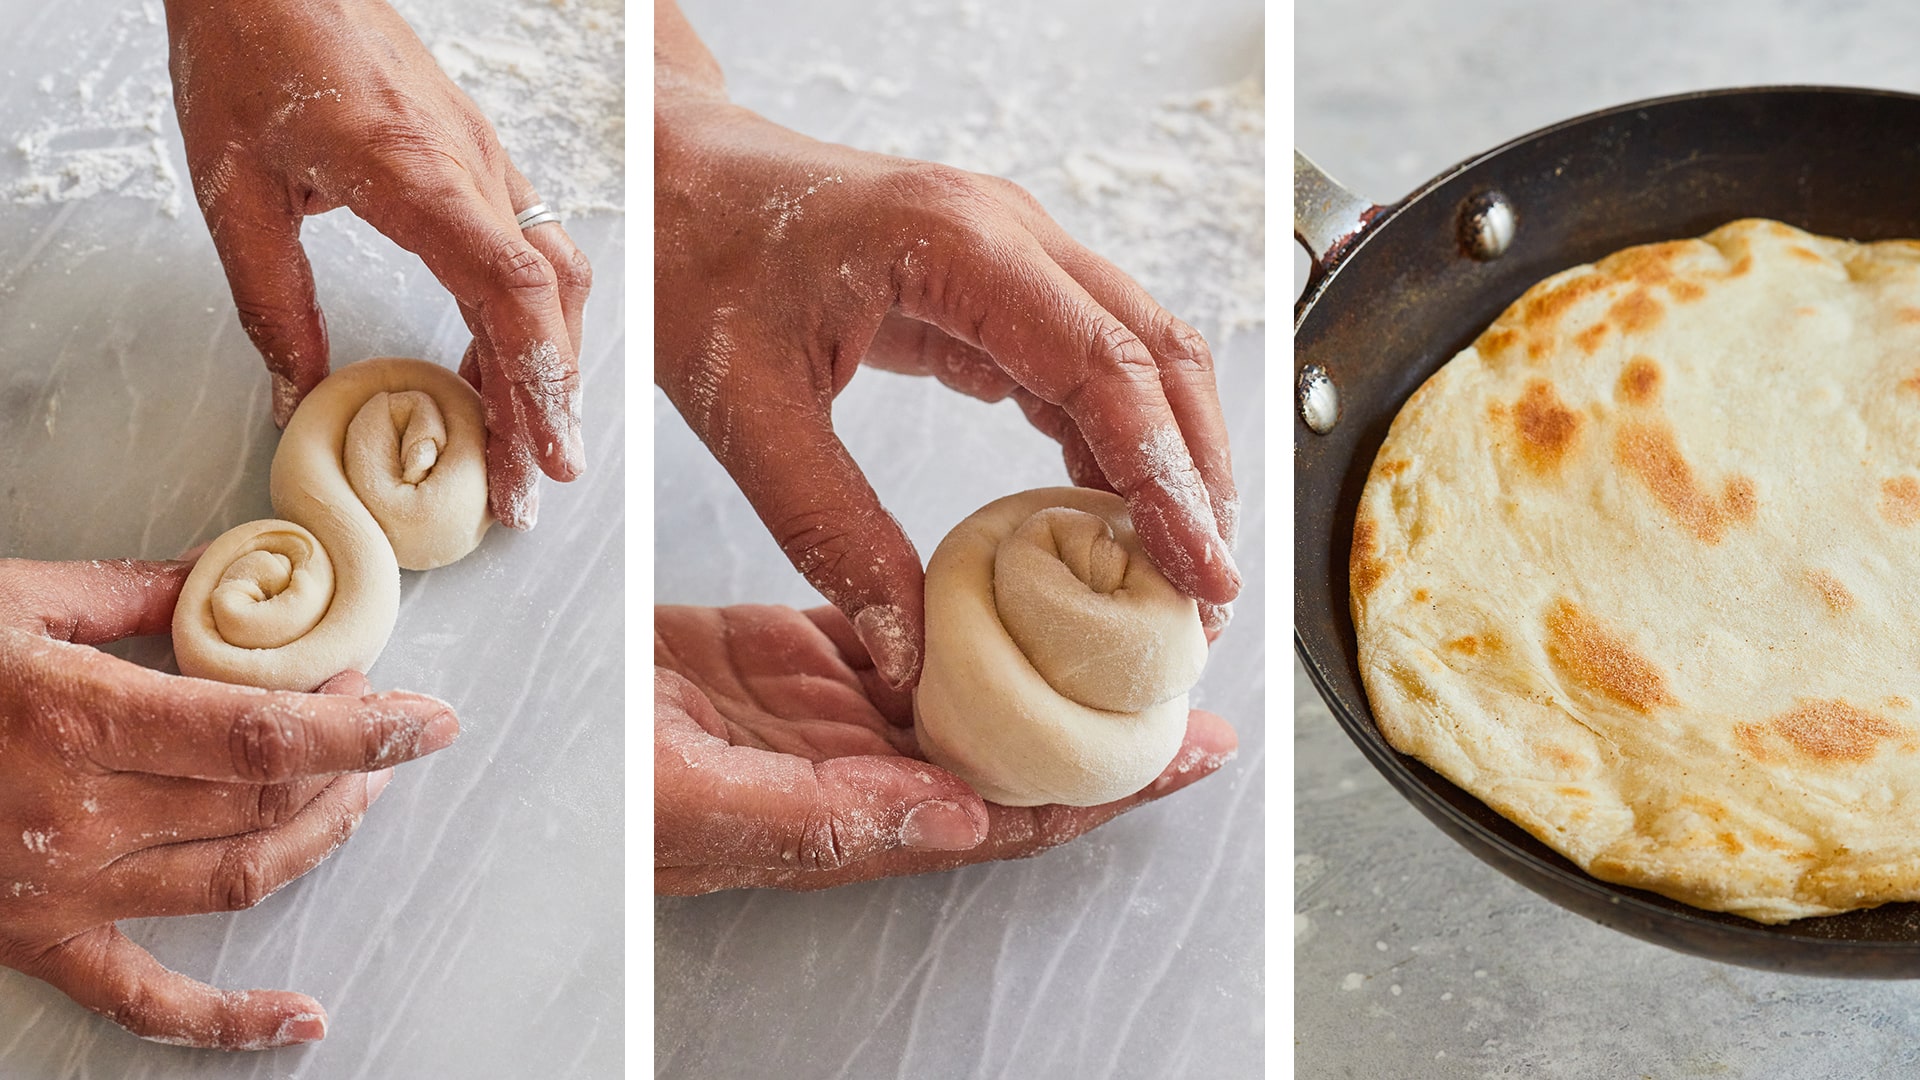
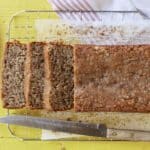
- With a pastry brush, spread about 1 tablespoon (½ oz/14g) of butter or ghee over the surface of the dough. Then, roll the dough into a tight coil.
- Start at both ends into a coil until the ends meet in the middle. Fold the coils together to make a disc, press together, and set aside. Repeat with the remaining portions of dough and then cover well and let it sit for another hour.
- When you are ready to cook, warm a 10-inch skillet over medium-high heat and set a wire rack next to the stove.
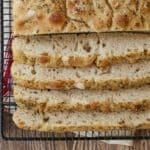
- Working with one disc at a time, on a floured surface, roll out the dough into a roughly 8-inch (20cm) circle. Brush off any excess flour and cook in the dry skillet for about 3 to 4 minutes per side, until it is cooked and lightly golden. Set it aside on the wire rack and repeat with the remaining dough.
- Once all the dough is cooked, turn the heat of the skillet to medium. Add a little butter or ghee to the pan and toast the paratha on both sides until crispy, about a minute or two per side.
- Using a clean towel, so you don’t burn your hands, carefully crush the paratha to release the steam, then place it on the wire rack while you toast the remaining paratha.
Gemma’s (And Ami’s!) Pro Chef Tips For Making Malabar Paratha
- You can replace the all-purpose flour in this recipe with maida (white flour made from durum wheat) or whole wheat pastry flour for a more authentic texture.
- You can make parathas ahead of time: cook the parathas through Step 9 and then refrigerate for up to 3 days or freeze for up to 2 months. Defrost if needed and then proceed as directed with toasting in Step 10 when ready to serve.
- It takes time but resting the dough is essential – the gluten needs to rest, or the dough can become stretchy and difficult to roll out.
- This is not traditional, but these parathas are so flaky that they remind me of a breakfast pastry. Try serving these in the morning with a little jam – you won’t be disappointed!
- This recipe can easily be doubled to serve a crowd!

How Do I Store Malabar Paratha?
You can store any leftover paratha in an airtight container in your refrigerator for up to 3 days. Reheat it on a warm, dry skillet.
Make More International Recipes!

And don’t forget to buy my Bigger Bolder Baking Cookbook!
Full (and printable) recipe below!
Try These Recipes!

Watch The Recipe Video!
Flaky Malabar Paratha
Ingredients
- 3 cups (15oz/426g) all-purpose flour (plus more for rolling)
- 1 ½ teaspoons salt
- 2 tablespoons vegetable oil
- 1 cup (8floz/240ml) water (at room temperature)
- ½ cup (4oz/115g) butter or ghee (softened, plus more for cooking)
Instructions
- In a large mixing bowl, combine the flour and salt, and then add the oil and rub into the flour until evenly mixed.
- Pour the water into the flour mixture and stir until a dough is formed. Knead the dough for 5 minutes, then cover the bowl and set aside for 1 hour to let the gluten relax.
- After the dough has rested, divide the dough into 8 equal portions.
- Working with one portion of dough at a time, on a floured surface roll out as thinly as possible, using more flour as needed to prevent sticking.
- With a pastry brush, spread about 1 tablespoon (½ oz/14g) of butter or ghee over the surface of the dough, and then roll the dough into a tight coil.
- Starting at both ends of the roll, coil the ends until they meet in the middle. Then fold the coils together to make a disc, press together, and set aside.
- Repeat with the remaining portions of dough and then cover well and set aside for another hour to let the gluten relax.
- When ready to cook, warm a 10-inch skillet over medium-low heat and set a wire rack next to the stove.
- Working with one disc of dough at a time, on a floured surface, roll out the dough into a roughly 8-inch (20cm) circle, brush off the excess flour and cook in the dry skillet for about 3-4 minutes per side, until cooked and lightly golden. Set aside on the wire rack and repeat with the remaining dough.
- Once all the dough is cooked, turn the heat up to medium, add a little butter or ghee to the pan and toast the paratha on both sides until crispy, about a minute or two per side.
- Using a clean tea towel to avoid burning your hands, carefully crush the paratha to release the steam and then place it on the wire rack while you toast the remaining paratha.
- Serve immediately. Store leftover paratha in an airtight container in the refrigerator for up to 3 days. Reheat on a warm, dry skillet.


Hi Gemma, I’d love to give this a go but would find it much easier to follow if i saw your demonstration on video. I know and understand you can’t do videos for all of your recipes and i don’t feel they’re needed for all but this one would be so useful to see your technique for shaping/rolling the dough. Thank you
Omg I am from Kerala, the state known for Malabar paratha in India. It is absolutely amazing that Gemma made this recipe. So much love from South India <3
Oh dear. Gemma I am lost without a picture of the finished product … and a video.
Though I am from North India, we still relish this South Indian paratha. Thank you for sharing this recipe with your fans all across the globe. With love..
I truly enjoyed your and Ami’s video tutorial! The still pics also look very easy to follow. I loved both of your comments about how “moms just know things.” So true!
Now on to be a Bigger Bolder Baking warrior in my own kitchen. Thanks again!
Great video! Thanks for posting. Can the dough be frozen & cooked at a later date?
Thanks!
Wonderful.
Thank you for sharing this recipe with your fans all across the globe.Thanks very much for sharing this recipe with us.
Hi Gemma and Ami, thank you for this wonderful recipe and explanatory video! It wasn’t as difficult as I always thought parathas were and I love Ami‘s technique of rolling. I had a lot of fun doing this for brunch today. Reminds me of home and our lazy Sundays.
I am originally from Guyana and we make a similar parathyroid but with baking powder as a leavened and we clap it after cooking to soften and separate the layers. I think this Guyanese style was invented in Guyana and copied in other Caribbean countries.