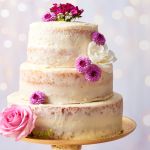
$20 Homemade Wedding Cake
Prep Time
1 hr 15 mins
Cook Time
1 hr
Decorating Time
25 mins
Total Time
2 hrs 40 mins
My easy Homemade Wedding Cake has fluffy lemony layers, velvety frosting & fresh raspberries—stunning yet easy to make for under $20!
Servings: 72 people
Ingredients
Genoise Sponge Cake
- 9 large eggs plus 9 large eggs , at room temperature
- 1 ½ cups (12 oz/340 g) plus 1 ½ cups (12 oz/340 g) granulated sugar
- 1 ½ cups (7 ½ oz/213 g) plus 1 ½ cups (7 ½ oz/213 g) all-purpose flour
- ¾ teaspoon plus ¾ teaspoon baking powder
Lemon Simple Syrup
- ¾ cup (6 oz/170 g) granulated sugar
- ¾ cup (6 fl oz/180 ml) water
- Zest and juice from 1 lemon
Ermine Frosting
- 3 x recipes Ermine Frosting
Raspberry Filling
- 1 x recipe Microwave Raspberry Jam
Instructions
To Make the Cake Layers
-
Preheat the oven to 350°F (180°C). Line two 10-inch (25 ½ cm), two 8-inch (20 cm) and two 6-inch (15 cm) cake pans with parchment paper and set aside.
-
In a bowl of a stand mixer fitted with a whisk attachment, whip 9 eggs on high speed for 1 minute.
-
While continuing to mix, gradually add 1 ½ cups (12 oz/340 g) granulated sugar to the eggs, then continue to whip for 10 minutes, until pale, thickened and doubled in volume.
-
In a small bowl, combine 1 ½ cups (7 ½ oz/213 g) of flour with ¾ teaspoon of baking powder, then gently fold the flour mixture into the eggs in a few additions, until fully incorporated.
-
Divide the batter between the two 10-inch (25 ½ cm) cake pans (about 5 cups per pan) and bake for 22-28 minutes, until the top is golden brown and a thin knife inserted in the center comes out clean.
-
Let cool for 10 minutes, then transfer to a wire rack to cool completely, about 30 minutes.
-
Mix the remaining cake layer ingredients in the same way as above and then divide the batter between the remaining pans in this way: for the 8-inch (20 cm) pans, you will need about 3 cups per pan and for the 6-inch (15 cm) pans you will need about 2 cups per pan. (The batter should come up about halfway up the sides of each pan.)
-
Bake for 22-28 minutes, until the tops are golden brown and a thin knife inserted in the center comes out clean.
-
Let cool for 10 minutes, then transfer to a wire rack to cool completely, about 30 minutes.
To Make the Lemon Simple Syrup
-
In a small saucepan over medium heat, combine the sugar, water and lemon zest and heat until the mixture is clear and simmering.
-
Let cool to room temperature, then stir in the fresh lemon juice.
-
Strain to remove the zest and any lemon pulp and set aside.
To Fill and Frost the Cakes
-
Have a 9-inch (23 cm), 7-inch (18 cm) and 5-inch (12 ½ cm) cake boards and 8 straws nearby.
-
Place one 10-inch (25 ½ cm) cake layer on the 9-inch (23 cm) cake board and brush the top and sides generously with the simple syrup.
-
Spread a thin layer of frosting across the top.
-
Create a dam of frosting around the top edges of the cake, then spread on a layer of raspberry jam.
-
Place the second 10-inch (25 ½ cm) cake layer on top. Cover the cakes with a very thin coating of frosting, then smooth away enough to leave the top and sides partially exposed.
-
In the same way fill and frost the 8-inch (23 cm) cake layer (using the 7-inch (18 cm) board) and 6-inch (15 cm) cake layer (using the 5-inch (12 ½ cm) board).
To Assemble the Wedding Cake
-
Insert four straws 4-inches (10 cm) apart in the center of the 10-inch (25 ½ cm) cake, then trim away any excess so that the straws are flush with the surface of the cake.
-
Place the 8-inch cake with its board on top of the inserted straws.
-
Insert the remaining four straws 2-inches apart in the center of the 8-inch (20 cm) cake, cut them so they are flush with the surface then place the final 6-inch (15 cm) cake on top.
-
Use any remaining extra frosting to smooth out any seams in the layers.
-
Refrigerate if not serving within 6 hours of assembly.
Recipe Notes
- Work with cold layers: The cake layers are easier to handle if they are cold. If time allows, after the layers have cooled, wrap well in plastic wrap and refrigerate for at least two hours and up to overnight before proceeding.
- DIY cake boards: You can buy cake boards online (or at your local craft store if they have a baking section), or you can make your own by cutting circles out of a sturdy cardboard box. Be sure to wrap the boards in plastic wrap and then aluminum foil to ensure they are food-safe.
- Keep filling and frosting thin: The frosting and jam between the cake layers should be fairly thin so the structure of the cake isn’t compromised.
- Adjust as you go: As you frost and stack the layers, keep looking at the cake from all sides to make sure the layers are even. If the cake seems to be tilting to one side, this can be adjusted by trimming the layers or adding a little extra frosting. All of this is easier to do before the cake is fully assembled.
- Flower safety: Unless you are using edible flowers, it is essential to wrap the stems so that the flowers don’t come in contact with the cake, since some flowers may be toxic.
- Keep flowers fresh: Store the flowers in water until a few hours before you plan to serve the cake so they don’t wilt.
- How to slice: When slicing and serving, cut the cake “event style” (in a grid) instead of triangular wedges to get more servings.