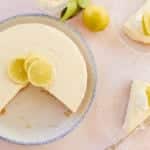
My No-Bake Lemon Cheesecake is light, creamy, and bursting with lemon flavor — the easiest, most refreshing dessert for any occasion.
- 1 recipe Graham cracker crust
- 1 cup (8 fl oz/240 ml) water , boiling
- 1 package (3 oz/85 g) lemon Jell-O
- 2 cups (16 oz/454 g) cream cheese , softened
- ¼ cup (1 oz/28 g) powdered sugar , sifted
- 1 teaspoon lemon zest
- 1 teaspoon vanilla extract
- 1¼ cups (10 fl oz/282 ml) heavy whipping cream , cold
-
Press the Graham cracker crust into a 9-inch (23cm) springform pan and set aside.
-
In a heat-safe measuring jug, add the boiling water and lemon Jell-O. Whisk until completely dissolved and allow it to cool down at room temperature for a minimum of 30 minutes.
-
Using a stand mixer with a paddle attachment (or electric hand mixer), beat the cream cheese on medium-high speed until light and creamy, about 3 minutes.
-
Slowly add the cooled Jello to the cream cheese, 2 tablespoons at a time, mixing thoroughly between additions to prevent the Jello from setting once it hits the cream cheese.
-
Add the powdered sugar, lemon zest, and vanilla and mix on low speed until combined.
-
In a separate bowl, whip the heavy whipping cream to soft peaks. Gently fold the whipped cream into the cream cheese mixture until fully combined.
-
Pour over the crust, cover the pan and refrigerate for at least 4 hours or preferably overnight.
-
When ready to serve, run a thin knife around the edges to separate the cheesecake from the pan before releasing it.
-
Enjoy with whipped cream! Store any leftovers well covered in the refrigerator for up to 3 days.
- Dissolve the Jell-O completely: Make sure your Jell-O is fully dissolved in hot water before adding it to the cream cheese to avoid lumps.
- Add the Jell-O gradually: Slowly mix the cooled Jell-O into room temperature cream cheese, a little at a time. Adding it too quickly or to cold cream cheese can cause it to seize and result in a lumpy mixture or a cheesecake that won’t set.
- Create individual servings: Divide the crust and filling into 10 small containers for easy, elegant, and portable desserts. Clear glasses or jars make a pretty presentation.
- Serve with fresh berries: This cheesecake pairs beautifully with fresh or macerated berries for a bright, juicy contrast.
- Switch up the flavors: Easily customize your cheesecake by swapping in different flavors of Jell-O for a new twist every time.
- Use a reliable crust recipe: Follow my simple Graham Cracker Cookie crust for a buttery, crumbly base that complements the creamy filling perfectly.
- Cake pan. If you have to use a cake pan, butter and line it with parchment paper in advance.