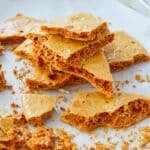
My Chocolate-Covered Honeycomb recipe makes crisp, airy candy with just 4 ingredients—no candy thermometer needed for homemade Crunchie bars.
- ½ cup (4 oz/115 g) granulated sugar
- 4 tablespoons golden syrup (or dark corn syrup)
- 1 ½ teaspoons baking soda (AKA bicarb of soda)
-
Line a baking tray with parchment paper and set aside.
-
In a heavy bottomed saucepan over medium-low heat, let the sugar and golden syrup(or dark corn syrup) mixture melt gently.
-
Turn up the heat to medium and let it simmer until the color of maple syrup, about 3 minutes. Watch carefully so it doesn't smoke.
-
Turn off the heat and immediately whisk in the bicarbonate of soda fast and stand back and watch the syrup turn into a thick foam. Quickly stop whisking and use your spatula to pour this immediately onto a piece of baking parchment, or a Silpat sheet.
-
Leave until set cold and then break it up into shards, it will look like aerated set honey. To wash your pot fill it with hot water and let it sit and it will melt away.
-
To make a Crunchie Bar: Melt good quality chocolate (I used chocolate with 72% cocoa solids). Dip your broken honeycomb in the chocolate using a fork. Take out and let excess chocolate drip off. Place on a wire rack to set.
-
Note: This is a recipe used widely around the world for many years and with many names such a Cinder Toffee in Wales, Hokey Pokey in the UK, Sea Foam, Fairy Candy, Molasses Puffs, and no doubt other names I am not familiar with.
Watch the Recipe Video!
- Use baking soda, not baking powder. Using baking soda is essential to creating the honeycomb texture.
- Watch honey carefully: If using honey instead of golden syrup, keep a close eye on it since honey burns more quickly.
- Avoid making honeycomb on humid days. The candy will absorb the moisture and won't be crisp.
- Don't overcook the mixture. Overcooking the syrup will make it bitter.
- Use a large pot. Honeycomb expands quickly and dramatically, so allow plenty of room when you add the baking soda to the pan, and stand back.
- Do not overmix. This will deflate the bubbles.
- Scrape the honeycomb mixture out of the pot quickly. The mixture starts bubbling immediately, and may not pour out smoothly, so scrape it onto the baking sheet if you need to.
- Don't touch the mixture. Take care—the caramel mixture is very hot.
- Don't press on the mixture. Use a light hand when spreading. Pressing on it will affect the airy candytexture.
- Store it in a dry environment. If you live in a humid climate, you can use food-grade silica packets in an airtight container to keep the homemade honeycomb crisp longer.
- You can spread the honeycomb on a natural stone countertop. If you have a cool, clean natural stone countertop, such as marble, granite, or soapstone, lightly oil the area with a neutral-flavored oil. Once the honeycomb foams up, pour it on the prepared area.
- Easy clean up. To wash your pot, fill it with hot water and let it sit and the honeycomb residue will melt away.