This post may contain affiliate links. Please see my full disclosure for details.
Hi Bold Bakers!
There’s an unfair bias when it comes to pies, and I think people are seriously missing out!
Pies are a popular dessert around the holidays — some Americans can’t imagine a Thanksgiving without a pumpkin or pecan pie. But they’re missing an entire season’s worth of delicious fruit and veggies to pack into some pie crust and enjoy.
Just like pumpkin pie tastes like a bite of fall, a good cherry pie tastes like a mouthful of summer and cherry hand pies are perfect for the busy hustle and bustle, or lazy heat-filled days, of summer.
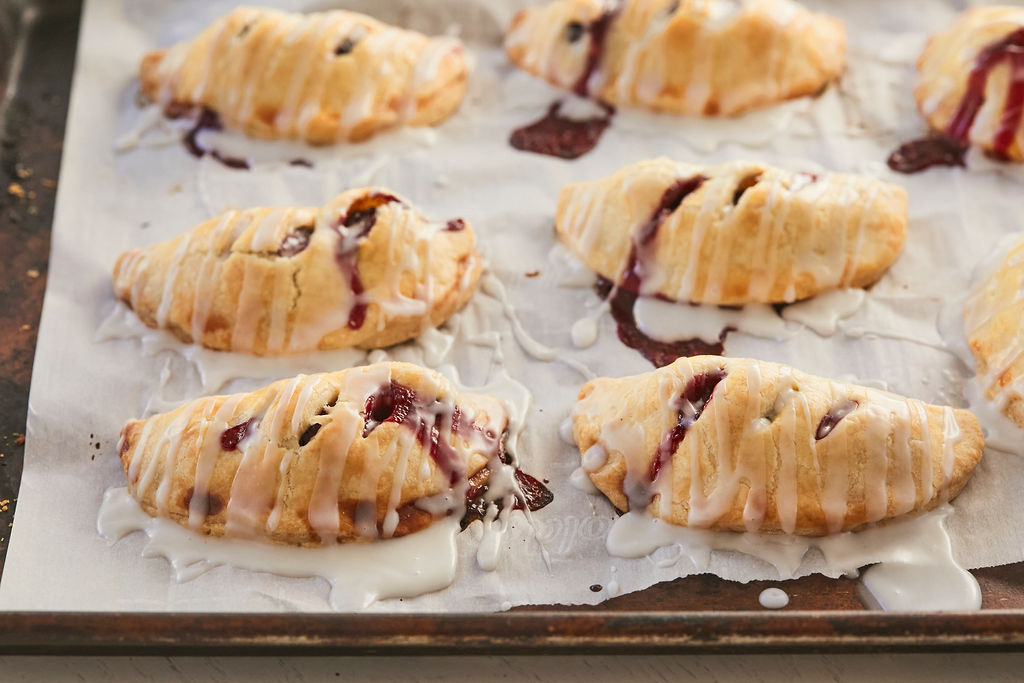
Everything you love about a classic cherry pie is in this homemade Cherry Hand Pie recipe — sweet, juicy cherries all wrapped up in a little pie crust for a lovely, portable treat. You can bring them to picnics, make them for brunch, or serve them as a dessert at a backyard BBQ!
What Are Cherry Hand Pies?
Cherry hand pies are just a classic cherry pie in a handheld form! It’s great for when you’re hosting a socially distant BBQ or if you have young ones who might bicker over which slice is the biggest. I find that they’re easier to serve, and a bonus is you get even more of that delicious, crispy pie crust to balance out the sweetness of the cherry pie filling.

What You Need To Make Cherry Hand Pies
- Measuring Cups and Spoons
- Two baking sheets
- Parchment paper
- Saucepan
- Mixing bowls
How To Make Cherry Hand Pies
If you aren’t ready to try your hand at a traditional cherry pie (You should be! It’s easier than you think!), then cherry hand pies won’t only give you some baking confidence, they’ll give you a delicious treat you’ll turn to again and again. And don’t forget to get the full recipe with measurements, on the page down below:
- First, make the filling. In a saucepan, over medium heat, combine your sugar, cornstarch, lemon juice, and water. Let this simmer for 2-3 minutes until it has thickened.
- Remove this from the heat and stir in your pitted and halved cherries. Set aside to cool.
- As the filling cools, roll out your pie crusts and cut them into 5-inch (12.5 cm) circles.
- Spoon a small amount of the cherry filling into the center of your cut out crust. Moisten the edge with egg wash and fold over to create a half-moon shape. Press down with your fingers or use a fork to seal.
- Place your assembled pies onto baking sheets lined with parchment paper and place it into the refrigerator for 30 minutes.
- When you are ready to bake, cut a few slits into the top of the crusts of the pies and brush with the egg wash.
- Bake the pies for about 20-25 minutes, or until the crust is golden brown, in a preheated 375°F (190°C) oven.
- As the pies are baking, make the glaze. In a bowl, mix powdered sugar, milk, and vanilla until blended. It should be pourable, but thick — if it is too thick, add more milk.
- Remove the pies from the oven, let them cool, and pour the glaze over them, which will create a beautiful “shell.”

Gemma’s Pro Chef Tips for Making Cherry Hand Pies
- Don’t fret if your pie crust cracks when you are trying to fold it into a half-moon shape. Instead, try cutting the circles in half, spooning the filling on the bottom, and then sealing the top all around.
- Let your filling cool completely before trying to assemble the pies; otherwise, the crust may become too soft to handle.
- Allow your pies to cool before pouring the glaze on so it sticks properly to the crust.
- Defrosted frozen cherries work just as well as fresh in this recipe, but be sure to drain the juice released after defrosting!
- Make my pie crust for these or use store-bought.
- Your pie filling can be kept in the fridge for up to 5 days. You can use it in these hand pies, a full cherry pie, or in a crumble!
How To Store Cherry Hand Pies
These cherry hand pies can be stored, loosely covered, at room temperature for up to 2 days. Help them taste fresh from the oven by popping them into a 300°F (150°C) oven for 10 minutes!

Make More Pie!
- The Only Blueberry Pie Recipe You Need
- Classic Cherry Pie
- How to Make Pie Crust
- Flakiest Gluten-Free Pie Crust
And don’t forget to buy my Bigger Bolder Baking Cookbook!
Full (and printable) recipe below!
Try These Recipes!


Cherry Hand Pies Recipe

Ingredients
- ½ cup (4oz/115g) sugar
- 2 tablespoons cornstarch
- 1 tablespoon lemon juice
- ½ cup (4floz/115ml) water
- 2 cups (10oz/284g) cherries, pitted and halved
- 2 x recipe pie crusts
- egg wash
- Vanilla Glaze
- 2 cups (8oz/230g) powdered sugar, sifted
- 2-4 tablespoons milk
- 1 teaspoon vanilla extract
Instructions
- Preheat the oven to 375°F (190°C) and line two baking sheets with parchment.
- Make the filling: in a saucepan over medium heat, combine sugar, cornstarch, lemon juice, and water and let simmer for 2-3 minutes, until thickened.
- Remove from the heat and stir in the cherries. Set aside to cool.
- While the filling is cooling, roll out the pie crusts and cut into 5-inch (12.5 cm) circles.
- Spoon a small amount of cherry filling into the center of the cut pie crust, moisten the edge with some egg wash and fold over into a half-moon shape. Press down with your fingers or a fork to seal.
- Place assembled pies on the baking sheets and refrigerate for 30 minutes.
- When ready to bake, cut a few slits in the top crust of the pies and brush with the egg wash.
- Bake for about 20-25 minutes, or until the crust is golden brown.
- While the pies are in the oven make the glaze: in a bowl, mix powdered sugar, 2 tablespoons milk and the vanilla until blended. Add more milk, if necessary, to create a nice pourable but thick consistency.
- Once the pies are out of the oven and still hot, generously drizzle the glaze over them and allow to set before storing. If you do this while they are still hot the glaze sets on the pastry and creates a nice 'shell'.
- Store pies, loosely covered, at room temperature for up to 2 days. Refresh in a 300°F (150°C) oven for 10 minutes.


Whenever I need a break and to escape the news, I just come here and check out your recipes. I read the comments and I love how you always jump in with help if someone asks. You are such an amazing Chef and beautiful person inside and out! ????????????????????????
Any change if I use canned pie filling for saving time? Will it set?
Thank you for the recipe Gemma, here cherries are not in season, I used rhubarb, with blackberries instead, I love the dough, I want to make them with crushed walnuts/ almonds and cardamom with the next lot that I bake.
Pretty good, but the filling tastes too much like cornstarch, and I put in the said amount.
How do you make the egg wash?
Can these be frozen? I want to make extra for my granddaughters lunch but she can’t eat 12 @ a time ????????.
Oops, nm. I just saw @ the bottom you answered for another poster. Thank you ahead of time. ????????
These look yummy! Is there a calorie count for the filling and for the crust?
Hi Gemma, in your tips for this recipe you say to cool before putting on laze but in the recipe you say to glaze while still hot ?
Hi Gemma
Would it be ok to make apple hand pies using fresh cooking apples and a bit of sugar, thanks
Can I use fresh blueberries in this recipe?
Best,
Diana