Cakes

Cake Pops in Ice Cream Cones

4.25 from 28 votes
Indulge in the fun homemade Cake Pops in Ice Cream cones! An elevated bite-sized treat perfect for parties and any occasion.

This post may contain affiliate links. Please see my full disclosure for details.

Hi Bold Bakers!

WHY YOU’LL LOVE THIS RECIPE: Have a blast with our Cake Pops in Ice Cream Cones recipe! Loved for its portable charm, irresistible flavors, and ability to add an instant spark to any gathering, this customizable recipe allows you to tailor each cone to your preference, making it perfect for birthday parties, picnics, baby shower, or simply as a delightful project perfect for kids to enjoy anytime.

  • Textures and flavors: Whimsical fusion of cake pops and crispy cones, creating a delightful mix of textures and flavors.
  • Decadent richness: Luxurious chocolate ganache coating provides a decadently rich sensation with every bite.
  • Fun, festive touch: Brightly colored sprinkles bring extra joy and excitement to every bite, making these treats a playful project that kids adore.

IMPORTANT NOTE: This recipe was updated on 6/5/2024, to include explanations of key ingredient, answers to the most frequently asked questions, and Pro Chef Tips.

Table of Contents

What are Cake Pops in Ice Cream Cones?

Cake pops are small balls of cake, often mixed with frosting, which are molded onto lollipop sticks and coated with chocolate or candy melts.

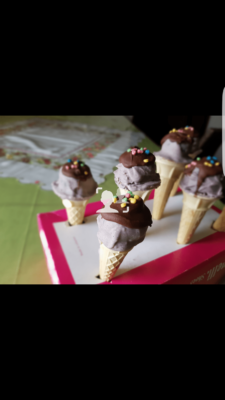
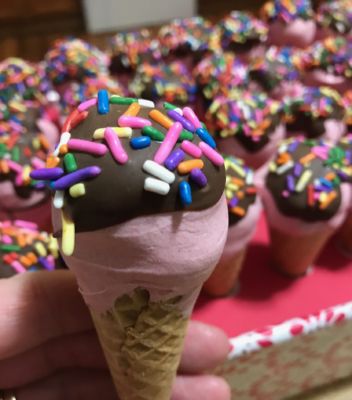
I’ll show you how to make them BIG & BOLD into sweet little Ice Cream Cones.

Tools You Need

Key Ingredients

For the chocolate cake pops

  • Bittersweet Chocolate 
    • This is used to make the ganache, providing a rich and deep chocolate flavor. It also helps to bind the cake crumbs together.
  • Heavy Whipping Cream
    • Mixed with the bittersweet chocolate, the heavy whipping cream creates a smooth and creamy ganache that serves as a binder and adds moisture to the cake crumbs.
  • Unfrosted Chocolate Cake, Crumbled
    • The crumbled chocolate cake forms the base of the homemade cake pops, providing the main flavor and texture. It absorbs the ganache to create a moist and cohesive mixture.

For the topping

  • White chocolate, finely chopped 
    • This is melted and used as a coating for these bite-sized desserts, providing a sweet and creamy contrast to the rich bittersweet chocolate cake.
  • Food coloring
    • It creates a vibrant and festive color for decorating the cake pops.
  • Milk chocolate
    • Used for drizzling or dipping the cake pops, the milk chocolate adds another layer of flavor and richness.
    • It also helps to adhere the sprinkles to the cake pops.
    • Alternatively, you can use chocolate melts which are designed to melt quickly and evenly when heated.
  • Sprinkles
    • These colorful decorations add visual appeal and texture to the cake pops, enhancing their appearance and providing a fun touch.

How to Make Cake Pops in Ice Cream Cones

  • Make the ganache:

    1. Place the bittersweet chocolate in a medium, heatproof bowl. Set aside.
    2. Heat the cream in a heavy-bottomed saucepan until simmering. Immediately pour it over the chopped chocolate and let it sit there for 5 minutes without stirring at all.
    3. Using a whisk and starting in the center, begin to stir the chocolate and cream together with a small, circular motion, gradually widening the circle as the ganache comes together. Stop as soon as it is emulsified.
  • Make the cake balls:

    1. Crumble the cake and mix ½ cup (4 oz/115 g) of the ganache with the cake crumbs until it is evenly mixed and holds together.
    2. Divide the cake mixture into 13 equal portions and roll each into a compact ball. A cookie scoop can help with a perfect round shape.  Refrigerate on a cookie sheet to firm up while you get the cones ready.
  • Prepare the cones:

    1. Cardboard box method:

      • First, poke 13 evenly spaced holes (about ½-inch/12 mm wide) in the lid if a small cardboard box. Set aside.
      • Measure 3 inches (7 ½ cm) from the bottom tip of each cone and, using a serrated knife, very carefully trim anything remaining off the top.
      • Place the trimmed cones in the holes of the box lid, then fill each one to the top with the chocolate frosting.
    2. Alternatively, you can fill a 9×5-inch (23 x 12 ½ cm) loaf pan ¾ of the way full with dry rice or lentils, then nestle the cones upright in this.

  • Assemble the cake pops:

    1. Dip the bottom of each chilled cake ball in a little bit of remaining ganache and place it securely on top of the cone. Return to the refrigerator for 1 hour, or until completely set and hard.
  • Decorate the cake pops:

    1. Melt the white chocolate in a double boiler over simmering water and stir in 1 drop of red food coloring. If you want a darker pink shade, add a second drop. Transfer to a small bowl.
    2. Working quickly so that the dark chocolate ganache doesn’t melt, dip in your cake pops into the warm white chocolate and return them to your cardboard stand. Refrigerate for about 30 minutes or until the coating is set.
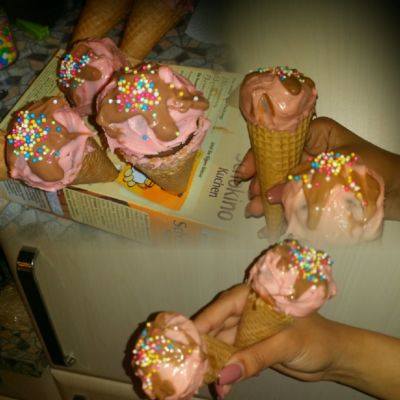
    3. Melt the milk chocolate in a small bowl in the microwave or in a double boiler over simmering water, then drizzle over each cake pop. Top with some sprinkles and let set.
    4. Allow the cake pops to sit at room temperature for at least 2 hours (and up to 2 days) before eating to allow the ganache to soften.

Gemma’s Pro Chef Tips

  • We like the taste and texture of sugar cones but you can also use cake cones for this. These cones are larger, even when trimmed, so you may need to double the ganache recipe to be able to fill the bases. Also, you may need to make fewer and larger cake balls to cover the wider top.
  • The assembled cake pops need to be cold and completely hard before you attempt to dip them into the white chocolate coating. So they don’t fall apart and there won’t be excess chocolate dripping onto the sticks.
  • Go all out and make easy Homemade Ice Cream Cones from scratch. Use just under a tablespoon of batter for each cone then you won’t need to trim them later!
  • Instead of box cake mixes, we recommend trying this easy recipe with our Best Ever Chocolate CakeChocolate Bundt CakeRed Velvet Cake, or Sticky Gingerbread!
  • You can use a different flavor of cake for the cake balls but we don’t recommend using anything other than ganache to mix with the cake and fill the cones as this recipe was developed specically to have success with ganache and we can’t guarantee good results with buttercream.

Make Ahead & Storage Instructions

Store in a covered container at room temperature for up to 2 days or refrigerate for up to 2 weeks. (Bring back up to room temperature before eating if refrigerated.)

Can You Freeze Cake Pops?

  1. Cooling: Let your cake pops cool completely.
  2. Prepare for Freezing: Lay them on a parchment-lined baking sheet, not touching.
  3. Freezing: Freeze them on the baking sheet until firm, usually 1-2 hours.
  4. Storage: Transfer the frozen cake pops to an airtight container or freezer bag, separating layers with parchment paper.
  5. Label and Seal: Label the container with the date and contents, then seal it tightly.
  6. Storage Duration: Cake pops can be stored for 2-3 months in the freezer.
  7. Thawing: Thaw them in the fridge overnight when ready to eat.
  8. Decorating: Once thawed, decorate as desired.

FAQs

What are the tricks to stop cake pops from falling off the sticks?

Dip the sticks in melted chocolate before inserting them into the cake balls.

How do I decorate cake pops?

Instead of sprinkles, you can also use freeze-dried fruit, toasted nuts, crumbled cookies, or shredded coconut. 

How to make vanilla cake pops?

You can adapt this recipe by using 1 part of heavy cream and 3 parts of white chocolate (by weight) to make white chocolate ganache.

Then continue with our Vanilla Birthday Cake for vanilla cake pops.

More Kid Friendly Recipes

IMPORTANT NOTE: This recipe was updated on 6/5/2024, to include explanations of key ingredient, answers to the most frequently asked questions, and Pro Chef Tips.

Watch The Recipe Video!

Cake Pops in Ice Cream Cones

4.25 from 28 votes
Indulge in the fun homemade Cake Pops in Ice Cream cones! An elevated bite-sized treat perfect for parties and any occasion.
Author: Gemma Stafford
Servings: 13 Cake Pops
Prep Time 30 minutes
Assembly and Chill Time 2 hours 15 minutes
Total Time 2 hours 45 minutes
Indulge in the fun homemade Cake Pops in Ice Cream cones! An elevated bite-sized treat perfect for parties and any occasion.
Author: Gemma Stafford
Servings: 13 Cake Pops

Ingredients

For the cake pops

  • 1 ⅓ cups (8 oz/225 g) bittersweet chocolate, very finely chopped
  • 1 cup (8 fl oz/240ml) heavy whipping cream
  • 3 cups (8 oz/225 g) unfrosted chocolate cake, crumbled
  • 13 ice cream sugar cones

For the topping

  • 1 cup (6 oz/170 g) white chocolate, finely chopped
  • 1-2 drops red food coloring
  • ½ cup (3 oz/85 g) milk chocolate, finely chopped
  • Sprinkles

Instructions

  • Make the ganache: Place the bittersweet chocolate in a medium, heatproof bowl. Set aside.
  • Heat the cream in a heavy bottomed saucepan until simmering. Immediately pour it over the chopped chocolate and let it sit there for 5 minutes without stirrring at all.
  • Using a whisk and starting in the center, begin to stir the chocolate and cream together with a small, circular motion, and gradually widening the circle as the ganache comes together. Stop as soon as it is emulsified.
  • Make the cake balls: Mix ½ cup (4 oz/115 g) of the ganache with the cake crumbs until it is evenly mixed and holds together.
  • Divide the cake mixture into 13 equal portions and roll each into a compact ball. Refrigerate to firm up while you get the cones ready.
  • Prepare the cones: First poke 13 evenly spaced holes (about ½-inch/12 mm wide) in the lid if a small cardboard box. Set aside.
  • Measure 3-inches (7 ½ cm) from the bottom tip of each cone and, using a serrated knife, very carefully trim anything remaining off the top.
  • Place the trimmed cones in the holes of the box lid, then fill each one to the top with ganache.
  • Assemble the cake pops: Dip the bottom of each chilled cake ball in a little bit of remaining ganache and place it securely on top of the cone. Return to the refrigerator for 1 hour, or until completely set and hard.
  • Decorate the cake pops: Melt the white chocolate in a double boiler over simmering water and stir in 1 drop of red food coloring. If you want a darker pink shade, add a second drop. Transfer to a small bowl.
  • Working quickly so that the dark chocolate ganache doesn't melt, dip in your cake pops into the warm white chocolate and return them to your cardboard stand. Refrigerate for about 30 minutes or until the coating is set.
  • Melt the milk chocolate in a small bowl in the microwave or in a double boiler over simmering water, then drizzle over each cake pop. Top with some sprinkles and let set.
  • Allow the cake pops to sit at room temperature for at least 2 hours (and up to 2 days) before eating to allow the ganache to soften.
  • Store in a covered container at room temperature for up to 2 days or refrigerate for up to 2 weeks. (Bring back up to room temperature before eating if refrigerated.)

Recipe Notes

  • We like the taste and texture of sugar cones but you can also use cake cones for this. These cones are larger, even when trimmed, so you may need to double the ganache recipe to be able to fill the bases. Also, you may need to make fewer and larger cake balls to cover the wider top.
  • The assembled cake pops need to be cold and completely hard before you attempt to dip them into the white chocolate coating. So they don't fall apart and there won't be excess chocolate dripping onto the sticks. 
  • Go all out and make easy Homemade Ice Cream Cones from scratch. Use just under a tablespoon of batter for each cone then you won’t need to trim them later!
  • Instead of box cake mixes, we recommend trying this easy recipe with our Best Ever Chocolate CakeChocolate Bundt CakeRed Velvet Cake, or Sticky Gingerbread!
  • You can use a different flavor of cake for the cake balls but we don’t recommend using anything other than ganache to mix with the cake and fill the cones as this recipe was developed specically to have success with ganache and we can’t guarantee good results with buttercream.


4.25 from 28 votes (21 ratings without comment)
Subscribe
Notify of
guest

51 Comments
most useful
newest oldest
Inline Feedbacks
View all comments
Amy
Amy
2 months ago

Hi Gemma,

I need to make cake pops for a party, about 80 pops. How many days in advance can I make the cake? Also, once I make them, how do I store them if I make them a day in advance?

sio
sio
2 years ago

instead of using cream, may i use condensed milk??

Unkown
Unkown
3 years ago

I have a question is the “Cream” whip cream or something else?

LUCIAN
4 years ago

I LOVE CHOCOLATE CAKE

Lorna
Lorna
4 years ago

Thanks Gemma for sharing this recipe. I will definitely do this. Looks delicious????

Manleen
Manleen
4 years ago

Hi Gemma I made them but I found them a little too sweet
Pls tell me what can I do to reduce this

Sulfith Mubarak
Sulfith Mubarak
5 years ago

Hlo Gemma
I wanna to do vanilla cake pops.so wat frosting I HV to do to mix with cake crumbs?

Lavanya Venkateswaran
5 years ago

Hi Gemma! This recipe looks fabulous, and I want to make it for my son’s birthday party. Can I make them a day in advance? How should I store them?

Thank you!
Lavanya

Mariana
Mariana
6 years ago

I wnt to use these for my daughters b day candy table. . . .soooo they can’t sit out long you have to eat them quickly??

VASU
VASU
7 years ago

hi gemma
can we use brownies instead of using a cake ????

This Recipe Made By Bold Bakers

6 Images

Tibasheikh

Tibasheikh

pifen

pifen

Xanadu

Valerie123kids

About Us

Meet Gemma

About Us

Meet Gemma

Hi Bold Bakers! I’m Gemma Stafford, a professional chef originally from Ireland, a cookbook author, and the creator of Bigger Bolder Baking. I want to help you bake with confidence anytime, anywhere with my trusted and tested recipes and baking tips. You may have seen one of my 500+ videos on YouTube & TikTok or as a guest judge on Nailed It! on Netflix or the Best Baker in America on Food Network. No matter your skills, my Bold Baking Team & I want to be your #1 go-to baking authority.


Weeknight Family Favorites Chapter from the Bigger Bolder Baking Every Day Cookbook