This post may contain affiliate links. Please see my full disclosure for details.
Hi Bold Bakers!
WHY YOU’LL LOVE THIS RECIPE This Chocolate Mochi Ice Cream Recipe brings you the best of both worlds with a straightforward method. The soft and chewy texture of a traditional Japanese rice cake is the perfect complement to velvety, cold ice cream. Plus, the decadent cocoa flavor mingles with the subtle sweetness, elevating this frozen treat to your new craveable favorite!
Besides having an unforgettable texture contrast and amazing flavor fusion, this frozen dessert is a fun and convenient bite-size treat. You can not only share it at parties, gathering, or on any special occasions, but also enjoy it as a mess-free snack on the go without utensils!
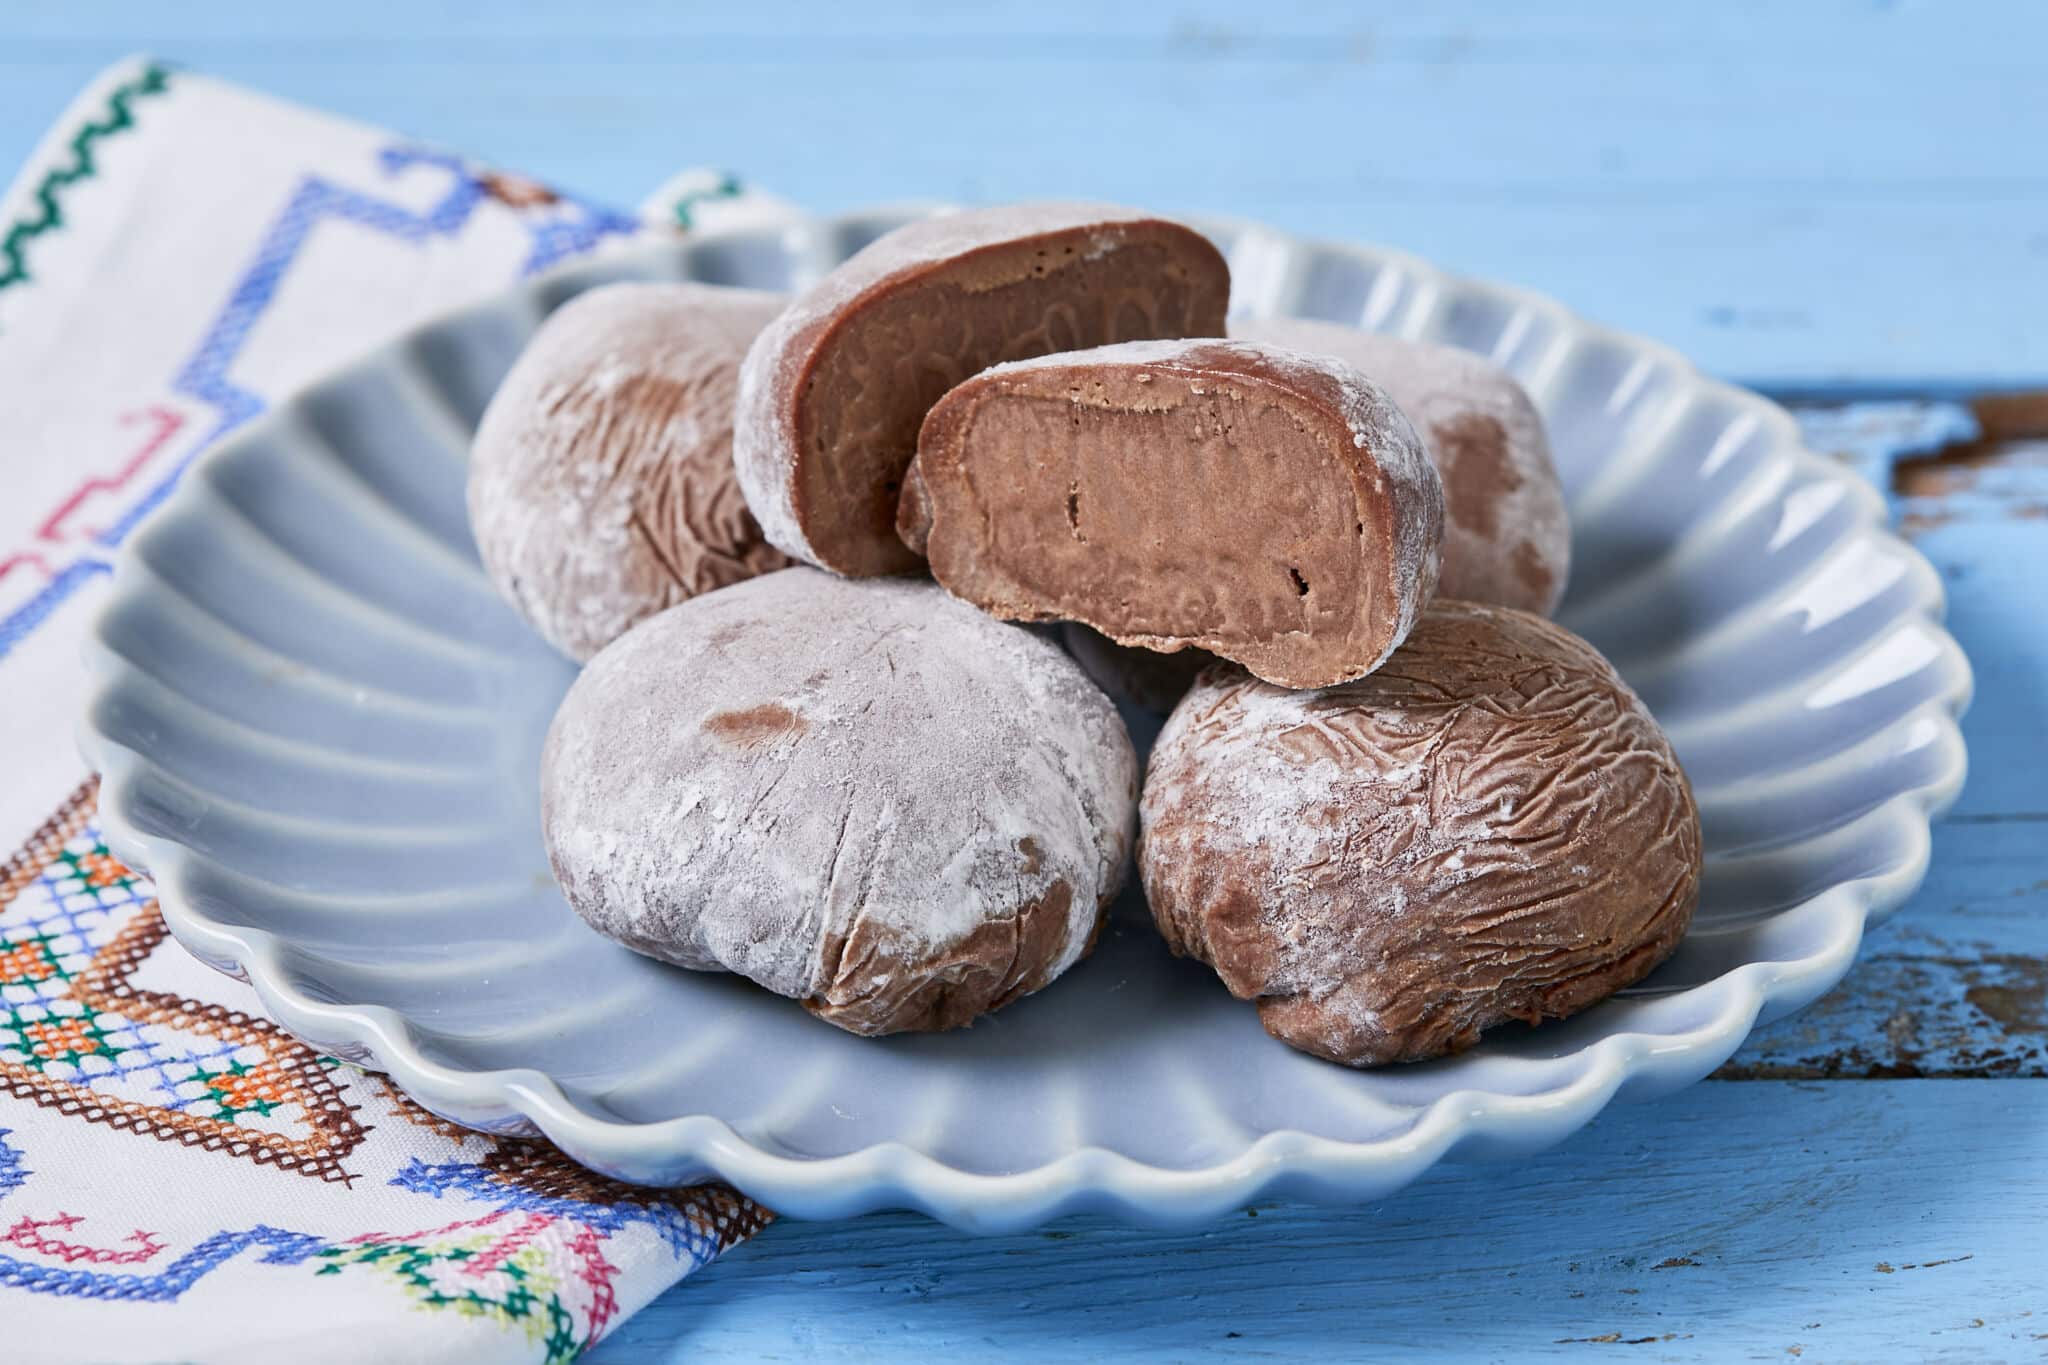
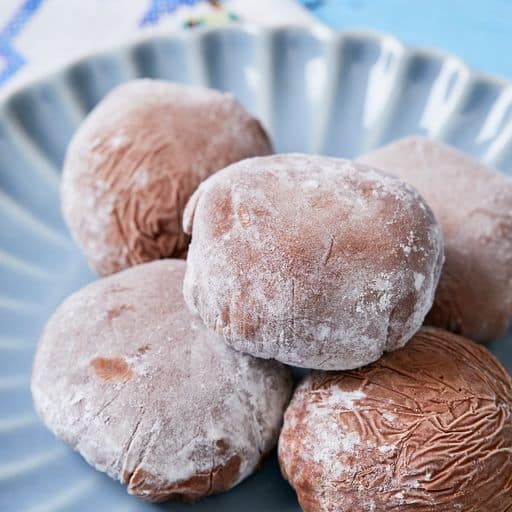
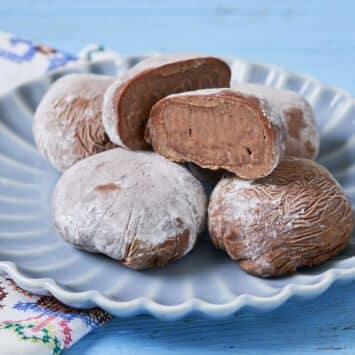
Additionally, this dessert is absolutely gorgeous. The striking appearance of the dark brown exterior and glossy ice cream interior makes Chocolate Mochi Ice Cream a dessert with a real wow factor that’s fun to enjoy and share!
Table of Contents
- What is Chocolate Mochi Ice Cream?
- Tools You Need
- Key Ingredients and Why
- How to Make Chocolate Mochi Ice Cream
- Can I Make Chocolate Mochi Ice Cream in Advance?
- How to Store Chocolate Mochi Ice Cream
- FAQs
- Gemma’s Pro Chef Tips
- Enjoy More Mochi and Ice Cream Recipes
What is Chocolate Mochi Ice Cream?

Chocolate Mochi Ice Cream is an exquisite frozen dessert with indulgent velvety chocolate ice cream wrapped in pillowy chocolate-flavored mochi dough.
- Chocolate ice cream provides a perfect balance of sweetness and bitterness. Make my Homemade Chocolate Ice Cream or use good quality store-bought ice cream.
- Chocolate mochi is made from sweet glutinous rice flour and merges a traditional Japanese Mochi Ice Cream Recipe with a luscious cocoa flavor.
Check out my Gorgeous Hawaiian Butter Mochi Recipe, Chewy Mochi Brownies, and Matcha Butter Mochi Recipe for different flavors and textures!
Tools You Need
- Measuring cups and measuring spoons
- 8×8-inch baking sheet
- Large microwave-safe bowl
- Hand whisk
- Cling wrap
- Silicone/rubber spatula
- Small freezer-safe baking pan
- Rolling pin
Key Ingredients for Chocolate Mochi Ice Cream and Why
-
Glutinous rice flour / Mochiko flour (aka “sweet rice flour”):
Mochiko flour is made from finely-milled glutinous rice or sweet rice which is a unique type of short-grain variety that’s different from other rice.
- It has little to no amylose but contains just amylopectin, contributing to the adhesive characteristic of glutinous rice.
- On the contrary, other kinds of normal rice contain both amylopectin and amylose, which gives them a less sticky texture.
-
Granulated sugar (aka white sugar):
- Granulated sugar adds sweetness to mochi, which is ideal for balancing the bitterness of cocoa powder.
- Sugar competes with starch for water, interfering with the formation of a firm gel structure. This helps ensure a soft chewy texture.
- Furthermore, sugar also delays the retrogradation of starch, maintaining a softer and chewier consistency for a longer period.
-
Cocoa powder:
Cocoa powder enhances the overall taste profile and also lends a deep brown color, giving this dessert visual appeal. Always buy ‘unsweetened’ cocoa powder for baking as it doesn’t not have added sugar.
-
Whole milk:
Compared to reduced-fat milk or non-fat milk:
-
- Whole milk has a sufficient amount of milk fat to enrich the flavor with a subtle creaminess.
- Meanwhile, whole milk also provides more casein to bind ingredients better for a cohesive texture.
-
Butter (softened):
- Butter adds a rich nutty flavor and aroma.
- The milk fat in butter improves the dough’s elasticity resulting in a smoother and more pliable consistency for a longer time.
-
Chocolate ice cream:
- Chocolate ice cream serves as the core of this dessert, providing rich and satisfying flavor and a cold refreshing sensation.
- The velvety interior complements the chewy chocolate exterior, creating a well-balanced dessert.
-
Cornstarch (for dusting):
- Cornstarch prevents stickiness and absorbs moisture to achieve the desired final product.
How to Make Chocolate Mochi Ice Cream
-
Making the Mochi

-
-
Line an 8×8-inch (20×20 cm) baking dish with parchment paper and set aside.
-
In a large microwave-safe bowl, combine the mochiko flour, sugar, and cocoa powder, and then whisk in the milk.
-
Cover the bowl with plastic wrap and microwave on HIGH for 2 minutes. Then add in the butter and whisk the batter, scraping the sides of the bowl until the butter melts and the batter comes together.
-
Microwave the mochi mixture again at 30-second intervals until it holds together in the center of the bowl but is still soft and spreadable.
-
Transfer the batter to the prepared tray, cover, and refrigerate until completely cold, about 2 hours.
-
Scoop sixteen 1½ tablespoon-sized balls of ice cream onto a small baking tray lined with parchment. Place in the freezer until ready to use.
-
-
Assembling the Chocolate Mochi Ice Cream

-
-
Cut the cold dough into 16 squares by cutting 4 x 4 lines.
-
Generously dust one ball with cornstarch and roll it between 2 pieces of plastic wrap into a roughly 3×3-inch (7½ x 7½cm) square. Remove the top piece of plastic wrap and set aside.
-
Working quickly, place a ball of ice cream in the center of the mochi square and use the bottom piece of plastic wrap to help you handle the mochi and wrap it around the ice cream (see step-by-step instructions in the video below).
-
Twist the plastic wrap around the assembled mochi ice cream ball to help it hold its shape, flatten it slightly into a dome shape, and keeping it wrapped in plastic, return it to the freezer. Repeat with the remaining mochi and ice cream balls. (You can reuse the top piece of plastic wrap for all of the mochi.)
-
Let the mochi freeze for at least two hours before eating.
-
Can I Make Chocolate Mochi Ice Cream in Advance?
Yes, you can make chocolate mochi ice cream ahead of time.
The assembled, plastic-wrapped mochi will keep well in the freezer for up to two months.
How to Store Chocolate Mochi Ice Cream
The best way to store mochi ice cream is to keep it tightly wrapped in plastic wrap in the freezer for up to 8 weeks.
FAQs
What can I use instead of sweet rice flour?
Glutinous/sweet rice flour is mochi’s signature ingredient, and there is NO substitute to achieve the same result.
- Sweet rice has no to little amylose but contains just amylopectin, contributing to the adhesive characteristic of glutinous rice.
- On the contrary, other kinds of normal rice contain both amylopectin and amylose and have a less sticky texture.
Can I use a different method to cook the mochi dough?
Yes, you can cook mochi on the stovetop.
- Bring the steamer/ pot of water to a boil then keep the heat at medium-high. Place the bowl (covering it with a tea towel or paper towel to absorb dripping steaming water from the lid), in a steamer on the stovetop. Steam for roughly 20 minutes.
- Use a wet spatula to stir it halfway through. Cook until it turns from white to shiny translucent color. Then continue per my recipe.
How do I prevent the mochi from sticking to my hands when shaping it?
- Generously dust each mochi dough ball with cornstarch and roll between 2 pieces of plastic wrap into a desired shape.
- Remove the top piece of plastic wrap and set aside. Keep the bottom piece of plastic for wrapping and storing mochi ice cream.
What’s the substitute for cornstarch?
In order to prevent mochi from sticking, you can also use potato starch, tapioca starch, arrowroot starch, or rice flour.
Gemma’s Pro Chef Tips
- Every microwave is different – your mochi may take more or less time to cook than mine did. Go slowly and keep checking and stirring until it’s done.
- There is a lot of plastic wrap used in making this mochi – it is very soft and almost impossible to roll and assemble without it, but if we find another method we will be sure to let you know!
- When assembling the mochi ice cream, you must work quickly and keep everything as cold as possible. The ice cream will begin to melt almost immediately.
- You can try making this with any flavor of my no-churn ice cream or gelato!
- This mochi can also be cut into small cubes, dusted very lightly with cornstarch to prevent sticking, and served as an ice cream topping.
- You can easily buy mochiko flour here on Amazon.

More Mochi, Ice Cream, and Gelato Recipes
Try These Recipes!


Watch The Recipe Video!
Chocolate Mochi Ice Cream Recipe
Ingredients
- ¾ cup (3 ¾ oz/105 g) mochiko flour
- 7 tablespoons (3 ¼ oz/90 g) granulated sugar
- 3 tablespoons (¾ oz/21 g) cocoa powder
- 1 cup (8 fl oz/240 ml) whole milk
- 3 tablespoons (1½ oz/42 g) butter, softened
- 3 cups (1 tub) chocolate ice cream
Instructions
- Line an 8x8-inch (20x20 cm) baking dish with parchment paper and set aside.
- In a large microwave-safe bowl, combine the mochiko flour, sugar, and cocoa powder then whisk in the milk.
- Cover the bowl with plastic wrap and microwave on HIGH for 2 minutes.
- Carefully remove the plastic wrap, add in the butter, and whisk the batter, scraping the sides of the bowl until the butter melts and the batter comes together. Depending on your microwave, you may need to repeat this process for another 30 seconds or a minute. The mochi is done when it holds together in the center of the bowl (it will still be soft and spreadable, but also hold its shape)
- Spread this batter into your prepared pan all the way to the edges, cover and refrigerate until completely cold, about 2 hours.
- While the mochi is chilling, scoop sixteen 1½ tablespoon sized balls of ice cream onto a small baking tray lined with parchment. Place in the freezer until ready to use.
Assembling the Mochi Ice Cream
- Cut the cold dough into 16 squares by cutting 4 x 4 lines.
- Working with one square of mochi dough at a time (keep the rest in the refrigerator to keep cold), generously dust with cornstarch and roll between 2 pieces of plastic wrap into a roughly 3x3-inch (7½ x 7½cm) square. Remove the top piece of plastic wrap and set aside.
- Working quickly, place a ball of ice cream in the center of the mochi square and use the bottom piece of plastic wrap to help you handle the mochi and wrap it around the ice cream (see step by step video above).
- Twist the plastic wrap around the assembled mochi ice cream ball to help it hold its shape, flatten slightly into a dome shape and, keeping it wrapped in plastic, return it to the freezer. Repeat with the remaining mochi and ice cream balls. (You can reuse the top piece of plastic wrap for all of the mochi.)
- Let the mochi freeze for at least 2 hours before eating. When ready to enjoy, allow the mochi to sit at room temperature for 5 minutes before eating. The assembled, plastic wrapped mochi will keep well in the freezer for up to 2 months.


Does it need to be Mochiko flour? Can it be any other brand?
Hi Gemma,
I tried this recipe but the mochi dough came out very runny so I couldn’t handle it in my hands, I used a lot of cornstarch and somehow wrapped it.
I need to know for the next time what wrong I did with the dough? I measured all the ingredients and left it overnight in the fridge and the dough looked fantastic until I started to cut and wrap it.
Thanks in advance