This post may contain affiliate links. Please see my full disclosure for details.
Hi Bold Bakers!
Looking for Pastry Perfection? Look no further than my 12 Easy Steps To Pastry Perfection! Learn everything you need to know about making the perfect pastry, from the best ingredients to my favorite pro chef techniques.
It’s pie-making season again! Wait… does pie ever go out of season? Well, whether you’re strictly a holiday pie maker, or a year-round, pie-any-day, any-sort-of-way type, read on for my all-inclusive guide for perfecting your pie crust! (And, when you’re done learning my tips and tricks, be sure to check out my recipe for the Flakiest Buttery Pie Crust or my recipe for the Flakiest Gluten-Free Pie Crust if needed!

Choosing The Best Ingredients For Pie Crust
Flour
Pie crust is made with flour, fat, salt, and liquid. So let’s start first with the flour. Generally, for pie crusts, we use either all-purpose flour (GF all-purpose flour if needed) or white pastry flour.
When buying all-purpose flour (AP flour), you’ll notice there are two types, but you may not know the difference between bleached and unbleached flour. Flour is bleached to speed up the aging process, which results in some textural differences compared to unbleached flour. Bleached flour has a finer grain that more readily absorbs liquids than unbleached, and the protein content is slightly lower than unbleached. The end result is a flour that is lighter and more delicate.
White pastry flour has an even lower protein content than bleached all-purpose flour. The lower the protein, the flakier and more delicate the pie crust — but lower protein also means a weaker structure, which makes the pastry more difficult to work with and more prone to cracks when baking. Even if you’re not worried about your pie being beautiful, cracks can cause the filling to seep out of the bottom of the crust, leaving you with a dreaded soggy bottom.
So which flour is best for pie crust? In the pursuit of pastry perfection, I recommend good quality, bleached all-purpose flour.
Butter
You need fat to make pie crust, and there’s no better-tasting fat than good butter! But there are a lot of options staring you in the face in the dairy section of your local grocery store. How do you possibly choose between salted or unsalted butter? Should you use cultured butter? Is American or European butter better?
First, let’s address the great debate between salted and unsalted butter for baking. You’ll get a great pie crust with either one, but if you are a baker who likes to be precise, go with unsalted butter.
Salted butter varies in salt content, which means you’re more likely to get inconsistent results unless you always stick with the exact same brand. When you use unsalted butter, you start at the same neutral place, which makes it easier for you to adjust the salt to your taste.
Next, is it better to use cultured butter? There are two key factors when it comes to choosing between using cultured or uncultured butter. To make cultured butter, the cream is slightly fermented before churning, which results in a subtly sour and more “buttery” flavor that is perfect for pie crust. The downside is that cultured butter tends to be a bit pricier.
Don’t get too caught up in this aspect, however. If cost is a factor, or you are baking on a budget, uncultured butter will give you an excellent result as well!
Finally, there is the choice between American and European butter.
The main difference between American and European butter is the fat content. American butter has about 80% fat, whereas European butter is churned longer and has about 82% fat. The higher fat content creates a flakier and more tender pastry and imparts a more golden color to the dough. Most European butter tends to be cultured as well, so they are more flavorful. Again, the only downside is cost, and because butter is the main ingredient in pie crusts, you need a lot of it.
(A small sidenote: if you want to use cultured or imported butter, look out for sales. This tends to happen more frequently around the holidays; if you have freezer space, buy extra. Butter will keep in the freezer for up to six months.)
So, when it comes to butter, you can go with American, European, or cultured butter, but always choose a good quality, unsalted butter for the most consistent results.
Some of you may be wondering if you can use shortening for pie crust. My advice? Use butter.

Salt
Now for my favorite party: salt! Yes, salt gets its very own section in this guide because it is that important in a great pie crust!
Why should you add salt to pie crust? I’m so glad you asked: flavor! You need salt in your pie crust; otherwise, it will taste flat, flavorless, and unbalanced with the sweet pie filling. A good, buttery, perfectly salted crust is everything when it comes to pastry perfection.
That said, let’s address some concerns when it comes to adding salt to baked goods. There are countless types of salt in your grocery store and probably in your kitchen, including kosher salt, sea salt, and maybe even iodized table salt.
Most recipes will ask for kosher salt, which has a larger, almost fluffier grain than table salt. To make things even more confusing, every brand of kosher salt has a different texture, which results in how salty it tastes.
Sea salt can be found in coarse, fine, or flakey grains. Coarse and flakey grain salts will not dissolve when baked and are best used as a finish for a punch of salty flavor and crunch.
Commonly available table salt is always fine-grained, but it is often iodized, which can result in an acrid, off-putting taste.
For the best pie crust, opt for a salt that dissolves well, is evenly distributed throughout the dough, and imparts a pure salty flavor without any additives.
My choice of salt for pie crust is Diamond Crystal brand kosher salt. If I’m out, I’ll switch to fine-grained sea salt instead.
Liquid
Finally, a pie crust will need some liquid to hold it all together. There are excellent crusts that can be made with sour cream, yogurt, or buttermilk, but simple ice water works perfectly and is always available.
A secret tip I’ll share with you: I like to add a touch of vinegar to the water when making pastry perfection. The vinegar helps minimize gluten formation and keeps the crust tender.
Most pie crust recipes will give you a range of how much liquid to add to your dough. Always start with the smallest amount and add more if absolutely necessary to keep the dough together. If your pie crust has too much water, the dough will shrink while baking as the liquid evaporates. Beyond shrinkage, it makes your dough very tough.
When it comes to pie crust, the less liquid, the better.
Playing With Pie Crust Recipes To Achieve Pastry Perfection
It’s no secret that the internet is chock full of different pie crust recipes — you could spend hours, days, looking at recipes with every variation in the book. And you know what? I encourage you to play around and build your own recipe — the recipe that will have friends begging for your secret, the one your kids will compare every pie to, and the one that’s perfect for you!
- You can add a touch of sugar to your crust, which not only gives it a little sweetness but helps tenderize and brown the crust.
- An egg yolk will add additional fat, color, and richness.
- A pinch of baking powder will add a subtle lift.
- Milk powder can also tenderize the crust and promote a nice browning.
- Cream cheese, sour cream, yogurt, or buttermilk can replace all or some of the water and add depth of flavor. Also, the acid in these ingredients helps create a lovely, flakey texture.
- Replacing some water with vodka will create a dough that is easier to work with and bakes up extra flakey and tender.
Remember, a perfect pie crust can be made with simply flour, salt, butter, and water. But it’s your pie, and you should have it just the way you like. If you’re planning on using one of the above variations, I do recommend you find and test a recipe from a trusted source that includes these ingredients. Baking is about balance, and just replacing one thing for another can give you surprising results — and not always in a good way!
Preparing The Dough
Two-Part Butter Prep
The first thing I do when making pie dough worthy of the title “pastry perfection” is prepare the butter.
Before you pull out any other ingredients or equipment, measure out the cold butter and dice it. Put about 1/3 of the butter in the freezer, and put the remaining butter in the refrigerator to stay cold.
First, the refrigerated butter gets mixed until it is fine and crumbly, then the colder butter gets cut in until it is small but chunkier. Separating the butter this way will allow you to better incorporate the butter into the flour for both maximum tenderness (from the smaller bits) and flakiness (from the larger chunks.)

How To Mix Pie Dough
Before you start, let’s make sure that all of the ingredients are cold; you don’t want your butter to melt while you’re mixing the dough. When the butter stays cold, it never fully mixes into the flour, which is exactly what you want. While the pie dough is baking, the fat from the bits of butter melts into the flour and creates the structure, the liquid creates steam as it evaporates, and both of these actions make tiny air pockets all over. Those air pockets are exactly what makes a pie crust flakey.
(For comparison’s sake, when making a shortcrust pastry for a tart, you cream room-temperature butter, sugar, and flour together. The result is a dense, tender, cookie-like pastry that isn’t flakey.)
If you have a food processor, I recommend using it over mixing by hand. It is quicker, which means your butter has less time to melt. To use a food processor to make pie dough, add your dry ingredients to the food processor (flour, salt, sugar, and any other additions) and process for 10 seconds to combine. Add in the refrigerated butter and pulse just 5-10 times until the mixture looks like small crumbs. Next, add in the butter from the freezer and pulse just until this butter is the size of peas. Finally, add in the minimum amount of liquid and pulse 3-4 times, just until the mixture looks like damp crumbs.
If you are mixing the dough by hand, use a whisk to combine the dry ingredients in a large mixing bowl. With a pastry blender, cut in the refrigerated butter until it looks like small crumbs. Add in the butter from the freezer and cut in until the butter looks like small peas. Finally, stir in the minimum amount of liquid with a spatula until it resembles damp crumbs.
To bring the dough together, whether you have used a food processor or mixed it by hand, you have two options.
One option is to turn the dough onto a work surface (or use a bench scraper) to continue to fold the dough from the edges into the center until a dough is formed. This method will produce the flakiest layers.
Or, for a simpler method, you can turn the dough onto a clean tea towel and use the towel to help press the dough into a ball. This will result in a crust that is almost as flakey as the first option, and you have less risk of overworking the dough.
Either way, you must work quickly to ensure that the butter stays cold.
A note on the amount of liquid in your dough: this is the point in the mixing process that you may need to sprinkle in a touch more liquid, one teaspoon at a time, but only if the dough is very dry and crumbly. With liquid in pie crust, less is always more: as long as it holds together, err on the drier side. The pie dough will continue to moisten and come together as it rests.

Resting the Dough
Once the dough has come together, it is time to allow it to rest. Resting the dough is important when it comes to pastry perfection for a few reasons: the flour has a chance to fully and evenly hydrate, any gluten that has formed during the mixing process will have a chance to relax, and if any butter was in danger of melting, it will have a chance to firm up before the dough is rolled.
Rested, chilled pastry is also less sticky, which makes it easier to handle and helps it hold its shape better when baked.
To rest the dough, shape it into a flattened disc and place it in either an airtight container or wrap it well with plastic wrap. Pie dough should ideally rest for 2 hours, but if you are pressed for time, at least 30 minutes will be better than nothing. For longer storage, it can be held in the refrigerator for up to 24 hours and up to 3 months in the freezer. The best way to defrost pie dough is to place it, still wrapped, in the refrigerator overnight.
Rolling Out the Dough
When rolling out dough, much like when you were mixing the dough, it is important to work quickly to keep the dough cold and prevent the butter from melting. The dough should be rolled on a cold, lightly floured surface. If you have a marble slab for rolling out pastry, use it to help keep the dough cool. If not, a clean, nonporous, untextured countertop, or even a sturdy wooden cutting board, will work. You can also roll out your dough on a pastry cloth, silicone mat, or even a piece of parchment paper.
Although the dough should be chilled, it may crack when you are rolling it out if it’s too cold. Let the dough rest at room temperature for a minimum of 10 minutes, and then try again.
As you roll out the dough, don’t forget to check to make sure the dough isn’t sticking to your surface. If it is, add more flour. There’s nothing sadder than a beautifully rolled-out crust that is too stuck to your work surface to use.
If there is any point that the butter bits seem to be getting sticky and melting, return the dough to the refrigerator for about 5 minutes to let it cool down before you continue.
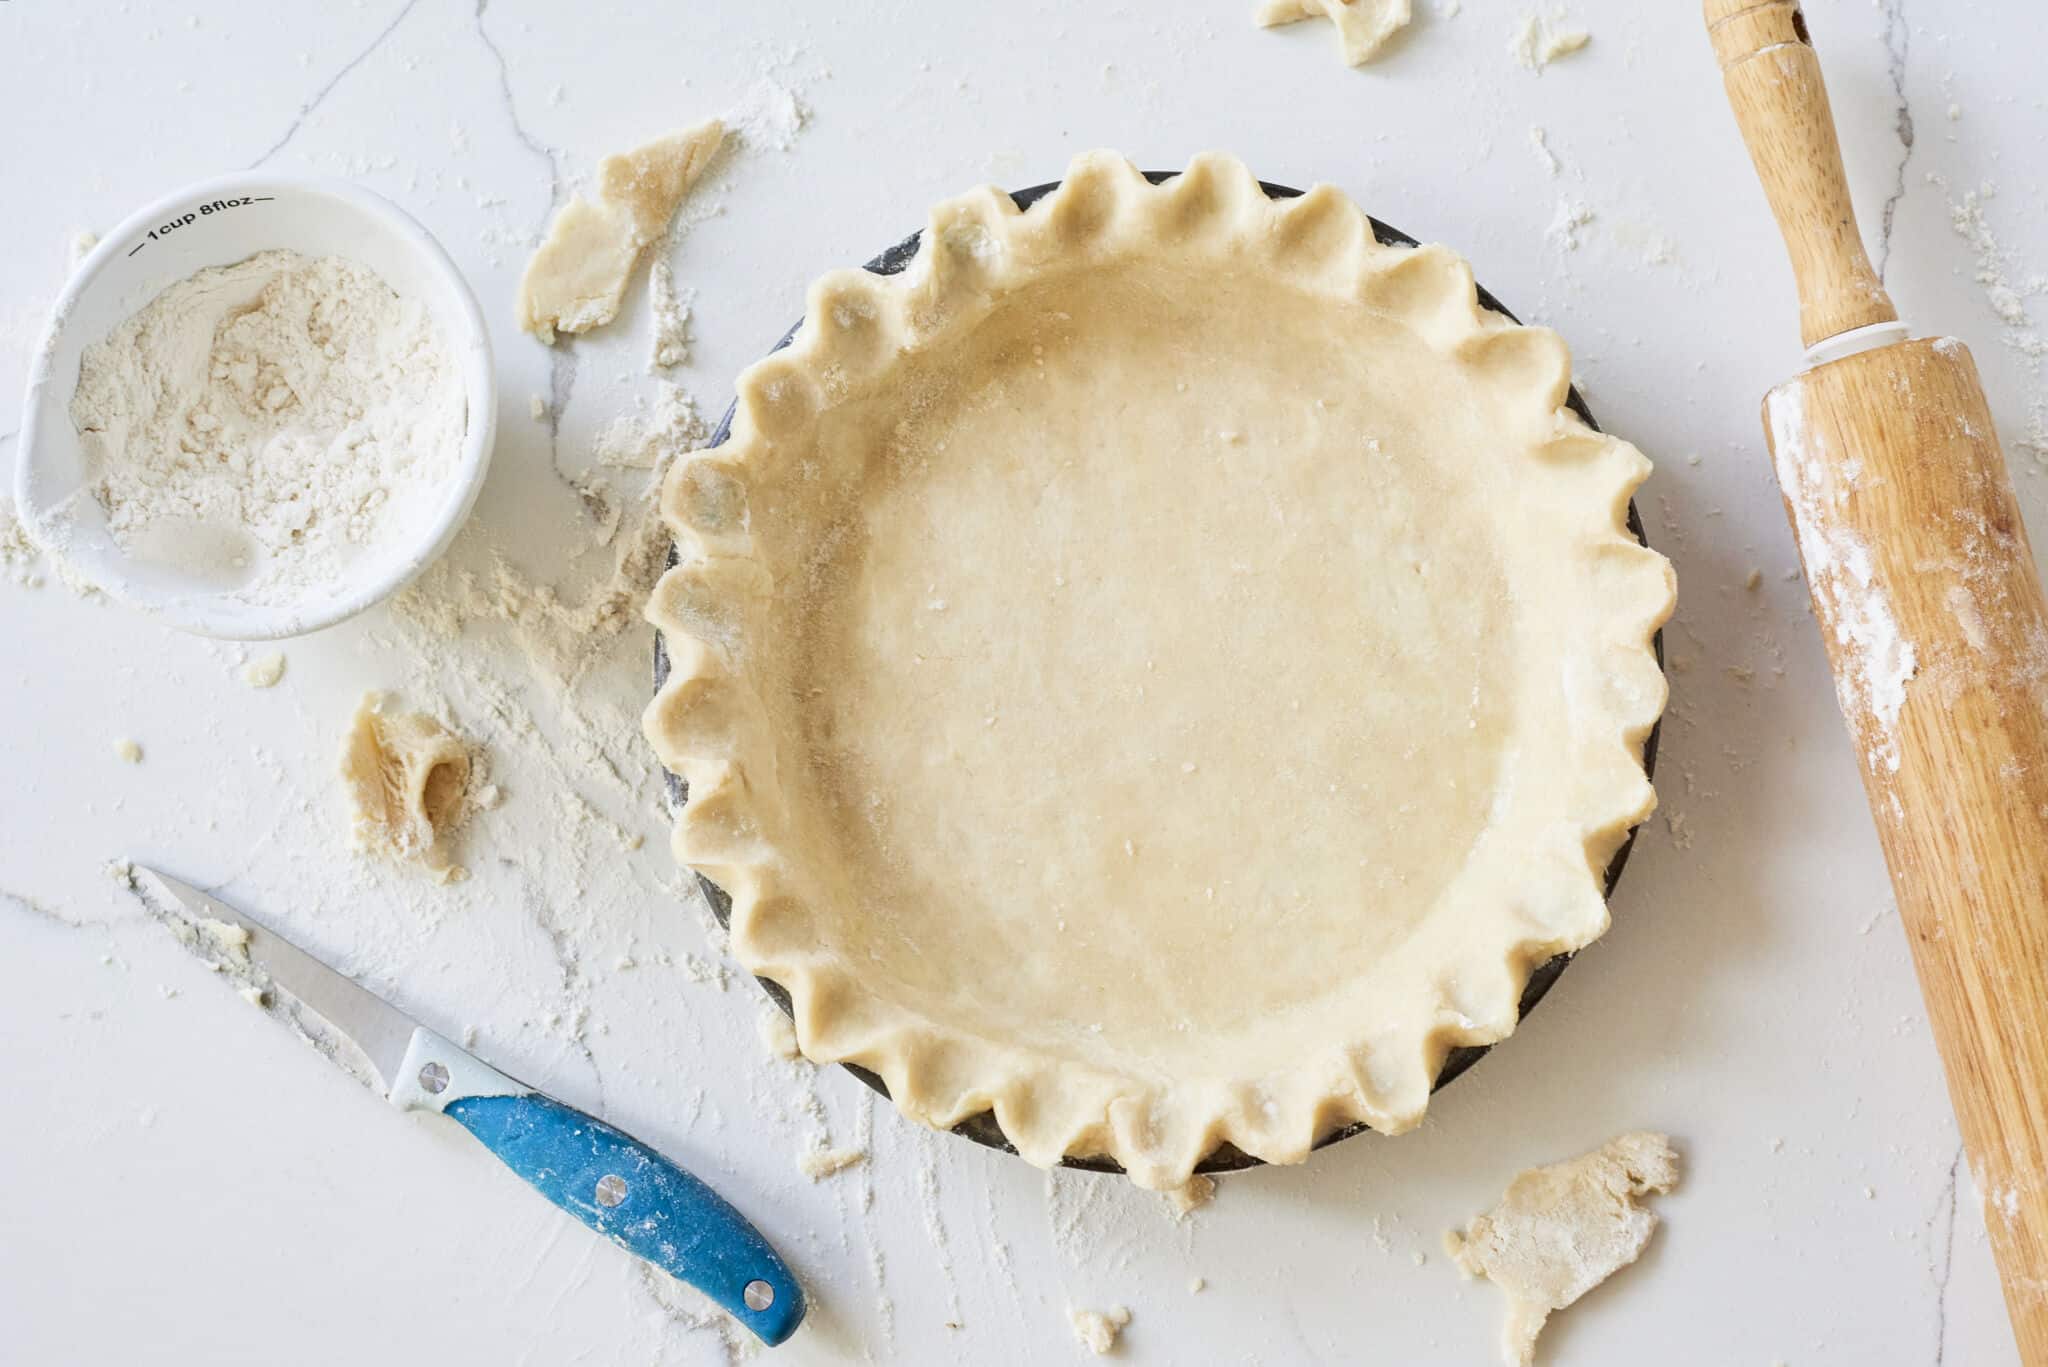
The standard for how thick to roll a pie crust is roughly ¼-inch thick (6mm). And remember, always roll out your bottom crust a few inches larger than the size of your pie pan to cover the sides and have a touch of overhang to be neatly trimmed away. The top crust can be rolled out large enough to have about ½ inch (12mm) of crust that can be tucked under the bottom crust for the tightest seal. If you have any more than a ½-inch (12mm) overhang, trim it away to avoid an edge that is too thick to bake up properly.

How To Transfer Pie Dough Into A Pie Pan
There are a few methods to transfer your rolled-out crust to your pie pan. Some recipes will call for gently draping the crust over your rolling pin and then unrolling it onto the pan. Others will tell you to fold the dough in 4ths and lift it this way. This can work, depending on the recipe and temperature of the dough, but more often than not, I end up with giant cracks. And using parchment paper to lift the dough and slide it into the pan can make it difficult to center the dough on the pan, leading you to have to shift the dough and, again, possibly crack it. Cracked dough is, arguably, the opposite of pastry perfection.
In my experience, the best way to transfer your pie dough to the pie pan is to keep the pan close, slide your hands underneath the dough with your palms up and fingers spread out, and carefully lift it onto the pan, like in the photo below.

Tips For Baking Pie Crust
Baking time and temperature are dependent on the type of pie you are making, so you can see a range from 350°F (180°C) and up. Pastry does love a hot oven to bake in, so it browns nicely and crisps up; however, so you’ll likely see recipes calling for around 400°F (200°C).
Here’s a great chef’s tip I have learned over the years: to avoid an underbaked, soggy bottom on a pie, place a baking sheet in the oven while it is preheating. When you’re ready to bake your pie, place it directly on the heated sheet. This sheet will conduct heat and, in turn, brown the bottom of the pie. For best results, bake your pie in the middle or lower rack of the oven to be closer to the heating elements from below.
How To Store Leftover Pastry
Once baked, pastry and the refrigerator are no longer friends. It is best to store your pie loosely covered at room temperature. I often keep leftover pie uncovered in a cold oven since covering the pie can cause moisture, which will soften the pastry. Pie is best eaten about 4 or 5 hours after it is baked, and leftovers will keep well for about 1 day. You can re-crisp the pie by heating it in the oven at 250°F (120°C) for about 10 minutes.

There you have it, Bold Bakers! I hope we have covered it all, and we wish you delicious success in your pastry-making adventures! If you need some more inspiration, be sure to check out the recipes below!
Perfect Your Pie Crust With These Great Recipes
- Delectable Caramel Apple Pie
- How to Make Pumpkin Pie
- Perfect Pumpkin Pecan Pie
- Apple Cheddar Pie
- Decadent Chocolate Pudding Pie
Get More Articles!


About Us
Meet Gemma

About Us
Meet Gemma
Hi Bold Bakers! I’m Gemma Stafford, a professional chef originally from Ireland, best-selling cookbook author, and the creator of Bigger Bolder Baking and the Bold Baking Network. I want to help you bake with confidence anytime, anywhere with my trusted and tested recipes and baking tips. You may have seen one of my 1000+ videos on YouTube, Instagram, Facebook, or TikTok or as a guest judge on Nailed It! on Netflix or the Best Baker in America on Food Network. No matter your skills, my Bold Baking Team & I want to be your #1 authority for everything baking.
How do you prevent your crust from slumping? I blind baked a crust and 2 sides slumped down the sides
When adding a top crust, whether latticed or not, do you fold the bottom crust over the edges of the top crust? Then flute if you want to flute? I am just never sure if you’re supposed to fold the bottom over the top or fold the top over the bottom then tuck it into the edge of the pie pan.
I have always made my pumpkin pie the night before but I am wondering if that is the best idea. Also, I want to par bake the crust, should it cool before I pour the pumpkin mixture in?
Thank you.
I love u so much I like to do every thing did like condens milk ,some kind of cream ,mug cake , monkey cakes many things you make so many varieties of baking thank u so much bigger bolder baking.
Gemma, how much milk powder would you use if you elect to use it?
Any thoughts on metal versus glass versus ceramic pie pans? Thank you