This post may contain affiliate links. Please see my full disclosure for details.
Hi Bold Bakers!
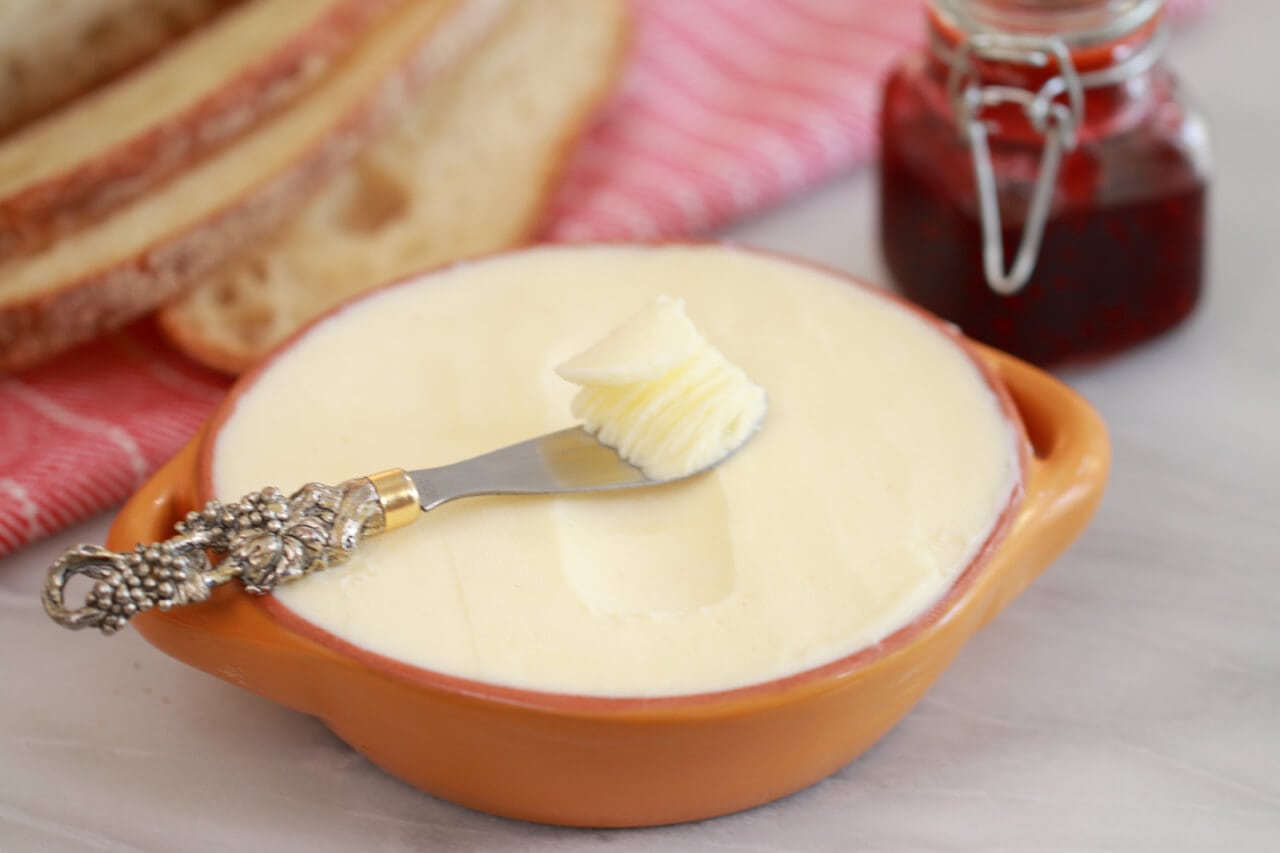
WHY YOU’LL LOVE THIS RECIPE: Homemade butter might sound fancy, but it’s one of the easiest recipes you’ll ever make. With just 2 ingredients and 10 minutes, you can turn simple cream into rich, creamy butter that’s better than anything you’ll find in stores. I first made homemade butter years ago out of curiosity—and I’ve been making it ever since. It’s a staple in my kitchen for everything from warm toast to beautifully baked cookies or pastries. Once you try it, you’ll wonder why you ever bought butter at all.
- Quick & Easy: Ready in just 10 minutes using a simple jar, a food processor, or a mixer.
- Expert-Tested: A tried-and-true method I’ve made countless times.
- Unmatched Flavor: Fresh, creamy, and full of pure dairy richness.
- Versatile: Perfect for spreading, baking, or finishing savory dishes.
- Satisfying to Make: Watch cream transform into golden butter—it never gets old!
Butter is the foundation of so many baked goods, which is why I had to show you just how simple the magic is to make your own from scratch. And nothing goes to waste—during the butter-making process, you’ll also get fresh buttermilk as a byproduct. It’s full of nutrients and perfect for baking, marinating meat, or adding to drinks. I like to freeze extra buttermilk in small portions so it’s ready anytime for pancakes, biscuits, or cakes.
Bold Bakers Loved This!
” I used the food processor for the butter making process and it came out great! It was much simpler than the Kitchen Aid Mixer! I do need to get some cheese cloth. There is something so special about gifting someone with homemade bread and a container of homemade butter!” — Candace A.
“I made this on thursday. It turned out great and the taste is so yummy. ” — Hazel
“Oh my goodness, this is easy! I will be making my own butter going forward. I’m in Ecuador and I haven’t cared for the taste of store-bought butter as it is a little sour. Your recipe was so easy make and it is delicious butter. Thank you!” — Lisa H.
IMPORTANT NOTE: This recipe was improved and updated on 11/9/2025, to include explanations of ingredients, make ahead and storage instructions, answers to the most frequently asked questions, endless ways to use butter, and Pro Chef Tips.
Table of Contents
- Tools You Need
- Ingredients
- How to Make Homemade Butter
- Gemma’s Pro Chef Tips
- Make Ahead and Storage Instructions
- Endless Ways to Use Homemade Butter
- FAQs
- More Homemade Ingredients
Tools You Need
- Measuring cups
- Stand mixer or electric hand mixer with whisk attachment
- Sieve
- Bowl
- Tea towel or cheesecloth
Ingredients
Heavy Whipping Cream
- Use full-fat cream with at least 36% butterfat for best results.
- Higher fat content produces a richer, creamier butter with better texture.
- Keep the cream well-chilled—cold cream whips faster and separates more easily into butter and buttermilk.
- The flavor of your butter depends heavily on the quality and freshness of the cream.
Salt
- A pinch of salt is optional, but it adds a classic buttery taste and enhances the natural sweetness of the cream.
- Can be omitted for unsalted butter, ideal for baking where precise salt control is important.
- You can also customize with herbs, spices, or flavored salts for savory or specialty butters.
Ice Water
- Helps fully separate the butter solids from the liquid buttermilk.
- Makes the butter easier to rinse and shape, removing any residual buttermilk.
- Optional but recommended for firmer, longer-lasting butter.
How to Make Your Own Butter
- Pour the Cream: In the bowl of your food processor (or stand/hand mixer), pour in the cold heavy cream.

- Whip the Cream: Whip on high speed until the cream thickens and begins to separate. After around 2–3 minutes, it will start to look over-whipped—keep going!
- Watch for Separation: After around 4 minutes, the mixture should fully separate into yellow butter fat molecules and a cloudy liquid (buttermilk).
- Add Ice Water: Pour in the ice-cold water. This helps the butter fully separate from the liquid and produces more buttermilk.

- Strain the Butter: Place a sieve over a medium bowl and pour in the mixture. The liquid collected is your buttermilk—save it for baking, cooking, or drinks.

- Squeeze Out Buttermilk: Using clean hands or a dish towel, squeeze the butter solids to remove any remaining buttermilk. The drier the butter, the longer it will last.

- Add Salt or Flavors: Stir in salt or any other desired flavors to your soft butter.
- Store Properly: Transfer the butter to an airtight container and store in the fridge for up to 6 weeks.
Gemma’s Pro Chef Tips
- Use High-Fat Cream: The richer the cream, the creamier and more flavorful your butter. Look for cream with at least 36% fat.
- Keep Everything Cold: Chilled cream and ice water help the butter separate faster and give a cleaner texture.
- Choose Your Device: Butter can be made in a food processor (fastest for large batches), stand mixer (medium-high speed with whisk), hand mixer (works for small batches in a deep bowl), blender (small amounts, use short bursts), or even by shaking cream in a mason jar.
- Don’t Rush the Whipping: Stop only when the butter solids have fully separated from the buttermilk; over-whipping slightly is okay.
- Save the Buttermilk: It’s a bonus ingredient packed with nutrients—perfect for pancakes, cakes, biscuits, marinades, or even drinks.
- Rinse the Butter Well: Removing all buttermilk prevents your butter from becoming too soft or spoiling quickly.
- Customize Your Butter: Add herbs, spices, citrus zest, or flavored salts to create your own specialty butter.
- Freeze in Portions: Extra butter can be shaped or portioned and frozen for up to 3 months, ready for baking or spreading.
- Use Clean Tools: Any leftover moisture or residue can affect texture—use clean bowls, spoons, or cheesecloth when squeezing and shaping.
FULL (PRINTABLE) RECIPE BELOW!
Make Ahead and Storage Instructions
- Refrigerate: Store homemade butter in an airtight container in the fridge for up to 6 weeks.
- Freeze for Later: Shape or portion butter into small blocks or balls, wrap tightly in plastic or parchment, and freeze for up to 3 months. Thaw in the fridge before use.
- Use Fresh Buttermilk: Keep the buttermilk from making butter in a sealed container in the fridge for up to 1 week. It’s perfect for baking pancakes, cakes, biscuits, or marinating meat.
- Portion Control: Freeze butter or buttermilk in small portions to have ready-to-use amounts for baking or spreading.
- Maintain Quality: Always use clean utensils when scooping or handling butter to prevent contamination and preserve flavor.

Endless Ways to Use Homemade Butter
Cakes:
Cookies:
Flavored Butter Recipes
Sweet Compound Butters:
- Vanilla Bean Compound Butter
- Chocolate Compound Butter
- Orange Honey Compound Butter
- Strawberry Compound Butter
- Maple Pecan Compound Butter
Savory Compound Butters:
Specialty Butters:
FAQs
Can I use dairy-free cream?
No, this recipe requires high-fat dairy cream. Non-dairy creams won’t separate into butter properly.
What’s the purpose of the ice water?
Ice water helps fully separate the butter solids from the buttermilk and makes rinsing and shaping easier.
What can I do with the buttermilk?
The leftover buttermilk is great for baking pancakes, cakes, muffins, or scones, marinating meat, or adding to drinks.
Can I make butter without a mixer or food processor?
Yes, you can shake cream in a jar until it separates, though it takes longer and more effort than using a mixer or processor.
Why isn’t my butter separating?
Make sure your cream is cold and high in fat. Whip it long enough for the solids and liquid to fully separate.
How do I know when it’s done?
Butter is ready when you see yellow solids forming and the liquid (buttermilk) separates clearly.
More Homemade Ingredients
- How To Make Sour Cream
- How to Make Cream Cheese
- Best Vanilla Buttercream Frosting Recipe
- How to Make Whipped Cream Without Heavy Cream
- How To Make Homemade Mozzarella
IMPORTANT NOTE: This recipe was improved and updated on 11/9/2025, to include explanations of ingredients, make ahead and storage instructions, answers to the most frequently asked questions, endless ways to use butter, and Pro Chef Tips.
Try These Recipes!


Watch The Recipe Video!
Homemade Butter

Ingredients
- 3 cups (24 fl oz/720 ml) heavy cream (high fat content)
- 1 teaspoon salt
- ⅓ cup (2½ fl oz/75 ml) ice water
Instructions
- In the bowl of your food processor pour the cold cream and whip on high speed until it separates. After around 2 ½ minutes you will see it start to over whip and really thicken. Keep going. After around 4 minutes it should be fully separated. You can see yellow buttery solids and cloudy liquid at this point. (You can also do this using a handheld or stand mixer).
- Once it separates, pour in your ice-cold water. This helps the butter fully separate from the liquid (buttermilk) and you will see even more buttermilk appear.
- Place a sieve over a medium bowl and pour in the contents of the bowl. The liquid that remains is buttermilk. Save it in the fridge and use it in your baking or to marinate meat.
- Squeeze the butter solids in your hands to make sure there is NO more buttermilk in there. You want to remove it all otherwise your butter will be wet. Also, you can squeeze it in a clean tea towel or a cheesecloth.
- Stir in the salt or any flavors (if using) to your soft butter.
- Store in an airtight container in the fridge for 6 weeks and use it in your baking, savory dishes, or even on toast.
Recipe Notes
- Use High-Fat Cream: The richer the cream, the creamier and more flavorful your butter. Look for cream with at least 36% fat.
- Keep Everything Cold: Chilled cream and ice water help the butter separate faster and give a cleaner texture.
- Choose Your Device: Butter can be made in a food processor (fastest for large batches), stand mixer (medium-high speed with whisk), hand mixer (works for small batches in a deep bowl), blender (small amounts, use short bursts), or even by shaking cream in a mason jar.
- Don’t Rush the Whipping: Stop only when the butter solids have fully separated from the buttermilk; over-whipping slightly is okay.
- Save the Buttermilk: It’s a bonus ingredient packed with nutrients—perfect for pancakes, cakes, biscuits, marinades, or even drinks.
- Rinse the Butter Well: Removing all buttermilk prevents your butter from becoming too soft or spoiling quickly.
- Customize Your Butter: Add herbs, spices, citrus zest, or flavored salts to create your own specialty butter.
- Freeze in Portions: Extra butter can be shaped or portioned and frozen for up to 3 months, ready for baking or spreading.
- Use Clean Tools: Any leftover moisture or residue can affect texture—use clean bowls, spoons, or cheesecloth when squeezing and shaping.


We do it a bit differently, in India. We set a curd from the cream of the milk that we get daily. We keep adding the cream allow it ti set and refrigerate. Around 15 days and we have a good amount of this cream-curd. Then we do what you did. Whip in a hand mixer using ice cold water. That is our white butter! And of course the butter milk, which we can flavour with mint/ginger and salt and drink loads! Then we keep it in the fridge in water, so that it freezes. The next step is to… Read more »
I am trying to figure out what I’m doing incorrectly. I made two batches of butter, back to back, using Kitchen Aid blender, whisk. Fresh heavy duty heavy cream. One batch takes only a few minutes to form butter, the other batch takes over 40 minutes. I can’t figure it out. What do you think is going on?
Thanks
Gemma, I used the food processor for the butter making process and it came out great! It was much simpler than the Kitchen Aid Mixer! I do need to get some cheese cloth. There is something so special about gifting someone with homemade bread and a container of homemade butter!
Thank you for your correspondence and encouragement!
Candy from Alabama
Sorry I forgot to put how many stars on my last comment.
I made this on thursday. It turned out great and the taste is so yummy. Thanks gemma, you make it a lot easier for me. Sending you hugsss ???????? with love from ????????
Hey Gemma,
Can we use Half and Half Cream?
Will this keep in the freezer?
I tried making butter both with a food processor and electric mixer.But it never turned into butter it remained whipping cream even after 10 minutes.please help!
This worked great. Could not be easier.
Easy peasy butter squeeze! Love the recipe, used it after I found 300ml cartons of double cream for 41p in the supermarket here in the UK!