
This post may contain affiliate links. Please see my full disclosure for details.
Hi Bold Bakers!
WHY YOU’LL LOVE THIS RECIPE: Struggling with sourdough starter recipes? You’re not alone—I’ve been there, frustrated by confusing instructions and unreliable results. That’s why I’m thrilled to share this foolproof, no-fuss sourdough starter guide with 1000+ reviews, designed for success with every baker in mind.
- Tested to Perfection: After countless trials and feedback from Bold Bakers like you, this recipe delivers every time.
- Proven Success: Hundreds of bakers have turned their starter dreams into reality with this simple method.
- Easy and Accessible: Just two ingredients, a jar, and some patience—no fancy tools required.
- Comprehensive Support: Filled with tips, tricks, and troubleshooting advice to help your starter thrive.
This is the guide I wish I’d had at the start of my sourdough journey, and I’m so excited to share it with you. When I first explored sourdough, Emilie from The Clever Carrot was my go-to. Her clear, simple method (from her book Artisan Sourdough Made Simple) gave me the confidence to create my first starter. Now, after years of practice, my team and I have developed the most detailed step-by-step sourdough guide on the internet, answering hundreds of your questions. Be sure to explore our comprehensive Sourdough Q&A for everything you need to succeed at home!
Bold Bakers Loved This!
“This guide is amazing! I never thought I could make my own starter, but now I’m baking sourdough bread every week.” — Maria
“Your tips and troubleshooting section really helped me. My starter is thriving now, and I’ve already baked two loaves!” — John P.
“I followed your guide, and it worked perfectly! My starter is active and bubbly. Thank you for making it so easy to understand.” — Lynne
IMPORTANT NOTE: This recipe was improved and updated on 12/26/2024, to include NEW step-by-step photography, explanations and substitutes of key ingredients, a NEW feeding schedule (updated after the video), the latest maintaining and storage Pro Tips (including how to cover starter and what to use), troubleshooting, and what to do with sourdough discard.
Table of Contents
- What is a Sourdough Starter?
- Tools You Need for Sourdough Starter Recipe
- Key Ingredients and Substitutes
- How to Make a Sourdough Starter
- Gemma’s Pro Chef Tips for Making the Best Sourdough Starter
- Maintaining Your Starter and Troubleshooting
- Make Ahead and Storage Instructions for Foolproof Sourdough Starter
- FAQs
- What to Make With Sourdough Starter
- What to Do With Sourdough Discard
What is a Sourdough Starter
A sourdough starter is a live, fermented mixture of flour and water used to naturally leaven bread. It’s the heart of sourdough baking, providing flavor, structure, and rise without commercial yeast.
- Fermented: Created through the natural fermentation of wild yeast and lactic acid bacteria, giving it a tangy, complex flavor.
- Leavening Agent: Acts as a natural yeast, producing carbon dioxide for a light and airy texture.
- Living Culture: Requires regular feeding to stay active and healthy, similar to caring for a plant.
- Versatile: Used not just in bread but also in pancakes, waffles, and even cakes for unique flavor and texture.
[ Already have your starter up and running? Make my Sourdough Bread Recipe for Beginners! ]
Tools You Need
- Digital kitchen scale
- Glass jar or mason jar
- Measuring cups
- Measuring spoons
- Measuring jug
- Fork
- Spatula
Key Ingredients and Substitute
")
Whole Wheat Flour
- Provides the natural starches and nutrients that feed wild yeast and bacteria, enabling fermentation. Whole-grain flour such as whole wheat flour in this recipe, with its higher nutrient content, can accelerate the fermentation process.
- Substitutes:
- Rye flour: Accelerates fermentation with its high nutrient density and lower gluten content.
- Gluten-free flours (like teff flour, buckwheat flour, brown rice flour, or quinoa rice flour or sorghum): Suitable for gluten-free starters, though results may vary. Avoid single use of starches, nut flour or fruit flours.
- All-Purpose Flour: A balanced option with moderate gluten and starch content; ideal for beginners.
- Bread Flour: Higher protein content supports stronger gluten development for active starters.
- Spelt Flour: An ancient grain with a nutty flavor; ferments well but may create a slightly wetter starter.
- Kamut Flour: Another ancient grain with a buttery taste; promotes fermentation but can be denser.
- Barley Flour: Adds a sweet, malty flavor; low gluten content makes it less effective for starters requiring elasticity.
- Quinoa Flour: Gluten-free with high protein; suitable for gluten-free starters but may produce a denser result.
Water
- Hydrates the flour, creating a medium for wild yeast and bacteria to grow and thrive.
- Substitutes:
- Filtered water: Ensures no chlorine or impurities inhibit fermentation.
- Bottled water or spring water: Ideal if tap water contains high levels of chlorine.
How to Make a Sourdough Starter
Day 1: Create a Sourdough Starter
- Combine ½ cup (2 oz/58 g) of whole wheat flour and ¼ cup +2 tablespoons (3 fl oz/ 90 ml) of water in a large sealable glass jar.
- Mix with a fork until smooth; the consistency will be thick and pasty.

- Cover loosely with a small cloth or kitchen paper, and let it rest in at room temperature in a warm spot, for 24 hours.

*Tip: I recommend using an electric scale when making and working with sourdough as precision is important and works better than cup measurements.
Day 2: Feed Your Starter
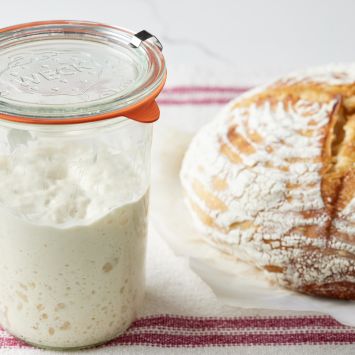
- On the second day you can see a starter that is dark on top and to be honest doesn’t look great. It might even have some liquid (hooch) on top of the surface. this is TOTALLY normal.

- Remove and discard approximately half of your starter from the jar. I did this by eyeballing it each time and its works perfectly. And you can use discard in recipes such as:
- Easy Sourdough Popover Recipe
- Sourdough Discard Crackers Recipe
- Sourdough Chocolate Chip Cookies Recipe

- Feed it with a ½ cup (2 oz/58 g) of all-purpose flour and ¼ cup +1 tablespoon (2 fl oz/60 ml) of water. Mix with a fork until smooth. The texture should resemble thick-ish batter at this point. It will not normally have any bubbles at this stage. Scrape down the starter off the sides of the jar, cover loosely, and let rest in your warm spot for another 24 hours.

Day 3, 4, 5 & 6: Keep on Feeding!
- Repeat the feeding process outlined on Day 2 (remove and discard half of the starter, and feed it with 1/2 cup (2oz/60g) of all-purpose flour and 1/4 cup +1 tablespoon (2oz/60g) of water.
- As the yeast begins to develop, your starter will rise, and bubbles will form on the surface and throughout the culture. During the first week of feeding put the starter into a clean jar when you see fit. Continue to cover with kitchen paper up until day 7.

*Tip: Place a rubber band or piece of masking tape around the jar to measure the starter’s growth as it rises.
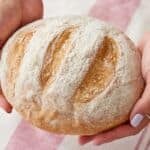
Day 7: Your Own Sourdough Starter is Born!
- By now, your starter should have doubled in size. You should see plenty of bubbles, both large and small. The texture will be spongy, fluffy and a bit strecthy. It should smell boozy, but not like stinky like gym socks. Your starter is now active and ready to use! If you decide not to use it at this point then continue to feed every 24 hours or cover with a lid and refrigerate it until needed and feed before using.
Gemma’s Pro Chef Tips for Making the Best Sourdough Starter
- Consistent feedings of the starter at the same time every day will ensure proper starter growth.
- Temperature controls the starter maintaining environment and the water for feeding. A moderate 80°F (26°C) is optimal.
- Be persistent! It takes time to get a strong starter fit for baking bread.
- A good starter should smell sweet with a slightly sour/yeasty scent.
- When you’re about to make bread, use the starter when it’s physically reached its peak level of rising with lots of bubbles at its surface. Use the water float test to be sure it’s ready.
- Place a rubber band or piece of masking tape around the jar to measure the starter’s growth as it rises.
Make-Ahead and Storage Instructions for Sourdough Starter
Make-Ahead
Sourdough starter is naturally a long-term project, but you can manage it for convenience:
- Building the Starter: Allow at least 7 days to develop a bubbly, active starter. Begin in advance if you plan to bake on a specific day.
- Refrigeration: Once your starter is active, you can store it in the refrigerator and feed it weekly to keep it healthy. This slows fermentation and minimizes daily maintenance.
Storage
At room temperature:
-
If you bake often, store your starter at room temperature (ideally between 78°F/25°C and 82°F/26°C) feeding it once or twice a day to keep it active.
Short-Term Storage (Up to 1 Week):
- Keep your starter in the refrigerator in a clean jar with a fitted lid.
- Feed it once every 7 days to maintain its activity.
Long-Term Storage ( at least 1-3 Months):
- Refrigeration: Feed the starter, let it rest at room temperature for a few hours, then refrigerate. Feed it again before baking to reactivate it.
- Drying: Spread a thin layer of active starter on parchment paper to dry completely. Crumble into flakes and store in an airtight container at room temperature. Rehydrate with water and flour when ready to use.
Freezing for Extended Periods
- Spoon some recently fed starter into a freezer-safe container, leaving room for expansion. Label and date it.
- To reactivate, thaw it in the refrigerator, then bring it to room temperature and feed it to restore activity.
Pro Tip: When ready to bake, store it at room temperature and feed it once/twice a day for 1-3 days or until it can predictably and reliably reach its peak for maximum rise and flavor!

Maintaining Your Starter and Troubleshooting
Is Your Starter Ready to Use?
-
Do the float test: Drop a teaspoon of bubbly starter in a jar of water; if it floats to the top you can use it in:
-
Please keep in mind, if your starter is not ready at this point which is quite common due to temperature issues, timing, and other factors, it is totally fine to continue the feeding process for 1-2 weeks or more. The flavor and texture will just get better with time.
I’m not ready to use my starter yet, what do I do?
-
If you are not ready to use your starter that is no problem at all. Simply transfer it to a clean sealable jar and keep it in the fridge to use later.
-
Once in the refrigerator, you only need to feed your starter once every 7 days. See ‘Storage Options’ below.
How to feed your sourdough starter for ongoing care
-
Begin by removing and discarding about half of your starter.
-
Replenish what’s left in the jar with fresh flour (use all unbleached purpose flour) and water.
-
Cover loosely, and let it rise at room temperature until bubbly and double in size. Once it falls, the bubbles will become frothy and eventually disappear. Then you’ll know it’s time to feed your starter again.
-
Feed your starter everyday if it’s stored at room temperature. Feed it 1x a week if you keep it in the fridge.
What are the best sourdough starter covers?
The best cover for a sourdough starter allows it to breathe while protecting it from contaminants and drying out, as well as avoids risk of presure buildup. Here are the most recommended options:
-
Loose Lid (Most Popular)
- What: Use the lid of a jar but keep it unscrewed or just resting on top.
- Why: It traps moisture to prevent drying while allowing gas to escape.
- Best For: Daily maintenance and feeding at room temperature.
-
Cloth Cover (Most Breathable)
-
- What: A clean kitchen towel, cheesecloth, or coffee filter secured with a rubber band.
- Why: It offers maximum airflow to prevent a buildup of carbon dioxide.
- Best For: Warm climates where excess moisture is a concern.
-
Fermentation Lids (Most Convenient)
- What: Specialized lids with built-in airlocks or vents.
- Why: These are designed to release gas without needing manual adjustments.
- Best For: Beginners who want a set-it-and-forget-it solution.
How to cover sourdough starter?
First Week: Establishing the Starter (Room Temperature)
- Covering: Use a breathable cover (e.g., loose lid or cloth).
- Feeding Schedule: Feed the starter daily (or twice daily in warmer climates).
- Reason: The yeast and bacteria need consistent warmth and food to develop.
Second Week: Strengthening the Starter (Room Temperature)
- Covering: Continue with a breathable cover.
- Feeding Schedule: Feed once or twice daily, depending on activity levels.
- Reason: This phase ensures the starter becomes robust and ready for baking.
Beyond Two Weeks: Maintaining Established Starter (Refrigerator)
- Covering: Use a tight lid to prevent drying out. Cloth covers are not recommended.
- Feeding Schedule: Feed once a week.
- Reason: The cooler temperature slows fermentation, reducing feeding frequency.
When should I tighten the lid?
-
Long-Term Refrigeration.
- When: If you won’t be feeding the starter for a week or longer.
- Why: Tightening the lid prevents the starter from drying out or absorbing odors from the fridge.
- Precaution: Loosen the lid slightly every week or so to release any built-up gases if storing for an extended time.
-
Transporting the Starter
- When: If you need to move the jar (e.g., traveling or gifting).
- Why: A tight lid prevents spills or leaks during transport.
- Precaution: Loosen the lid once the starter is stationary to avoid pressure buildup.
What happens if I miss a feeding?
-
If you miss a feeding, don’t worry — your starter is not going to die. It might look ugly (and smell horrendous) but it usually just needs a few feedings to perk back up.
-
If you haven’t fed in some time you might see a dark liquid might appear on the surface and throughout the culture. It has a very stinky smell, similar to rubbing alcohol or gym socks. This liquid is called “hooch” and is an indication that your starter needs to be fed. Any time you see this liquid, it’s best to remove it along with any discolored starter present.
Why Doesn’t My Sourdough Starter Have Bubbles?
- A happy sourdough starter should be active and bubbly. The live yeast and bacteria in the starter feeds off the sugars in the flour and expels CO2 and these ‘bubbles’ form. Generally, after each feeding, bubbles start to form in 4 to 12 hours.
- If there aren’t any bubbles left, it is most likely because your starter ran out of food (flour) and it should be fed more frequently. Should your feeding schedule be every 12 hours, perhaps an increase in feeding will help revive your starter so feed every 8-12 hours until normal activity resumes.
If Your Sourdough Starter Isn’t Rising
It takes some time for a good sourdough starter to rise and fall predictably. There are a few factors that will ensure this:
- Use water with no chlorine/chloramine. Such chemicals will disrupt fermentation or even kill the yeast.
- The temperature of the water for feeding and the environment also plays a big factor — yeast favors warmer conditions.
- However, too hot temperature could kill the yeast. A moderate 80°F (26°C) is optimal, or room temperatureif that’s all you have access to.
- Consider sticking your starter in the oven with the light on — an oven bulb will emit a delicate heat that can help the process along if needed.
- Regular feedings of flour and water will keep the yeast happy and healthy
How Much Sourdough Starter Do I Throw Out?
Generally, you throw away at least half of your starter every feeding.
- The reason for this being is that every time you feed your starter, it requires so much flour that it would become too much to handle if some starter weren’t initially discarded.
- Also, it helps to balance the acidity of the starter and prevents it from becoming too sour.
When Does A Sourdough Starter Go Bad?
A starter should generally smell sweet and slightly sour, it should look light in color as well. If the starter begins to create spots of pink, green, or dark brown that go beyond the surface of the starter then that’s a sign of bad bacteria growth so the starter should be discarded.
When Is It Ready To Bake With?
It is best to use the starter when it is at its peak height (look for when it’s doubled in size, which takes roughly 3-5 hours) during the rising and falling stages of growth. To test whether it’s ready to use: mix your starter to distribute bubbles evenly then drop a spoonful of starter into a bowl of water. If it floats, it’s ready to go. But if it drops to the bottom, allow it to rest for a few hours longer.
What Should It Smell Like?
A good starter should smell sweet, but slightly sour/boozy due to the fermentation. It should not smell bad however like socks or garbage.
What do I do if dark liquid appears on my sourdough starter?
If dark liquid (called “hooch”) appears on your sourdough starter, don’t worry—it’s a sign your starter is hungry. Here’s what to do:
- Check the Starter: If the liquid is gray or dark, it’s been unfed for a while but is still usable.
- Stir or Pour Off: Stir the hooch back in for a tangier flavor, or pour it off if you prefer a milder taste.
- Feed It: Remove half the starter and feed it equal parts flour and water by weight (e.g., 50g flour and 50g water).
- Let It Rest: Leave it at room temperature for a few hours until it bubbles and rises.
- Repeat if Needed: Feed daily until it’s active and bubbly again.
Following the above instructions it just took me just 24 hours to bring it back to a happy and healthy starter ready to be used.

What are the differences among sourdough starter, pre-ferment, and levain?
A:Both a starter and a levain fall under the same category as a preferment. And both can be tested by “floating” in the water: if it floats, then it’s ready to use.
- A preferment is a mixture of flour, water, and your starter left to ferment before mixing all ingredients into a final dough. In general, it takes around 4-5 hours for a pre-ferment to develop at a warm place.
- A starter means feeding flour outside the recipe, with water and a ripe or unfed/ inactive starter, usually only part of which will be used in the recipe. Usually the ratio is starter: water: flour=1:1:1 (Factor in that there’ll be some attached to the tools you use. )
- Take a little bit more than ⅓ of the total required starter amount from the mother/unfed starter, feed it with the same amount of water and flour: If you need 4 ozs/115 g starter for your recipe then remove 1/3 (about 39 g) starter to a separate jar, add 1/3 flour (39 g) and 1/3 (39 g) water and this is another way to do the preferment.
- Levain means feeding a portion of the flour to be used in the recipe , with water and a ripe/active starter before incorporating other ingredients and let the mixture ferment , which contributes to the flavors and can scale up the preferment.
- All of the levain mixture will be used into the dough and it may range from 6% to 30% of the final dough’s weight.
- To do a levain preferment, you need to get an active starter per the instruction in my Sourdough Starter Guide and then go from there.
What to Make With Sourdough Starter?
Try These Easy Sourdough Recipes:
- Perfectly Crusty Sourdough Bread Recipe for Beginners
- Sourdough Pizza Crust
- Whole Wheat Sourdough Bread
- Sourdough Banana Bread
- The Easiest Sourdough Focaccia
- Homemade Sourdough English Muffins
What to do With Sourdough Discard?
You can use sourdough discard in most recipes on biggerbolderbaking.com, such as cookies, sourdough pancakes, cakes, brownies, fritters, flatbreads, etc.
- ROUGHLY for every 2 cups of dry ingredients, up to 1/2 cup discard, for every 4 cups dry, up to 1 cup discard (unfed).
- The dough / batter should stay the same consistency with no discard.
Or, give these sourdough discard recipes a try:
- Easy Sourdough Popover Recipe
- Sourdough Discard Crackers Recipe
- Sourdough Chocolate Chip Cookies Recipe
IMPORTANT NOTE: This recipe was improved and updated on 12/26/2024, to include NEW step-by-step photography, explanations and substitutes of key ingredients, a NEW feeding schedule (updated after the video), the latest maintaining and storage Pro Tips (including how to cover starter and what to use), troubleshooting, and what to do with sourdough discard.
Try These Recipes!


Watch The Recipe Video!
Sourdough Starter Recipe
Ingredients
- ½ cup (2 oz/58 g) whole wheat flour
- ¼ cup + 2 tablespoons (3 fl oz/90 ml) water , filtered
To Feed Your Starter You Need:
- ½ cup (2 oz/58 g) all-purpose flour
- ¼ cup +1 tablespoon (2 fl oz/60 ml) water
Instructions
Day 1: Making your Sourdough Starter
- Combine ½ cup (2 oz/58 g) of whole wheat flour and ¼ cup +2 tablespoons (3 fl oz/ 90 ml) of water in a large sealable glass jar. Mix with a fork until smooth; the consistency will be thick and pasty. Cover loosely with a small cloth or kitchen paper, and let it rest in at room temperature in a warm spot, for 24 hours.*Tip: I recommend using an electric scale when making and working with sourdough as precision is important.
Day 2: Feed Your Starter
- On the second day you can see a starter that is dark on top and to be honest doesn't look great. It might even have some liquid (hooch) on top of the surface. this is TOTALLY normal.
- Remove and discard approximately half of your starter from the jar. I did this by eyeballing it each time and its works perfectly.
- Feed it with a ½ cup (2 oz/58 g) of all-purpose flour and ¼ cup +1 tablespoon (2 fl oz/60 ml) of water. Mix with a fork until smooth. The texture should resemble thick-ish batter at this point. It will not normally have any bubbles at this stage. Scrape down the starter off the sides of the jar, cover loosely, and let rest in your warm spot for another 24 hours.
Day 3, 4, 5 & 6: Keep on Feeding!
- Repeat the feeding process outlined on Day 2 (remove and discard half of the starter, and feed it with 1/2 cup (2oz/60g) of all-purpose flour and 1/4 cup +1 tablespoon (2oz/60g) of water. As the yeast begins to develop, your starter will rise, and bubbles will form on the surface and throughout the culture. During the first week of feeding put starter into a clean jar with when you see fit. Continue to cover with kitchen paper up until day 7. *Tip: Place a rubber band or piece of masking tape around the jar to measure the starter’s growth as it rises.
Day 7: A Sourdough Starter is Born!
- By now, your starter should have doubled in size. You should see plenty of bubbles, both large and small. The texture will be spongy, fluffy and a bit strecthy. It should smell boozy, but not like stinky like gym socks. Your starter is now active and ready to use! If you decide not to use it at this point then continue to feed every 24 hours or cover with a lid and refrigerate it until needed and feed before using.
Is Your Starter Ready to Use?
- Do the float test: Drop a teaspoon of bubbly starter in a jar of water; if it floats to the top you can use it.Please keep in mind, if your starter is not ready at this point which is quite common due to temperature issues, timing, and other factors, it is totally fine to continue the feeding process for 1-2 weeks or more. The flavor and texture will just get better with time.
I’m not ready to use my starter yet, what do I do?
- If you are not ready to use your starter that is no problem at all. Simply transfer it to a clean sealable jar and keep it in the fridge to use later. Once in the fridge, you only need to feed your starter once every 7 days. See ‘Storage Options’ below.
Starter Storage Options
- If you bake often, store your starter at room temperature (ideally between 78°F/25°C and 82°F/26°C) feeding it once a day to keep it active. If you plan to bake only once in a while, store it in the fridge to preserve its strength and feed it once a week. When ready to bake, store it at room temperature and feed it once/twice a day for 1-3 days or until it can predictably and reliably reach its peak.
How to Feed Your Sourdough Starter for Ongoing Care
- Begin by removing and discarding about half of your starter.
- Replenish what’s left in the jar with fresh flour (use all unbleached purpose flour) and water.
- Cover loosely, and let it rise at room temperature until bubbly and double in size. Once it falls, the bubbles will become frothy and eventually disappear. Then you’ll know it’s time to feed your starter again.
- Feed your starter everyday if it’s stored at room temperature. Feed it 1x a week if you keep it in the fridge.
What happens if I miss a feeding?
- If you miss a feeding, don’t worry — your starter is not going to die. It might look ugly (and smell horrendous) but it usually just needs a few feedings to perk back up. If you haven't fed in some time you might see a dark liquid might appear on the surface and throughout the culture. It has a very stinky smell, similar to rubbing alcohol or gym socks. This liquid is called “hooch” and is an indication that your starter needs to be fed. Any time you see this liquid, it’s best to remove it along with any discolored starter present.


Hi Gemma,
When we are feeding the refrigerated starter every week, are we to leave it at room temperature for 12hours or shall we feed it and rest it immediately into refrigerator?
Hi everyone,
My mother gave an idea. The discard starters from day 3- day 6 can be collected in one jar and be refrigerated. The collected discard starter can be used as a wet ingredient in making flatbread like chapati. Make the dough, rest it at room temperature for 30 min to an hour and make flatbread.
There is no difference in taste.
Thanks,
Shruthi.
I’ve named my DoughVid-19 in light of the pandemic. Can’t wait to use it.
Hi Gemma!
I was wondering if you could do a mug & spork giveaway. Please reply to my comment ; I would like to know. Also please stop deleting my comment. This comment has been deleted twice already.
I made this starter and it was good!
Thank you!
Hi Gemma greetings,
So I was looking at flour online when I chanced upon King Arthur’s page on what all treats could be made using discard sourdough starter.
Here is the link:
https://www.kingarthurflour.com/recipes/collections/sourdough-discard-recipes
You could try out these if you want to…
Thanks,
Shruthi Achut
Amazingly simple and fun to do I have been feeding my “breadzilla” the last 6 days and can’t wait to use it to turn into a sourdough loaf tomorrow. My husband is part Czech and has roots in Germany too so when I said I was starting a sourdough starter to make him a loaf he fell in love with me just that little bit more and had very happy nan memories come back when he gave it a good sniff. Thank you for making it so easy I have been trying to find a recipe that didn’t scare me… Read more »
Hey Gemma!
I started mine with all purpose flour because I can’t find anything else at the moment. Anyway, it’s day 3 now and I just did my first feeding, but I noticed that my starter has a strong cheese smell. It definitely has a strong sour smell but no sweet smell. I don’t know if it qualifies as smelling bad like feet. I don’t know if it means I’m actually growing bad bacteria. Should I throw it out?
So, after you keep it in the fridge and only feed it once a week, how do you know when you can use it? And do you take out half? Thanks!
Hi Gemma!
I was wondering if you could do a mug & spork giveaway. Please reply to my comment;I would like to know.
Thanks, Clarissa
I’ve been using active dry yeast for all my breads, but I’ve run out of dry yeast. I’ll give this recipe a try for sure!