
This post may contain affiliate links. Please see my full disclosure for details.
Hi Bold Bakers!
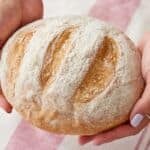
WHY YOU’LL LOVE THIS RECIPE: This Easy Sourdough Bread Recipe makes sourdough baking approachable for beginners while delivering incredible flavor and texture.
- Beginner-Friendly: Clear, step-by-step instructions guide you through every stage.
- Basic Ingredients: Only flour, water, salt, and your starter—nothing extra needed. No Special Tools Required: Use simple kitchen essentials for a stress-free process.
- Reliable Results: Achieve a beautifully crusty loaf with a soft, airy interior every time.
If you’re excited to dive into this recipe, why stop here? Read along to find more easy sourdough recipes!
I began my sourdough journey in January 2020, and this was the very first loaf I baked. Back then, I was just starting out and didn’t know nearly as much as I do now. Over the past five years, I’ve learned a lot about making sourdough bread—from mastering essential techniques to maintaining a healthy, active starter. This recipe has been completely revamped to make it simpler and more accessible. I streamlined the steps, focusing on the most important details, added helpful tips I’ve picked up along the way, and organized the recipe into clearly labeled sections for easier navigation. One exciting new addition to this post is step-by-step photography, allowing you to see exactly what each stage of the process should look like. I’ve found this incredibly helpful, and I hope it makes your sourdough journey even smoother.
Whether you’re a beginner or looking to refine your skills, I wish you success in baking a loaf you’ll be proud of! Want to level up your sourdough baking? Check out the internet’s MOST detailed and thorough Sourdough Q&A that myself and my team of sourdough experts created with hundreds of your questions and answers that we have received.
Bold Bakers Loved This!
“I have been baking sourdough bread almost daily for the last 6 weeks, and my whole family agrees that this is the best recipe I have tried so far!” — Heidi
“This is a fantastic recipe and has become a weekly tradition in my home. Now that I am comfortable with the recipe, I have been experimenting with adding some additional ingredients.” — Eric
“Last week was my first time making sourdough bread, and thanks to your recipe, it turned out perfect & delicious!” — Chelle
IMPORTANT NOTE: This recipe was improved and updated on 1/7/2025, to include NEW step-by-step photography, key ingredients explanations and substitutes, make-ahead and storage instructions, serving options and variations, and Pro Chef Tips.
Table of Contents
- What is Sourdough Bread?
- Tools You Need
- Key Ingredients and Substitutes
- How to Make Sourdough Bread
- Gemma’s Pro Chef Tips
- Make Ahead and Storage Instructions
- Serving Options and Variations
- FAQs
- More Easy Sourdough Recipes
What is Sourdough Bread?
Sourdough bread is a type of bread made using a naturally fermented starter instead of commercial yeast. The starter combines flour and water, which captures wild yeast and bacteria from the environment to leaven the bread and give it its distinct tangy flavor.
- Naturally Leavened: Uses a wild yeast starter, resulting in a unique texture and flavor—authentic.
- Tangy & Complex Flavor: The fermentation process creates a signature sour taste—distinctive.
- Artisan Texture: Typically features a chewy interior with a crisp, golden crust—rustic.
- Longer Fermentation: Requires time to develop its depth of flavor and structure—traditional.
This traditional bread is beloved for its balance of flavor, texture, and history, making it a rewarding experience for bakers of all levels.
Tools You Need
- Weighing scales (optional)
- Large mixing bowl
- Measuring jug
- Measuring spoons
- Spatula
- Bowl/proofing basket/banneton
- Large metal oven-proof bowl or 18/10 Stainless Steel pot with SS handles, for steaming (optional)
- Clean dish towel
- 2 Baking Trays
Ingredients and Substitutes
")
Bread Flour
- Also know as “strong flour“, contains 12%-14% protein, higher than all-purpose flour’s protein content of 9%-11%, which helps form a strong gluten structure and gives the bread its chewy texture.
- Substitute: All-purpose flour can be used, but the bread will have a slightly softer crumb. For a more rustic texture, replace up to 50% bread flour with whole grain flour, though it may need more water.
Active Sourdough Starter
- The starter is essential for fermenting the dough, contributing both rise and the characteristic tangy flavor of sourdough bread.
- Substitute: If you don’t have an active sourdough starter, you can create your own using my Sourdough Starter Recipe. You can also experiment with a quick-rise yeast for a faster rise, though it won’t provide the same flavor.
Water
- Hydrates the flour and activates the yeast, enabling the dough to come together and rise.
- Substitute: Milk or a non-dairy alternative like almond milk will yield a slightly richer texture, though it can also change the flavor and crumb structure.
Salt
- Enhances the flavor and controls the fermentation of the dough, preventing the yeast from becoming too active and overpowering the dough.
Olive Oil
- Adds moisture to the dough, resulting in a slightly softer crumb, and enhances the flavor of the bread.
- Substitute: Vegetable oil or melted butter can be used in place of olive oil.
How to Make Sourdough Bread
The Day Before: Making the Sourdough
- Mix wet ingredients: In a large bowl, add in your active sourdough starter, water, and olive oil and whisk to combine.
- Add dry ingredients: Add the flour and salt and mix together using either a spatula or your hand. I prefer my hand so you can feel exactly how wet or dry your dough is.
- Form a dough ball: Bring your dough together to form a ball that cleans the bottom of the bowl. (If your dough is a little on the dry side add a splash more water).
- Remove the dough from the bowl and grease that bowl with a little olive oil. Place your dough back into the bowl and tightly cover with cling wrap and a dishtowel.
- Bulk fermentation: Set aside the dough to bulk ferment for roughly 12-18 hours. If you are unable to bake it off after this time place it in the fridge for up to 3 days.

The Next Day: Shape, Proof and Bake
- Fold and stretch: Complete one round of stretch and folds: Wet your hands to prevent sticking, then grab an edge of the dough and pull it out and over the ball of dough. Turn the dough a quarter turn and pull and fold the next side. Do this two more times. Repeat the stretch and folds two more times.

- Shape: On a flourless surface, shape the dough into a boule or a ball by pushing the dough against your counter to make it round and smooth.
- Lay a kitchen towel in a bowl or bread basket and dust it generously with flour or rice flour.
- Place your dough into the bowl with the seams facing you and the smooth side down. Cover over with the towel so that none of the dough is exposed to the air. (Air is not a doughs friend so keep it well covered so it doesn’t form a skin)
Proofing the Sourdough:
- Final proofing: Proof the dough for roughly 1 ¾ -2 ½ hours or until the bread has risen to almost double the size. Don’t rush this dough rise, if your bread is not ready then give it the time it needs. Once the dough is well risen and feels almost lighter and not as dense then it’s time to bake it off.

Bake the Sourdough
Baking in Dutch Oven: Method 1
- Prep: Preheat your oven to 450°F (225°C) and place a tray on a lower shelf in the oven.
- Skip the proofing bowl and allow the dough to proof in the actual dutch oven for the time given above. Making sure to line it with parchment or dust with flour beforehand.
- Turn down the oven to 400°F (200°C). Score the bread with a blade and bake the with the lid on for roughly 25-30 minutes. Remove the lid and continue to bake in the pot for the remaining time.

Baking the Sourdough: Method 2
- Safely and carefully turn the dough out onto a different floured flat baking tray. Gently, shape it back into a round loaf with your hands by pushing the seams underneath the bread.
- Score bread: Score the bread with a blade or a sharp knife or razor blade.
- Turn down the oven to 400°F (200°C) and slide your bread onto your pre-heated tray.
Creating Steam in the Oven:
Large Metal Bowl:
-
Place a large metal oven-proof bowl directly over the dough immediately as it goes into the oven. This bowl will create steam around your loaf. Carefully remove the metal bowl after 30 minutes and bake as normal for the remaining time. Tip: An 18/10 stainless steel pot with stainless steel handles will work well for this.
Cake Pan with Water:
-
Place a cake pan or shallow baking tray in the oven with hot water to create steam for the bread giving it a nice color and chewier crust. Carefully remove the cake pan of water after 30 minutes and bake as normal for the remaining time.
-
Once the crust is crisp, a deep golden brown and sounds hollow when tapped remove from the oven. Note: the crust softens once it cools so just note that you might think it got too crisp but a little later it will be softer.
-
Allow cooling down completely before cutting your bread. It’s tempting, but don’t cut hot bread, it’s just not the same. Let it cool down for at least 2-3 hours before cutting.
-
Store your sourdough covered at room temperature for up to 3 days. And CONGRATS! You just made a loaf of sourdough bread from scratch.

Gemma’s Pro Chef Tips
- I recommend bread flour and not all-purpose flour when making my simple sourdough bread recipe. The extra gluten yields you a bubblier crumb and a chewier bread.
- Place a large metal bowl, which must be oven-proof (#304, #430, or 18/10 stainless steel), over your dough in the oven. The bowl will create steam around the bread and give you a chewier crust. Bake like this for the first 30 minutes.
- Bake your sourdough on a pre-heat tray to give your bread a crisp crust. It also aids in the oven spring.
- If your dough appears cold and sluggish then place it near a heat source like an oven that is cooling down.
- Refrain from opening the door too much while baking as to not let out the heat that will give you a crisp crust.
- Allow your bread to cool completely before cutting: I know it’s tempting but it is at its best when it has fully cooled.
- For sourdough discard, find detailed guide and discard recipes here: Sourdough Starter Recipe.
Make Ahead and Storage Instructions
Make-Ahead Instructions:
- Dough Preparation: You can prepare the dough up to the point of the first rise (bulk fermentation) and then store it in the refrigerator to slow down fermentation. Simply cover the dough with plastic wrap or a damp kitchen towel and let it rise in the fridge for up to 24 hours. When ready to bake, allow the dough to come to room temperature before shaping and continuing the recipe as instructed.
- Sourdough Starter: Make sure it’s fed and active before using it in this recipe. More details can be found in my Sourdough Starter Recipe .
- At room temperature:
-
If you bake often, store your starter at room temperature (ideally between 78°F/25°C and 82°F/26°C) feeding it once or twice a day to keep it active.
-
- Short-Term Storage (Up to 1 Week):
- Keep your starter in the refrigerator in a clean jar with a fitted lid.
- Feed it once every 7 days to maintain its activity.
- Long-Term Storage ( at least 1-3 Months):
- Refrigeration: Feed the starter, let it rest at room temperature for a few hours, then refrigerate. Feed it again before baking to reactivate it.
- At room temperature:
Storage Instructions:
- Room Temperature: Once baked, allow your sourdough bread to cool completely on a wire rack before storing it. To keep the bread fresh for 3–4 days, store it in a paper bag or a bread box. This will allow the crust to stay crisp while the inside remains soft.
- Freezing: If you want to store the bread for longer, slice it and freeze the pieces in a zip-top bag or airtight container for up to 3 months. To thaw, simply leave the slices at room temperature or toast them directly from the freezer.
Serving Options and Variations
Savory Options:
- Butter – Homemade Butter, Ultimate Keto Coconut Butter,
- Savory Compound Butters – Herb-infused butters (garlic, rosemary, or parsley) add extra flavor: Blue Cheese Compound Butter, Chipotle Lime Compound Butter, Sun-Dried Tomato Compound Butter, and Roasted Garlic And Herb Compound Butter.
- Avocado Toast – Top your sourdough with mashed avocado, a sprinkle of sea salt, and maybe a drizzle of olive oil.
- Cheese – Creamy cheeses like goat cheese, brie, or sharp cheddar complement the tangy sourdough.
- Eggs – Serve with poached eggs, scrambled eggs, or a classic fried egg for a hearty breakfast.
- Soup – Pair with a warming soup, like Potato Soup, tomato or butternut squash soup, for a comforting meal.
- Charcuterie Board – Sourdough pairs wonderfully with meats, cheeses, olives, and other charcuterie board staples.
Sweet Options:
- Jam or Marmalade – A dollop of homemade strawberry jam, raspberry jam, blackberry jam, Sweet and Boozy Peach Whiskey Jam, or Orange Marmalade.
- Honey – Drizzle warm sourdough with honey or maple syrup for a sweet treat.
- Sweet Compound butters – Strawberry Compound Butter, Maple Pecan Compound Butter, Orange Honey Compound Butter, Vanilla Bean Compound Butter, and Chocolate Compound Butter.
- Nut Butters – Peanut Butter, Almond Butter, Chocolate Macadamia Nut Butter adds a creamy texture and nutty flavor to your toast.
- Or cookie butters: Nutter Butter Cookie Butter, Oreo Cookie Butter, Shortbread Cookie Butter.

FAQs
How would you describe sourdough bread? What does sourdough bread taste like?
Sourdough bread has a distinct and unique flavor profile compared to bread made with commercial yeast. Here are some characteristics of the taste of sourdough bread:
- Sourdough bread has a mild to pronounced tangy or sour taste and a complex flavor of earthiness, subtle sweetness, and nutty aroma.
- Typically, sourdough bread has a chewy and slightly crispy crust, and an open crumb structure with irregular and uneven air pockets.
- If whole-grain flours are used, sourdough bread also offers additional depth and a hearty taste.
Can I use rye in my starter and sourdough bread?
Yes. A starter made with rye flour will be much more vigorous when compared to wheat flour due to its higher amylase content.
- This can be beneficial if you are looking to make a starter more quickly.
- Baking sourdough bread using wheat flour with a rye starter will result in a loaf with a mildly sour flavor and a denser crumb when compared to a loaf baked with a wheat flour starter.
- If you want to use rye flour in addition to your rye starter in your loaf, use no more than ¼ of the total flour in the recipe. Rye flour has far less gluten than wheat flour and will not develop through autolyzing (wetting the flour) or kneading, and will result in a flat and dense loaf if more rye than that is used.
Why didn’t my sourdough rise?
- Inactive Starter: Ensure that your starter is consistently doubling in size within a few hours after feeding.
- Insufficient Feeding: An unfed starter may lack the strength to leaven the bread. Make sure your starter is at its peak activity when incorporated into the dough.
- Underdeveloped Gluten: Insufficient gluten development can lead to a weak structure that can’t hold the gas produced during fermentation. Knead or fold the dough adequately during bulk fermentation to strengthen the gluten.
- Incorrect Dough Hydration: Too much or too little water in your dough can affect its texture and rise. Adjust the hydration based on factors such as flour type and environmental conditions.
- Inadequate Bulk Fermentation: Insufficient bulk fermentation would not allow enough time to develop flavor and structure. Extend the bulk fermentation time as needed.
- Over Fermentation: On the other hand, over fermentation can result in exhausted yeast, leading to a lack of rise.
- Improper Proofing Conditions: If the final proofing conditions are too warm or too cool, it can affect the yeast activity. Find a suitable, consistent temperature of around 75°F (24°C) for proofing and adjust the time accordingly.
- Poor Scoring: Inadequate or improper scoring can restrict the dough’s expansion during baking. Make sure your cuts are deep enough and have the right pattern to allow controlled expansion.
- Lack of Steam in the Oven: Steam is crucial for creating a flexible crust that allows for good oven spring. Use a covered pot, Dutch oven, or introduce steam into the oven with a pan of hot water during the initial baking phase.
- Incorrect Oven Temperature: Baking at too low or too high a temperature can affect the rise. Start with a high temperature for the initial oven spring, then lower it as needed.
- Environmental Factors: Room temperature, humidity, and other environmental factors can influence the fermentation process. Be mindful of these conditions and make adjustments to your process as needed.
How to get a better oven spring in sourdough?
- Healthy and Active Starter: Ensure that your sourdough starter is healthy and active. A vigorous starter contributes to better fermentation and gas production, promoting oven spring.
- Proper Fermentation: Allow the dough ample time to undergo proper bulk fermentation (anywhere from a few hours to overnight, depending on the recipe). This phase contributes to flavor development and the production of gasses which is crucial for an airy, well-risen loaf.
- Appropriate Dough Hydration: Adjust the hydration level of your dough based on your flour type and environmental conditions. A moderately hydrated dough is often easier to handle and encourages good oven spring. A low to medium hydration of 60% to 70% is recommended for beginners.
- Optimal Gluten Development: Ensure that the gluten in your dough is adequately developed. This can be achieved through effective kneading or folding during bulk fermentation. Gluten will also develop with enough time when fermenting dough overnight.
- Preheat Your Oven: Preheat your oven thoroughly before baking. A hot oven provides the initial burst of heat needed for optimal dough expansion.
- Score the Dough: Score the top of your shaped dough just before baking. Proper scoring helps control the expansion of the dough during baking, preventing it from tearing irregularly.
- Steam the Oven: Introduce steam into the oven during the initial stages of baking to keep the crust flexible, allowing for better expansion.
- Bake at High Temperature: Start baking at a high temperature (e.g.450°F or 232°C) to encourage rapid lift.
- Handle the Dough Gently: Don’t put too much surface tension on your dough to avoid degassing it excessively.
- Allow Proper Rest Before Baking: After the final shaping, give the dough around 5-10 minutes to rest , then score and place it in the hot oven. This helps the dough relax and allows for better expansion during baking.
More Easy Sourdough Recipes
IMPORTANT NOTE: This recipe was improved and updated on 1/7/2025, to include NEW step-by-step photography, key ingredients explanations and substitutes, make-ahead and storage instructions, serving options and variations, and Pro Chef Tips.
Try These Recipes!


Watch The Recipe Video!
Easy Sourdough Bread Recipe

Ingredients
- ½ cup (4 oz/115 g) active sourdough starter
- 1 cup (8 fl oz/225 ml) lukewarm water
- 2 tablespoons olive oil
- 2 ¾ cups (14 oz/389 g) bread flour
- 2 teaspoons salt
- Olive oil for greasing
Instructions
The Day Before: Making the Sourdough
- In a large bowl, add in your active sourdough starter, water, and olive oil and whisk to combine.
- Add the flour and salt and mix together using either a spatula or your hand. I prefer my hand so you can feel exactly how wet or dry your dough is.
- Bring your dough together to form a ball that cleans the bottom of the bowl. (If your dough is a little on the dry side add a splash more water).
- Remove the dough from the bowl and grease that bowl with a little olive oil. Place your dough back into the bowl and tightly cover with cling wrap and a dishtowel.
- Set aside the dough to bulk ferment for roughly 12-18 hours. If you are unable to bake it off after this time place it in the fridge for up to 3 days.
The Next Day: Shape, Proof and Bake
- Complete one round of stretch and folds: Wet your hands to prevent sticking, then grab an edge of the dough and pull it out and over the ball of dough. Turn the dough a quarter turn and pull and fold the next side. Do this two more times. Repeat the stretch and folds two more times.
- On a flourless surface, shape the dough into a boule or a ball by pushing the dough against your surface to make it round and smooth.
- Lay a kitchen towel in a bowl or bread basket and dust it generously with flour.
- Place your dough into the bowl with the seams facing you and the smooth side down. Cover over with the towel so that none of the dough is exposed to the air. (Air is not a doughs friend so keep it well covered so it doesn’t form a skin)
Proofing the Sourdough
- Proof the dough for roughly 1 ¾ -2 ½ hours or until the bread has risen to almost double the size. Don't rush this step, if your bread is not ready then give it the time it needs. Once the dough is well risen and feels almost lighter and not as dense then it’s time to bake it off.
Baking with Metal bowl: Method 1
- Pre-heat the oven to 400°F (200°C).
- Safely and carefully turn the dough out onto a different floured flat baking tray. Gently, shape it back into a round loaf with your hands by pushing the seams underneath the bread.
- Score the bread with a blade or a sharp knife.
- Slide your bread onto your pre-heated tray and immediately place a large stainless steel oven-proof bowl immediately over the dough. This bowl will create steam around your loaf. Carefully remove the metal bowl after 30 minutes and bake as normal for the remaining time. Tip: You must use a #304 or #430 grade stainless steel bowl or A 18/10 stainless steel pot with stainless steel handles will work well for this.
Baking in Dutch Oven: Method 2 (Preferred Method)
- Skip the proofing bowl and allow the dough to proof in the actual dutch oven for the time given above. Making sure to line it with parchment or dust with flour beforehand.
- When ready to bake pre-heat the oven to 400°F (200°C) and score the bread.
- Bake the sourdough with the lid on for roughly 25-30 minutes. Remove the lid and continue to bake in the pot for the remaining time.
Baking the Steam Bath: Method 3
- Place a cake pan or shallow baking tray in the oven with hot water to create steam for the bread giving it a nice color and chewier crust. Carefully remove the cake pan of water after 30 minutes and bake as normal for the remaining time until a rich golden brown.
- Store your sourdough covered at room temperature for up to 3 days. It also can be frozen for up to 8 weeks. CONGRATS! You just made a loaf of sourdough bread from scratch.


Hi Gemma, I hope you are doing well in these crazy times… Great to encourage people to make their own breads. Particularly now. I just wanted to add a tip to your Dutch Oven method. This is really the easiest way to get a wonderful crunchy crust but I would recommend heating the pot in the oven as it’s preheating and even letting it stay in a little longer before adding the bread. This gives you that “oven spring’ and helps create the perfect crumb as well. And no dusting of the pot is necessary when you do it like… Read more »
I spent awhile looking for sourdough recipes, and this one was by far the easiest to follow. I’m sure there are a lot of great recipes out there, but most of us don’t need a ten-page-dissertation. This article was just the right amount of information and our bread turned out great (we used the metal-bowl technique and used all-purpose flour with a great result). Tomorrow will be a “two-loaf” day!
Hi mam I am a 11 year old can i bake this bread in a microwave? I am planning to make this next week please reply
Gemma, thank you for this wonderful recipe. As an enthusiastic but apprehensive sourdough lover, I’ve been maintaining my starter for over 10 years, although I must confess I have only occasionally used it for its originally intended purpose, because I have found learning to make sourdough bread very difficult for me. Your recipe resulted in the first sourdough loaf I have ever baked that I really enjoyed the result of – it was beautiful AND delicious. Many sites and bloggers insist that high hydration is essential to making sourdough bread – clearly, you and Emilie at Clever Carrot have proven… Read more »
I have been baking sourdough bread almost daily for the last 6 weeks, and my whole family agrees that this is the best recipe I have tried so far!
Can you bake this bread in a loaf pan? Also, can I use at least half whole wheat? I usually make bread with my own fresh ground flour. Thank you in advance.
This is Day 1 of starter. So looking forward to this journey.
Am in New Zealand’s lockdown.
Just took my bread from the oven & it looks beautiful! Used 1 cup all purpose flour the remainder bread flour. Next time I’ll try some whole wheat. Thanks for creating this EASY recipe!
OMG! Finally, a sour dough recipe that’s easy and it WORKS!! I made my first successful loaves of sourdough bread after watching your video and following the instructions. It felt like having a friend right there helping me in the kitchen. My family is probably even more excited than me after tasting the final product. Thank you!
Hi Gemma greetings!
My crust is not edible. It’s very hard. It was crispy but now it is not. How is the bread supposed to feel like when you bite into it ?
And what should I do to solve this ? I have cut the bread into slices. Also I have a very dense crumb.
Thanks,
Shruthi