This post may contain affiliate links. Please see my full disclosure for details.
Hi Bold Bakers!
Have you ever heard me say I’m not a cake decorator? I mean at all! Over 15-plus-years as a professional pastry chef, I was rarely in the position where I had to decorate a cake — never mind covering the thing in fondant.
So, why make marshmallow fondant? More traditional rolled fondant recipes require a few more ingredients and you more than likely won’t have them on hand. Marshmallow Fondant is a bag of marshmallows and icing sugar, That’s all you need.
Making your own fondant is inexpensive and fast. I have a great tip on fondant making and coloring on this post for my traditional Fondant recipe.

The Difference Between Marshmallow Fondant And Regular Fondant
Actually, there is really very little difference between marshmallow fondant and traditional fondant when it comes to the ingredients in them. Although marshmallow fondant is just 3 ingredients, and traditional fondant is many more, they are basically made up of the same things.
Marshmallows fondant is quicker and easier to make because the first step is already done for you when you use marshmallows that are already made. Basically, all you need to do is melt down the marshmallows, then add a little water and powdered sugar to get it to the right consistency. If you are new to cake decorating and are starting out, I strongly recommend marshmallow fondant over traditional fondant.
From start to finish I just find it so much easier to work with!
What You Need to Make Your Own Marshmallow Fondant
- 1 bag of mini marshmallows
- Water
- Powdered Sugar
- Flavorless Oil
- A Kitchen Mixer (see also how to make by hand)
How To Make Your Own Marshmallow Fondant
Quick and easy, with very few ingredients — that’s how! Get the full recipe with measurements on the page down below):
- First, you need to melt your marshmallows. Pour your big bag of marshmallows into a microwave-safe bowl, add a little bit of water, and put it in the microwave until melted.
- Once melted, you add in your icing sugar (recipe measurement below!), and you mix — you can do this by hand, but it will take some elbow grease for sure.
- After the fondant begins to come together, you drop it onto a well-oiled surface and you knead (and add some more icing sugar) until it’s nice and smooth!
- Once it’s kneaded, you can then add any color you’d like to it.

How To Store Marshmallow Fondant
To store Fondant and use at a later date, cover it in a little vegetable oil (like below) and store it in an airtight bag. The less air the better so your fondant doesn’t dry out.
Also, you can always use your leftover fondant to make Homemade Sprinkles. And you can make your own Homemade Marshmallows too!
How to Decorate a Cake with Fondant?
- Cover your cake in a thin layer of buttercream frosting to create a crumb coat. For more info check out my How to Do A Crumb Coat.
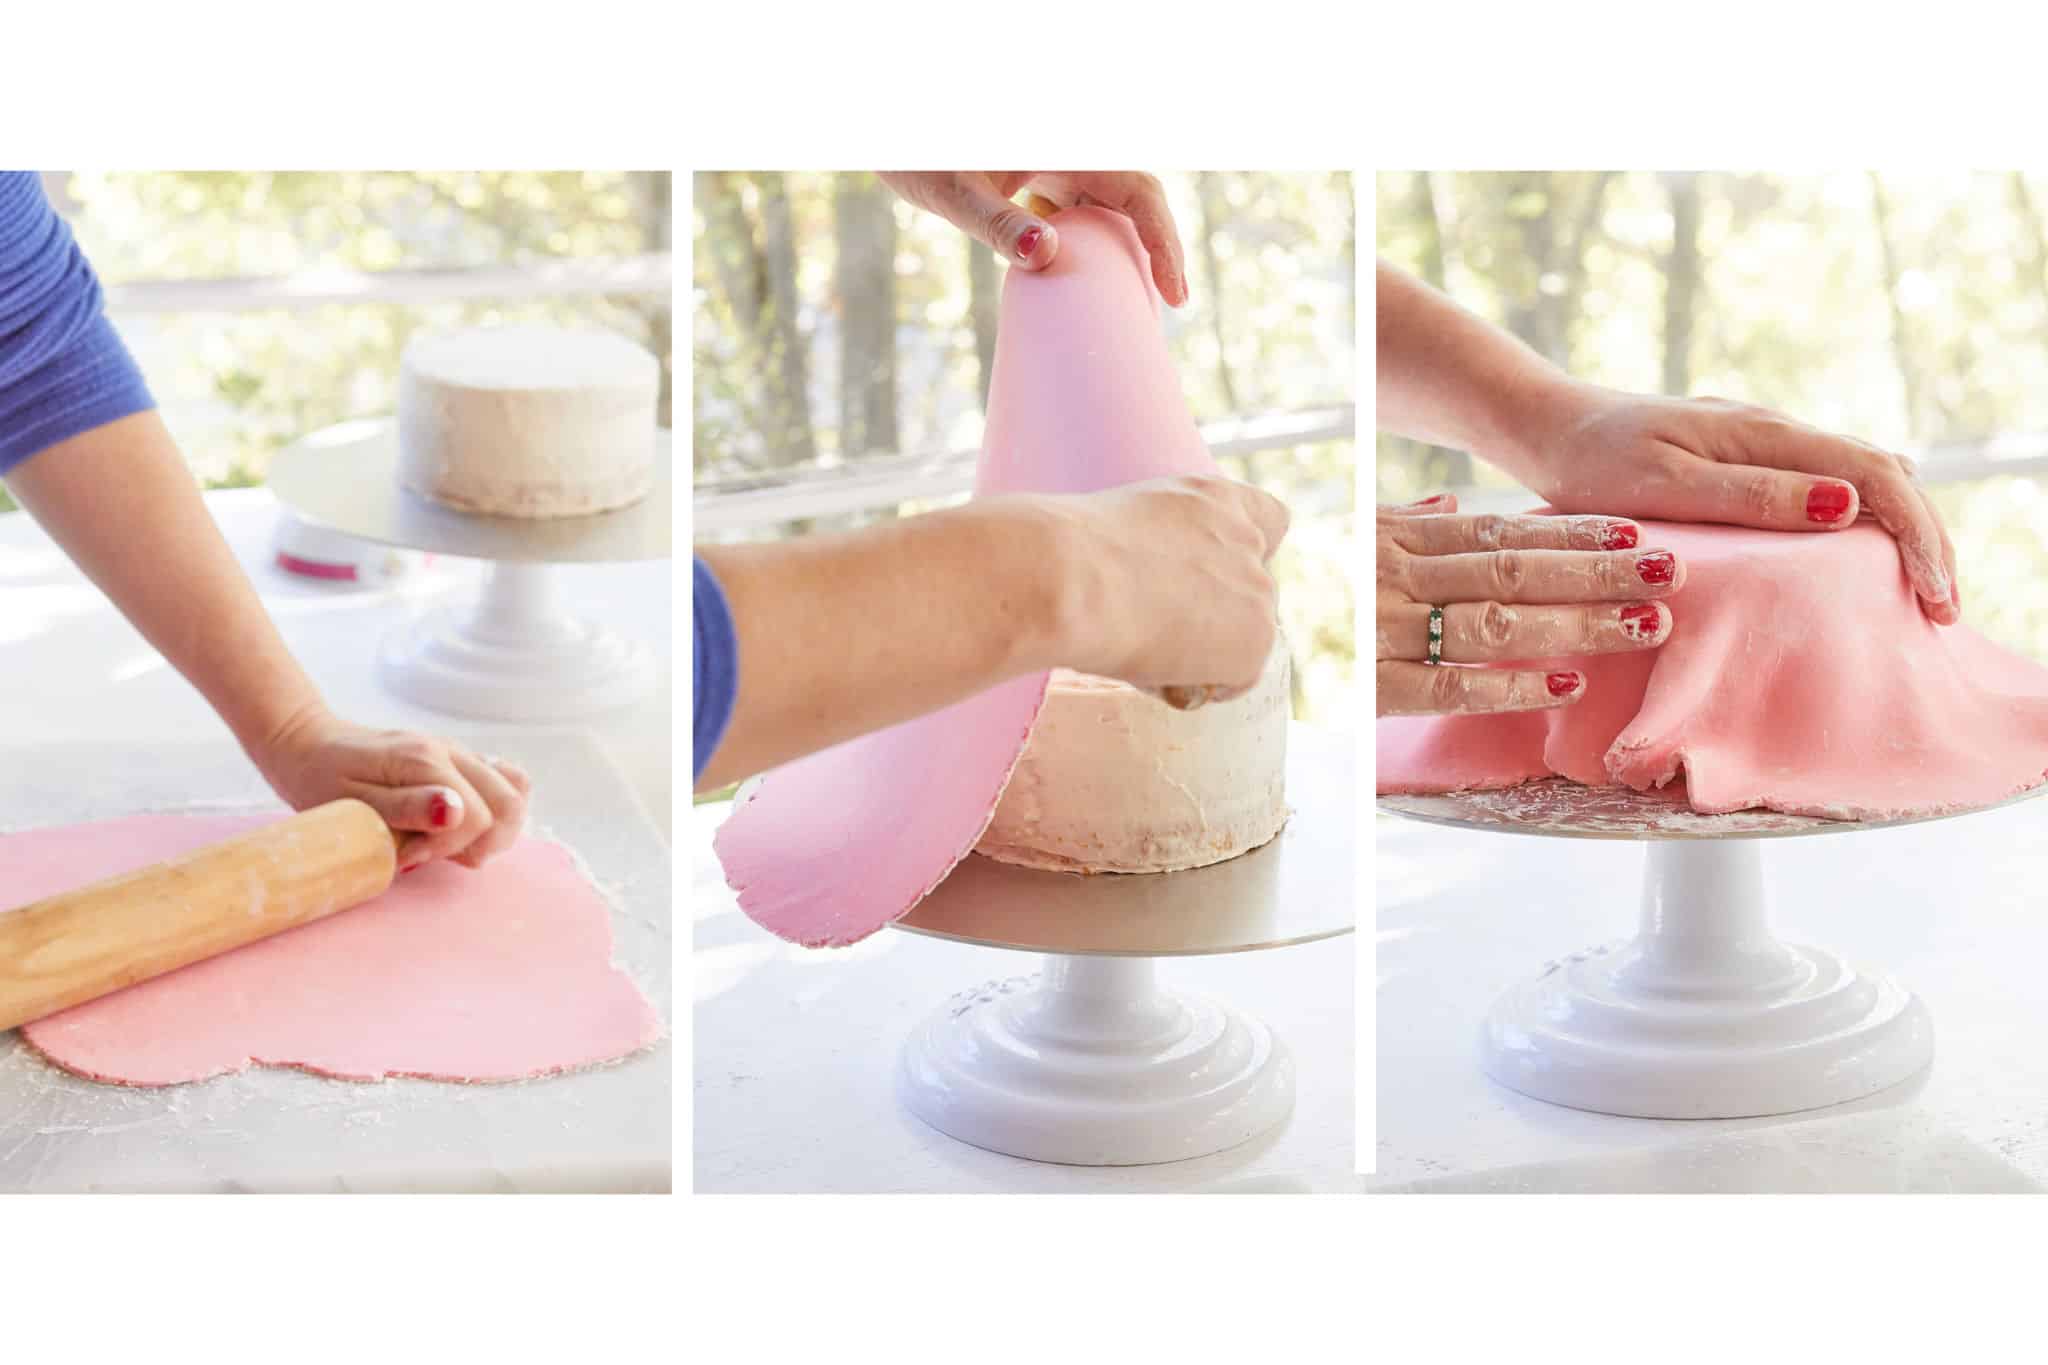
- Roll out marshmallow fondant on a surface dusted with powdered sugar or cornstarch. If your fondant is hard you can microwave it for a few seconds to soften it so it is easy to roll.
- Using your rolling pin gently drape the fondant over the cake
- Using your hands press and shape the fondant to the sides of the cake until smooth.
- Cut off any excess fondant. Tuck what remains under the cake and smooth it out to look flush.

Use Marshmallow Fondant with these Cakes!
- Gemma’s Best Ever Chocolate Cake
- Gemma’s Best-Ever Carrot Cake
- Gemma’s Best-Ever Vanilla Birthday Cake
- Celery Stamped Rose Painted Cake
- 10-Minute, 3-Layer Chocolate Cake
Follow Bigger Bolder Baking on Facebook for even more easy recipe videos!
Try These Recipes!


Watch The Recipe Video!
How to Make Marshmallow Fondant

Ingredients
- 1 Bag (16oz /453g) mini marshmallows (good brand)
- 2-3 tablespoons water
- 4 cups (453g/1lb) powdered sugar
- Flavorless oil (little for hands while kneading)
Instructions
- First melt marshmallows and water in a double boiler or in a microwave for 30 seconds at a time. Set aside once melted.
- *To make it in a kitchen mixer*, add in 3/4 of the powdered into the mixing bowl, followed by the marshmallow mixture, then mix together on low speed until you have incorporated a lot of the sugar and your fondant is coming together to form a ball. (NOTE: If your dough is still sticky at this point, add more powdered sugar until it forms a ball.)Then turn out on the counter add the rest of the reserved sugar bit by bit. Then knead — Knead Knead! — for about 7 minutes until it is soft and shiny. If it starts to feel a bit dry, add 1/2 Tbsp. water at a time until it feels soft and pliable – then keep kneading.
- *By hand*, stir 3/4 of the powdered sugar into the marshmallow mixture, then knead in the remaining 1/4 until it is all incorporated into the mixture. Then turn out on the counter and Knead Knead Knead! for about 7 minutes until it is soft and shiny. Incorporate the reserved sugar as you knead. If it starts to feel a bit dry, add 1/2 Tbsp. water at a time until it feels soft and pliable – then keep kneading.
- Note: be sure to grease your hands and counter before dumping mixture from bowl
- To add color to your fondant. Add a small amount of food coloring with a toothpick, then Knead Knead Knead! for about 7 minutes until it is soft and shiny. If it starts to feel a bit dry, add 1/2 Tbsp. water at a time until it feels soft and pliable – then keep kneading.
- To store your fondant to be used later, grease the outside of the ball and double wrap in saran wrap, then put in a ziplock bag to keep it moist.
- Roll your fondant on on your surface well dusted with icing sugar. Move it around so it is not sticking in one spot. Roll it to the desired size of your cake.
- For the hearts cut them out with a cutter. You can actually cut these out in advance and let them dry out. I let my hearts dry out in the open air to firm them up. They are easier to apply when they are firm.
- Your Fondant will last for weeks when stored airtight. Even your cut out hearts will stay perfect until you need them.


This is the simplest, most perfect recipe! I halved the recipe because I just didn’t need a whole batch. I pulverized freeze dried strawberries (1oz) into a powder and sifted them in with the powdered sugar. Beautiful pink color and strawberry tart/sweet flavor with out the use of any dyes or extracts! Required the use of A bit more water- didn’t measure, just added as needed for pliability. Sooo yummy! I imagine you could use any freeze dried fruit for a multitude of natural colors and flavors!!!
my foundant wont harden whet should i do?
I honestly do not understand all of these negative comments/feedback. I have made MMF using this recipe sooo many times and it has always worked! Of course it’s not the same texture as store bought fondant, it’s better! most people are just used to store bought where as this is light and super stretching and OMAZINGLY tasty, unfortunately my husband is allergic to something in store bought Marshmellow but he can eat the homemade marshmallows that this lady also has a tutorial on. Different places around the world, the time of year, the temperature in your kitchen can all play… Read more »
this is nothing like normal fondant, I couldn’t even roll it even after using exactly what the recipe said
Hi Gemma, I rarely use fondant, but want to make a buttercream cake with fondant flower decorations on top. I’m fascinated by the marshmallow fondant – will this act the same way that store-bought fondant does? My plan is to make the flowers ahead of time and let them dry, then apply them to the cake around noon, to be used after dinner as dessert. Will marshmallow fondant dry and hold a shape the way store fondant would? If not, what sort of differences would you expect please? Thanks for all your fab videos and ideas, I love your website!… Read more »
This is by far the BEST fondant recipe out there!
Should have looked at the cakes before trying this. After making this, anyone who thinks this is just like regular fondant is nuts.
How much does this recipe make?
Hi gemma .
Love this fondant but my problem is always the fondant rips and can always see bumps from the cake can u help me in covering the cake the right way and do you double cover your cakes
I tried it and since it was my first time doing it I think I did well and it tastes really good .Thank you Gemma