This post may contain affiliate links. Please see my full disclosure for details.
Hi Bold Bakers!
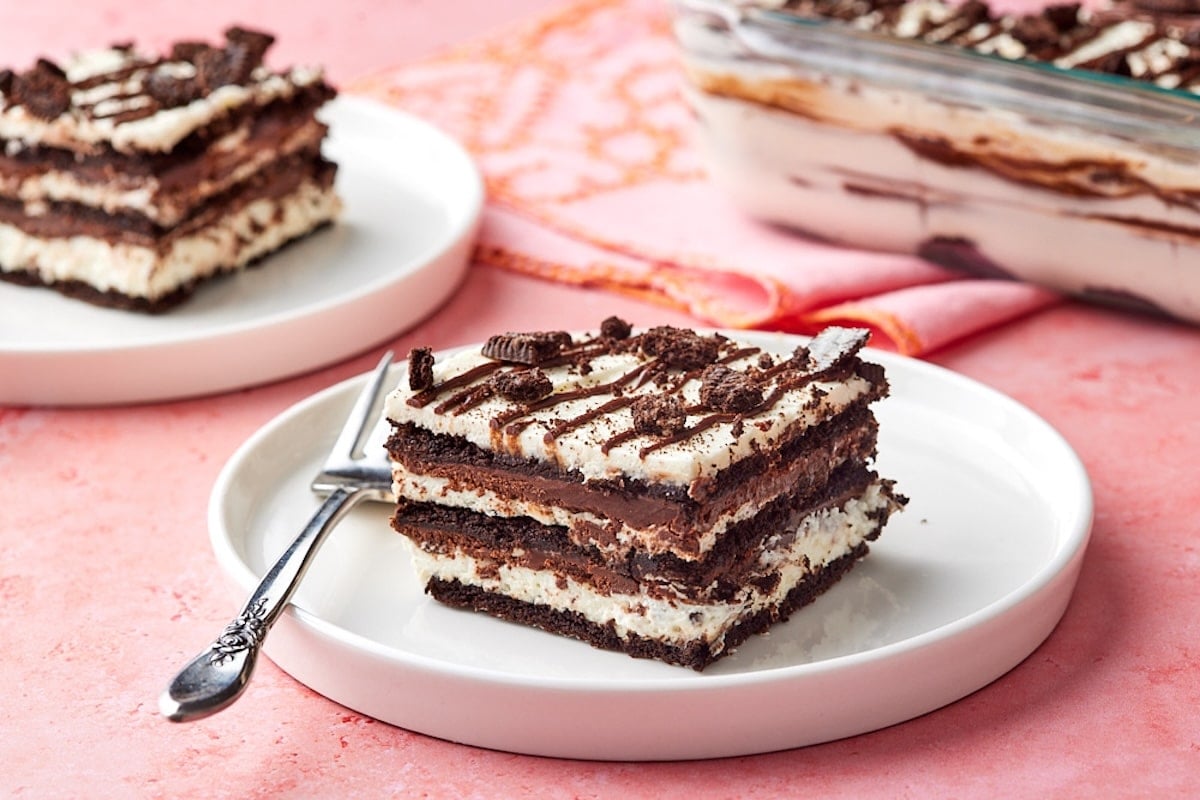
WHY YOU’LL LOVE THIS RECIPE: My indulgent Chocolate Icebox Cake elevates a nostalgic favorite into a showstopping dessert that’s just as perfect for special occasions as it is for casual gatherings. This easy no-bake recipe delivers big flavor with minimal effort—everyone will come back for seconds!
- Luscious texture: A light creamy filling is layered with soft cookies and rich, fudgy ganache.
- Perfectly balanced: Tangy cream cheese and bittersweet chocolate keep this dessert from going too sweet.
- Hands-off prep: Simply layer and chill.
- Elegant look: Classic black-and-white layers give this homey dessert a polished look.
- Everyone’s favorite! Cookies-and-cream flavor and cheesecake vibes—this dessert suits everyone!
I adore creamy desserts, and I wanted to give you an easy go-to for spring and summer that both kids and grown-ups adore. Icebox cakes are a timeless favorite, and my Chocolate Icebox Cake delivers with its creamy layers and deeply choclately flavor, all with minimal fuss. You can’t miss with an Oreo-based dessert, and you’ll also love my No-Bake Oreo Cheesecake, Oreo Crumbl Cookies, and Cookies and Cream Ice Cream Cake.
My top tip: When making the ganache, don’t let the cream get too hot before you pour it on the chocolate. Heat the cream until it’s steaming, but not boiling. The cream is ready when you can place a finger in the cream and keep it there for 3 to 4 seconds. Once you add the cream, stir gently. Overheating or aggressive stirring could cause the ganache to separate. For more ganache tips and other ways to use it, check out my guide.
Table of Contents
- What is Chocolate Icebox Cake?
- Tools You Need
- Key Ingredients and Substitutes
- How to Make Chocolate Icebox Cake
- Gemma’s Pro Chef Tips
- Make-Ahead and Storage Instructions
- Flavor Variations and Mix-ins
- FAQs
- More No-Bake Recipes

What is Chocolate Icebox Cake?
Chocolate Icebox Cake is a no-bake dessert made by layering Oreo wafers with a creamy filling that softens the cookies as it chills, creating a sliceable, cake-like texture. The chocolate cookies, cream cheese mixture, and chocolate ganache give this icebox cake a cookies-and-cream twist. This type of chilled cake became popular in the early 20th century with the rise of home refrigeration, where “iceboxes” were utilized to allow home cooks to create desserts without baking.
Tools You Need
- Mixing bowl
- Measuring spoons
- Measuring cups
- Glass measuring jug
- Kitchen scale (optional)
- Heat-proof bowl
- Medium saucepan
- Silicone spatula
- Stand mixer (optional) or electric hand mixer
- 8×8-inch (20x20cm) pan
- Offset spatula
Key Ingredients and Substitutes
For the Chocolate Ganache
Bittersweet chocolate
- The deep flavor of bittersweet chocolate gives the ganache a bold cocoa taste.
- Use finely chopped chocolate here so it melts easily into the cream.
- To learn about chocolate in baking, go to my Ultimate Guide to the Different Types of Chocolate.
- Substitute: For a sweeter ganache, use semi-sweet chocolate.
Heavy whipping cream
- Heavy whipping cream gives ganache a rich flavor, velvety mouthfeel, and glossiness.
- The high fat content of heavy whipping cream (about 36%) is crucial for creating a stable ganache that won’t split.
For the Cream Cheese Filling
Cream cheese
- Cream cheese thickens and stabilizes the cake filling.
- Additionally, the cream cheese gives the chocolate refrigerator cake a delightfully tangy flavor.
- Use brick-style, full-fat cream cheese (not cream cheese spread from a tub) in this recipe to ensure a perfectly thick filling.
- Before whipping, make sure your cream cheese is softened to room temperature for easier mixing.
- Be sure to whip the cream cheese until it’s smooth before adding the cream. This prevents lumps.
- Substitute: You can use an equal amount of mascarpone cheese in place of cream cheese (the filling won’t be as tangy).
Heavy whipping cream
- Heavy cream is whipped with the cream cheese to make a light, fluffy filling.
- Whipping the cream yourself gives you the superior flavor and texture you want in this icebox cake recipe—Using store-bought cream won’t give the same results.
Powdered sugar
- Powdered sugar (confectioners’ sugar) sweetens the cream filling and balances the tanginess.
- Importantly, powdered sugar creates a smooth filling.
- Make your own powdered sugar easily with my two-ingredient recipe.
Vanilla extract
- Vanilla extract rounds out the flavors and enhances the chocolate.
- Use the same amount of Vanilla Bean Paste if you’d like.
For Assembling the Icebox Cake
Oreos
- Oreos provide the structure in this refrigerator dessert.
- The Oreo cookies absorb the moisture and soften as the cake chills, forming soft, cake-like layers.
- Only the Oreo wafers are used here—scrape out the filling before layering the cookies.
- Substitute: You can use gluten-free Oreos to make a gluten-free dessert
- You can also use another type of chocolate sandwich-cookie wafers, or chocolate wafer cookies, or Chocolate Graham Crackers.
How to Make Chocolate Icebox Cake
Make the Bittersweet Chocolate Ganache
- Add the chocolate: Place the chopped chocolate in a small heatproof bowl.
- Heat cream: In a small saucepan, heat the cream over medium heat until simmering.
- Combine cream and chocolate: Pour the cream over the chocolate and let it stand undisturbed for 5 minutes.
- Stir: Stir gently until fully emulsified. Allow to cool to room temperature.
Make the Cream Cheese Filling
- Whip cream cheese: In a stand mixer with a whisk attachment (or with a handheld mixer and a large bowl), whip the cream cheese on medium speed until smooth and fluffy, about 2 minutes.
- Begin to add the cream: Add about half of the cream and whisk until smooth to loosen the cream cheese.
- Mix in all ingredients: Add the remaining cream, powdered sugar, and vanilla extract, and mix until blended.
- Whip mixture: Increase the speed to medium-high and whip until medium-stiff peaks form, about 3 minutes.
Assemble the Cake
- Prepare cookies: Split the Oreos in half. Scrape out and discard the cream.
- Arrange bottom layer: Arrange 16 Oreo halves in an even layer in an 8-inch (20 cm) square pan.

- Add filling: Spread one-third of the cream cheese filling evenly over the cookies.

- Top with ganache: Drizzle one-third of the bittersweet chocolate ganache over the filling.

- Continue layering: Repeat this process twice more. Use a knife to gently swirl the top of the final layer, if desired.

- Chill mixture: Cover tightly and refrigerate for at least 6 hours, until the cookies soften.
FULL (PRINTABLE) RECIPE BELOW!
Gemma’s Pro Chef Tips
- Use very finely chopped chocolate. When making the ganache, finely chop the chocolate so it melts evenly when the hot cream is added.
- Cool the ganache to room temperature before assembling. Ganache that’s too warm could deflate the cream layer in this icebox cake with chocolate wafers.
- Whip the cream cheese until completely smooth before adding the whipping cream. This will prevent a lumpy filling.
- Use thin chocolate cookies in this recipe. I used Oreos because they’re easy to find, but chocolate wafer cookies or chocolate Graham crackers work as well.
- Use an offset spatula. It makes spreading the cream cheese filling much easier and helps keep the layers even.

Make-Ahead and Storage Instructions
Make-ahead tips
- This icebox dessert must chill and set—make it at least 6 hours before serving.
- The ganache can be prepared and stored in an airtight container in the fridge for up to one week.
How to store leftovers
- Store leftovers, tightly covered, in the refrigerator for up to three days.
- I don’t advise freezing leftovers, as it will change the texture.
Flavor Variations and Mix-Ins
- Change up this icebox cake recipe by using Graham crackers or Biscoff cookies instead of chocolate wafers.
- Add a fruity twist by scattering a few fresh raspberries over the cream cheese layer, or make a Homemade Raspberry Sauce to drizzle on with the ganache.
- Use different fruits — layer sliced bananas, strawberries, or cherries between the layers.
- For extra cookies-and-cream flavor, mix in some Oreo crumbs to the cream cheese mixture.
- Sprinkle chopped, toasted walnuts, almonds, or hazelnuts over the cookie layer.
- Drizzle with peanut butter sauce or salted caramel sauce.
- Dust with cocoa powder, or top with chocolate curls.

FAQs
Can I make this chocolate cream cheese dessert by hand?
- You can absolutely make this chocolate cream cheese dessert by hand, but it will take a little effort and patience.
- Be sure to soften your cream cheese to room temperature before beginning.
- Use a spoon, whisk, or spatula to beat the cream cheese until lump-free.
- Mix in some of the cream to loosen it, then whisk until smooth.
- Whip the cream, powdered sugar, and vanilla extract separately until medium-stiff peaks form.
- Fold the whipped cream into the cream cheese mixture.
How do I make this icebox cake gluten-free?
- To make this icebox cake gluten-free, use gluten-free Oreos or gluten-free chocolate Graham crackers.
- In addition, ensure that your other ingredients are certified gluten-free.
Can I use other pans for this chocolate icebox dessert?
- Yes, you can use other pans if you don’t have an 8×8 (20×20-cm) pan. A 9×9 (23×23-cm) pan, or an 8-inch (20-cm) or 9-inch (23-cm) round pan, will give similar results.
- Or for a taller dessert, use a loaf pan.
More No-Bake and Icebox Cake Recipes
Try These Recipes!


Chocolate Icebox Cake
Ingredients
Bittersweet Chocolate Ganache
- 1 cup (6 oz/170 g) finely chopped bittersweet chocolate
- ¾ cup (6 fl oz/180 ml) heavy whipping cream
Cream Cheese Filling
- 1 cup (8 oz/225 g) cream cheese , softened
- 1 ½ cups (12 fl oz/360 ml) heavy whipping cream
- ¾ cup (3 oz/85 g) powdered sugar , sifted
- 1 teaspoon vanilla extract
Chocolate Cake Layers
- 24 Oreos
Instructions
To Make the Bittersweet Chocolate Ganache
- Place the chocolate in a small heatproof bowl.
- In a small saucepan, heat the cream over medium heat until simmering.
- Pour the cream over the chocolate and let it stand undisturbed for 5 minutes.
- Stir gently until fully emulsified. Allow to cool to room temperature.
To Make the Cream Cheese Filling
- In a stand mixer with a whisk attachment (or with a handheld mixer and a large bowl), whip the cream cheese on medium speed until smooth and fluffy, about 2 minutes.
- Add about half of the cream and whisk until smooth to loosen the cream cheese.
- Add the remaining cream, powdered sugar, and vanilla extract and mix until blended.
- Increase the speed to medium-high and whip until medium-stiff peaks form, about 3 minutes.
To Assemble the Chocolate Icebox Cake and Serve
- Split the Oreos in half. Scrape out and discard the cream.
- Arrange 16 Oreo halves in an even layer in an 8 inch (20 cm) square pan.
- Spread one-third of the cream cheese filling evenly over the cookies.
- Drizzle one-third of the bittersweet chocolate ganache over the filling.
- Repeat this process twice more. Use a knife to gently swirl the top of the final layer, if desired.
- Cover tightly and refrigerate for at least 6 hours, until the cookies soften.
- Enjoy with a glass of milk. Store leftovers covered with cling wrap in the refrigerator for up to 3 days.
Recipe Notes
- Use very finely chopped chocolate. When making the ganache, finely chop the chocolate so it melts evenly when the hot cream is added.
- Cool the ganache to room temperature before assembling. Ganache that's too warm could deflate the cream layer in this icebox cake with chocolate wafers.
- Whip the cream cheese until completely smooth before adding the whipping cream. This will prevent a lumpy filling.
- Use thin chocolate cookies in this recipe. I used Oreos because they're easy to find, but chocolate wafer cookies or chocolate Graham crackers work as well.
- Use an offset spatula. It makes spreading the cream cheese filling much easier and helps keep the layers even.


I made this for my birthday. It was a hit! They are easy to make too! My sister who doesn’t like desserts asked for the recipe.
This sounds delicious – especially when it’s too hot to turn on the oven and I have a craving for chocolate dessert. However, can I used any other cookies – I don’t like Oreos (I know, it’s blasphemous, but they are too sweet)?