This post may contain affiliate links. Please see my full disclosure for details.
Hi Bold Bakers!
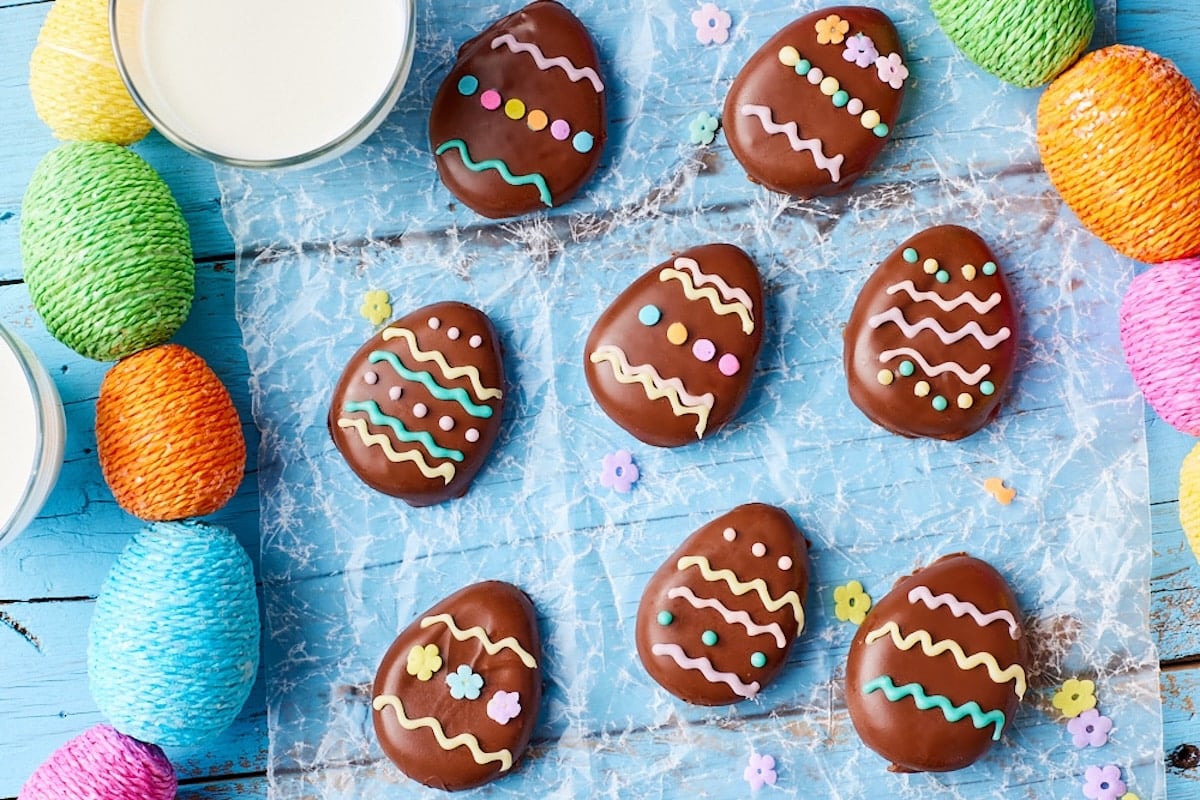
WHY YOU’LL LOVE THIS RECIPE: My delightful Homemade Peanut Butter Eggs (Reese’s Eggs) will be your new favorite Easter candy. The all-natural creamy peanut butter filling takes only a few minutes to mix—they’re almost as easy as grabbing some from the store, and so much more delicious!
- Everyone’s favorite combination: Think Reese’s, but better! These are naturally sweetened and have a richer, deeper flavor.
- No baking required: No candy thermometer needed either. Just make the filling, melt the chocolate, dip, and decorate!
- Simple pantry ingredients: It’s amazing how kitchen basics can turn into such a special treat.
- Great family project: More fun than dyeing Easter eggs, and obviously much tastier.
- Freezer-friendly: Freeze these homemade peanut butter eggs for up to three months!
When my son George woke me up a few years ago at 6:30 am, craving Reese’s Peanut Butter Cups (mom life!), it led me to create a healthier homemade version. Even better, George helped me make them and was so proud of his accomplishment. That moment led me to develop an easy, festive Easter version we could make together, and my Homemade Peanut Butter Eggs (Reese’s Eggs) are just as pretty as they are delicious. This nostalgic Easter favorite is perfect tucked into Easter baskets, arranged on a dessert table, or wrapped up as a sweet homemade gift.
My top tip: don’t skip the freezing step! The peanut butter center must be frozen for at least an hour so they hold their shape when dipped in chocolate. Work with a few at a time, keep the rest in the freezer so they don’t soften before you can coat them. For more cute and delicious Easter recipes, check out my Chocolate Easter Eggs, Baby Chick Vanilla Cupcakes, and Chocolate Mousse Pots with Strawberry Carrots.
Table of Contents
- What are Homemade Peanut Butter Eggs (Reese’s Eggs)?
- Tools You Need
- Key Ingredients and Substitutes
- How to Make Homemade Peanut Butter Eggs
- Gemma’s Pro Chef Tips
- Make-Ahead and Storage Tips
- Mix-Ins and Decorating
- FAQs
- More Easter Dessert Recipes

What are Homemade Peanut Butter Eggs (Reese’s Eggs)?
My Homemade Peanut Butter Eggs (Reese’s Eggs) is a from-scratch version of the candy store classic. The treats feature creamy peanut butter, almond flour, and maple syrup centers shaped into eggs, coated in chocolate, and decorated with piped Candy Melts and colorful sprinkles. The peanut butter cup was invented by H.B. Reese in the 1920s, and the company invented their seasonal peanut butter Easter egg in 1966.
Tools You Need
- Mixing bowl
- Measuring spoons
- Measuring cups
- Glass measuring jug
- Kitchen scale (optional)
- Spoon
- Two small baking trays
- Parchment paper
- Microwave-safe bowl (optional) or double-boiler
- Fork
- Piping bag and tips
Key Ingredients and Substitutes

Salted smooth peanut butter
- Salted smooth peanut butter is the base of the filling. It gives the candy a creamy texture and a rich, nutty flavor.
- I recommend using a Skippy-type peanut butter for the right consistency.
- If you use natural or “drippy” peanut butter, you may need to stir in an extra teaspoon of almond flour.
- The natural fats in peanut butter help keep the filling solid when it’s chilled.
- Substitutes: Use the same amount of almond butter if you prefer.
- For a nut-free option, use the same amount of sunflower butter.
Maple syrup
- Maple syrup gives this healthy Reeses treat natural sweetness and a note of caramel depth.
- Additionally, the maple syrup contributes to a smooth, cohesive filling.
- Substitute: You can also use the same amount of agave syrup.
Almond flour
- Almond flour thickens the filling of this peanut butter egg recipe so it holds its shape.
- Importantly, almond flour absorbs moisture, making the mixture moldable rather than sticky.
- Unlike the powdered sugar (confectioners’ sugar) used in some recipes, almond flour adds a rich, nutty flavor and helps keep the filling from being too sweet.
- Substitutes: You can use the same amount of very finely crushed Graham crackers or digestive biscuits.
Salt
- Salt enhances the filling ingredients and creates a pleasing contrast with the sweet chocolate.
Chopped milk chocolate
- Milk chocolate makes a smooth outer shell that coats the peanut butter center.
- Using milk chocolate creates the perfect contrast between the nutty, slightly salty center and the sweet coating.
- It’s important to use chopped chocolate here because chocolate chips contain stabilizers that keep them from melting smoothly.
- Substitutes: Use chopped semi-sweet or dark chocolate if you want a coating that’s not so sweet.
Vegetable oil
- Vegetable oil thins the chocolate, so it forms a smooth, glossy coating for the chocolate eggs.
- Importantly, the oil helps keep the chocolate from becoming too thick, making the dipping process simpler.
- Substitute: Use the same amount of coconut oil.
Candy Melts and sprinkles (optional)
- Candy Melts, colorful confectionery wafers that melt and can be used for piping, drizzling, or dipping, are an easy way to add sweet, colorful decorations. It hardens and gets glossy as it sets.
- Use sprinkles for an additional layer of festive color.
- Substitutes: You can also drizzle extra milk chocolate on the eggs and add chopped nuts or flaked coconut if you like.
How to Make Homemade Peanut Butter Eggs
Make the Peanut Butter Egg Filling
- Prepare the trays: Line two small trays with parchment paper and set aside.
- Mix filling: In a medium bowl, stir together the peanut butter, maple syrup, almond flour, and salt until fully combined.

- Let thicken: Let the peanut butter mixture rest for 10 minutes to allow the mixture to thicken.

- Shape filling: Divide into 16 portions (about 1 ½ tablespoons each), mold into egg shape, and flatten slightly.

- Freeze until firm: Place on one baking sheet and freeze for 1 hour, until firm.
Make the Chocolate Coating
- Combine coating ingredients: In a microwave-safe bowl, combine the milk chocolate and vegetable oil.
- Microwave to melt: Microwave in 30-second intervals, stirring between each, until melted and smooth. Alternatively, melt over a double boiler.

Coat the Peanut Butter Eggs
- Coat peanut butter eggs: Working in small batches and keeping the rest frozen, dip the shaped peanut butter eggs in the melted chocolate, then lift it out with a fork.

- Place on tray: Tap the fork gently on the edge of the bowl to remove excess chocolate, then place the coated egg on your other prepared tray.

- Finish coating: Repeat with the remaining eggs.

Decorate the Peanut Butter Eggs
- Prepare Candy Melts: Melt the Candy Melts of your choice according to the package directions and fill piping bags fitted with small round tips. (You can also just use any leftover chocolate from coating the eggs.)
- Decorate: Pipe your desired decorations and add sprinkles while the melts are still wet.

- Put in fridge to set: Refrigerate until the decorations are set, about 30 minutes.
FULL (PRINTABLE) RECIPE BELOW!
Gemma’s Pro Chef Tips
- Use salted peanut butter for the best flavor. Salted peanut butter will give the best balance of flavors, but you can use unsalted if you prefer.
- Smooth peanut butter is easier to shape. We like to use smooth peanut butter in these Reeses eggs, because it’s easier to use when forming the egg-shaped centers, but feel free to use crunchy if that is your preference.
- Almond butter is an option. You can replace the peanut butter with almond butter or any other nut butter that you wish.
- Keep the filling frozen. Keeping the homemade peanut butter eggs frozen before dipping them will make them easier to handle and reduce the risk of them falling apart.
- You can use semisweet or dark chocolate here instead of milk chocolate for the coating.
- Don’t forget the oil: The small amount of oil keeps the coating smooth and helps prevent bloom, but results in a softer set, so it is best to keep the eggs refrigerated.
- Tap off the excess chocolate drip: This step keeps the coating from being too thick.
- Don’t overheat the chocolate: Heat in 30-second interval, or heat gently in a double-boiler.
- Use for dessert trays, sweet buffets, or as a cute placecard holder: My homemade peanut butter eggs also make the perfect edible Easter gift.

Make-Ahead and Storage Tips
Make-Ahead Tips
- You can make and shape the peanut butter filling in advance, wrap or place in an airtight container, and refrigerate for one day before dipping.
- You can also make the peanut butter eggs ahead, place them in an airtight container, using parchment paper between the layers, and refrigerate for up to 2 weeks.
- For more extended storage, freeze for up to three months.
- Thaw overnight in the fridge before serving.
How to Store Leftovers
- Store leftovers for up to two weeks in an airtight container in the fridge.
- Place parchment paper between the layers if stacking the eggs.
- For more extended storage, freeze for up to three months.
- Thaw in the refrigerator overnight before serving.
Mix-Ins and Decorating
- Add some crunch: Use crunchy peanut butter, or add finely chopped toasted nuts to the filling mixture.
- Make it mini: You can make these eggs any size you want! 32 mini eggs would be really cute too.
- Festive shapes: Take the filling mixture, roll between sheets of parchment, and use cookie cutters to cut out shapes.
- Simple decorating: If you’re short on time, simply drizzle the leftover chocolate over the eggs and add sprinkles before the chocolate dries.
FAQs
Can I use natural peanut butter?
- I recommend using a Skippy or Jif-type peanut butter. Natural peanut butter is looser and oilier, so your filling may not be easily moldable.
- If you do use natural peanut butter, stir it well first.
- Additionally, if your filling is too soft, add another teaspoon of almond flour.
- Freeze the filling for an additional 15 minutes.
Why is my filling too soft?
- The consistency should be like cookie dough—thick enough to mold and keep its shape.
- If your filling is too soft, freeze it for another 15 minutes.
- If it’s still too soft, and if you used natural peanut butter, stir in another teaspoon of almond flour.
What chocolate is best to use?
- Use chopped chocolate for melting.
- Do not use chocolate chips. They are made with stabilizers, which keep them from melting smoothly.
- If you don’t want to use milk chocolate, you can use semi-sweet or dark chocolate instead.
How do I get a smooth chocolate coating for my Reeses peanut butter eggs?
- To get a smooth chocolate coating for your Reeses peanut butter eggs, be sure to use the amount of vegetable oil called for.
- Even though it’s a small amount of oil, it’s crucial to creating the proper smooth texture.
- If the filling starts melting during dipping, the chocolate is too hot. Let it cool for a few minutes before continuing with dipping.
More Easter Dessert Recipes
- Lemon Meringue Cake
- Flourless Chocolate Cake
- Pistachio Pound Cake with White Chocolate Glaze
- Best Lemon Meringue Pie
- Best Carrot Cake
Try These Recipes!


Peanut Butter Eggs (Reese's Eggs)

Ingredients
Peanut Butter Eggs Filling
- 1 cup (8 oz/225 g) salted smooth peanut butter
- ¼ cup (2 ½ oz/71 g) maple syrup
- 4 tablespoons almond flour
- ¼ teaspoon salt
Chocolate Coating
- 2 cups (12 oz/340 g) chopped milk chocolate
- 1 teaspoon vegetable oil
Decoration
- Sprinkles and Candy Melts
Instructions
To Make the Peanut Butter Egg Filling
- Line two small trays with parchment paper and set aside.
- In a medium bowl, stir together the peanut butter, maple syrup, almond flour and salt until fully combined.
- Let rest for 10 minutes to allow the mixture to thicken.
- Divide into 16 portions (about 1 ½ tablespoons each), shape into eggs, and flatten slightly.
- Place on one tray and freeze for 1 hour, until firm.
To Make the Chocolate Coating
- In a microwave-safe bowl, combine the milk chocolate and vegetable oil.
- Microwave in 30-second intervals, stirring between each, until melted and smooth. Alternatively, melt over a double boiler.
To Coat the Peanut Butter Eggs
- Working in small batches and keeping the rest frozen, dip each egg in the melted chocolate and lift out with a fork.
- Tap the fork gently on the edge of the bowl to remove excess chocolate, then place the coated egg on your other prepared tray.
- Repeat with the remaining eggs.
- Refrigerate for about 30 minutes, until the chocolate has set.
To Decorate the Peanut Butter Eggs
- Melt the Candy Melts of your choice according to the package directions and fill piping bags fitted with small round tips. (You can also just use any leftover chocolate from coating the eggs.)
- Pipe your desired decorations and add sprinkles while the melts are still wet.
- Refrigerate until the decorations are set, about 30 minutes.
- Enjoy chilled with a glass of milk. Store leftovers for up to 2 weeks in an airtight container in the refrigerator, placing parchment paper between the layers if stacking the eggs.
Recipe Notes
- Use salted peanut butter for the best flavor. Salted peanut butter will give the best balance of flavors, but you can use unsalted if you prefer.
- Smooth peanut butter is easier to shape. We like to use smooth peanut butter in these Reeses eggs, because it's easier to use when forming the egg-shaped centers, but feel free to use crunchy if that is your preference.
- Almond butter is an option. You can replace the peanut butter with almond butter or any other nut butter that you wish.
- Keep the filling frozen. Keeping the homemade peanut butter eggs frozen before dipping them will make them easier to handle and reduce the risk of them falling apart.
- You can use semisweet or dark chocolate here instead of milk chocolate for the coating.
- Don't forget the oil: The small amount of oil keeps the coating smooth and helps prevent bloom, but results in a softer set, so it is best to keep the eggs refrigerated.
- Tap off the excess chocolate drip: This step keeps the coating from being too thick.
- Don't overheat the chocolate: Heat in 30-second interval, or heat gently in a double-boiler.
- Use for dessert trays, sweet buffets, or as a cute placecard holder: My homemade peanut butter eggs also make the perfect edible Easter gift.


I initially thought that it wasn’t sweet enough with just the maple syrup, but I got used to it and now I love it. I LOVE THE CRUNCH of the first bite straight out of the fridge. It’s a 10/10!