This post may contain affiliate links. Please see my full disclosure for details.
Hi Bold Bakers!
As you know I have a fascination with bread making but I have yet to tackle the almighty New York Style bagel. Why? #1 because I’m not from New York and I don’t want to offend anyone who is, #2 some say its the composition of New York water that actually gives their bagels that distinct flavor and I’m just using regular water from my tap.
Regardless, I took a shot and I tested this recipe on my neighbors and Kevin, and I got the thumbs up so I feel confident sharing this with you.
What is a Bagel?
A Bagel is a bread originating in the Jewish communities of Poland. It made it’s way to the US in the late 19th century. Traditionally, it is yeasted dough shaped by hand into the form of a bracelet hence the german origin of its name ‘beugel’ translating to “bracelet” or “ring.”
[ Need cream cheese? Make your own in 3 different flavors! ]
More common in North America is the method of boiling the bread for a short time in water before baking it. The result is a dense, chewy, doughy interior with a browned and sometimes crisp exterior. This uniquely dense, doughy bread is also referred to as ‘cement donut’ for obvious reasons.
Why do Bagels Have Holes?
Two reasons: The hole in the middle of the bagel allows it to have a larger surface area, making it easier to consistently cook the bagel all the way through. This is important because bagel dough can be incredibly thick, which would make it difficult to know if the center was cooked completely if the hole was not there.
Also, the hole allows the bagels to be easily transported and stacked on wooden dowels as you will see in some bagel shops in NYC.

Why are Bagels Boiled First?
Boiling bagels gives them their unique chewy crust. Boil for 1 minute on each side and you will get a slight chew, however, I boil mine for 2 minutes each side and I feel it gives it that authentic chewiness that we expect from a New York Bagel.
How to Make Bagels
Here are all the steps laid out, plain and simple, so you can see how simple the process truly is. For the printable recipe with all of the measurements, you can find it lower down on the page.
Making the Bagel Dough
- Using an electric mixer fitted with a dough hook, mix all the dry ingredients together: flour, yeast, sugar, and salt on medium/low speed.
- Slowly add the warm water until your dough to form a smooth ball and clean the bottom of the bowl.
- Knead the dough on medium/low speed for roughly 10 minutes. While the machine is running try working in as much of the extra 3/4 cup of flour as possible to form a firm but stiff dough. Add a few drops of water if needed to incorporate more flour. (See video for a step by step.)
- Grease a large bowl with oil and place your dough in it to coat. Cover the bowl tightly with cling wrap and a dishtowel. Allow the dough to double in size, proofing for roughly 1 hour at room temperature.
- Once doubled, knock out the air from the dough and divide the dough into 8 pieces (roughly 4oz/115g each).
Shaping the Bagels
- Take a dough ball, and press it gently against the countertop moving your hand and the ball in a circular motion pulling the dough into itself while reducing the pressure on top of the dough slightly until a perfect dough ball forms. Repeat with the rest of the dough.
- Gently press your finger into the center of each dough ball to form a ring. Stretch the ring to about 1/2 the diameter of the bagel ( around 1 1/2 inches) and place on a lined cookie sheet. Repeat the same step with the remaining dough.
- Straight away, repeat the process of shaping the bagels as they might have sprung back into shape. (Watch the video for a step by step.)
- After shaping the dough rounds and placing them on the lined cookie sheet, cover with cling wrap and a towel and allow to proof for 20 minutes at room temperature.
Cooking the Bagels
- Preheat the oven to 425ºF ( 210ºC). Also, bring a large pot of water to a boil.
- Carefully place the proofed bagels into the boiling water. Don’t overcrowd your pot. You can boil in batches.
- Once the bagels are in, it shouldn’t take too long for them to float to the top. Let them boil there for 2 minutes, and then flip them over to boil for another 2 minutes. Boiling is what gives NYC bagels their unique chew.
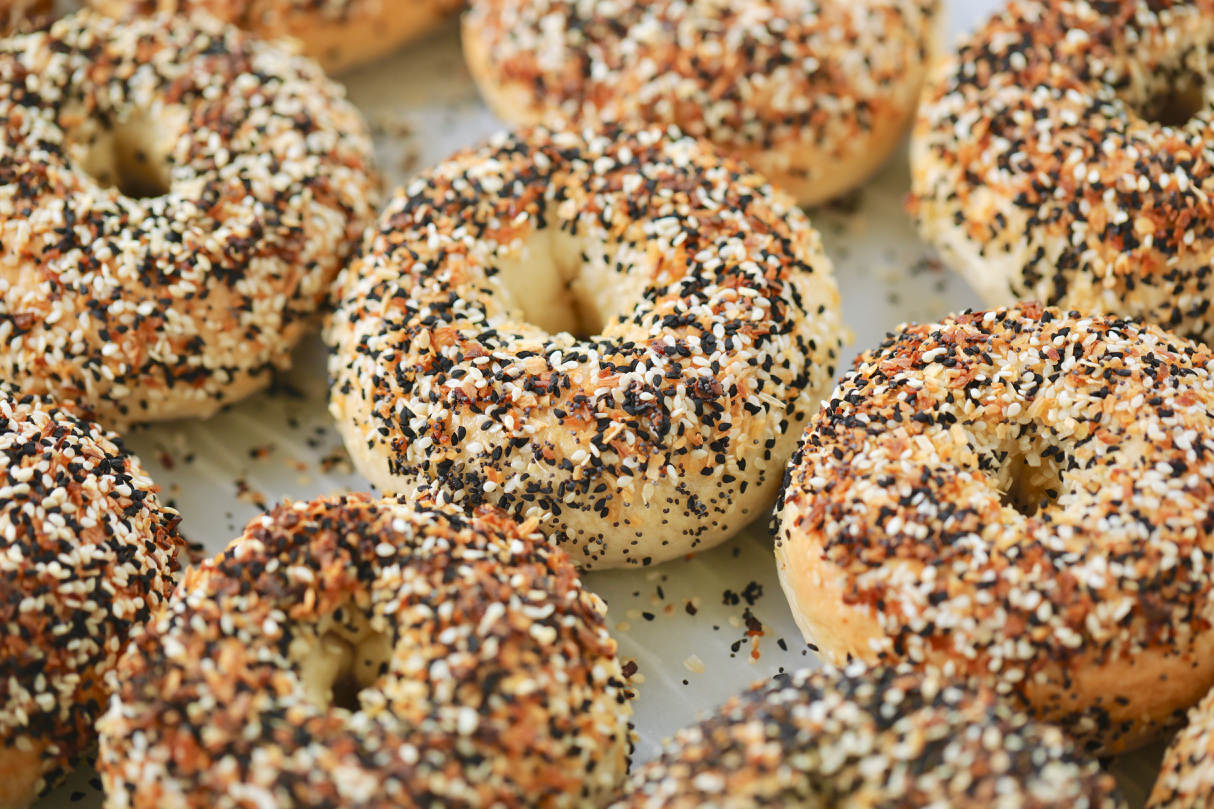
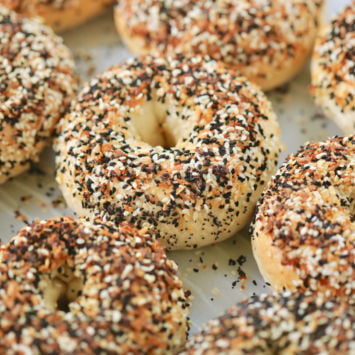
- Transfer the boiled bagels back onto your lined cookie sheet. Egg wash one by one and top with the ingredients listed above or add your own flavor.
- Bake for about 20 minutes or until golden brown.

What To Put On Your Bagel
Cream Cheese, baby! And the great thing is you know me now, and by now you know I’m not going to just swirl chives into cream cheese and tell you that’s the most delicious option. Here are some cream cheese flavors I created for this very reason, making your bagel eating experience that much better.
How Do I Store Bagels??
First off, I don’t bake and eat my bagels the same day. It is important to the flavor and overall texture to allow them to sit overnight before enjoying them. They just seem to morph overnight, in a good way.
Once baked, bagels last for up to 3 days before they start to really firm up. However, what I do is freeze mine to have them at my leisure whenever I’m hankering for some real deal carbs covered in cream cheese. You can freeze them for up to 8 weeks.
Make More Breakfast!

Want to give mad props to Kamran at thesophisticatedgourmet.com which is where I adapted this recipe from. I just love it when I find a great bread recipe and I know I’ll be using this for years.
And don’t forget to buy my Bigger Bolder Baking Cookbook!
Full (and printable) recipe below the video!
Try These Recipes!


Watch The Recipe Video!
Easy New York-Style Bagel Recipe
Ingredients
- 3 ½ cups (18oz/500g) bread flour* (see notes)
- 2 teaspoons (6g/.2oz) instant dry yeast
- 1 ½ tablespoons(18.75g/0.66oz) sugar
- 1 ½ teaspoons(9g/0.26oz) salt
- 1 1/3 cups (10 1/2 floz/300ml) warm water
- ¾ cup (3 ¾oz/105g) extra bread flour for kneading in
Optional Toppings:
- Caraway seeds, minced garlic, poppy seeds, dried onions, and sesame seeds.
Instructions
Making the Bagel Dough
- In the bowl of an electric mixer fitted with a dough hook, mix the flour, yeast, sugar, and salt in a large bowl on medium/low speed.
- Slowly add the warm water. Stir in just enough water for your dough to form a ball and clean the bottom of the bowl.
- Knead the dough on medium/low speed for roughly 10 minutes. While it is kneading slowly incorporate the extra 3/4 cup (3 ¾oz/105g) of flour until your dough is smooth and elastic. Try working in as much flour as possible to form a firm but stiff dough. Add a few drops of water if needed to incorporate more flour. (See video for a step by step)
- Lightly brush a large bowl with oil and turn the dough to coat. Cover the bowl tightly with cling wrap and a dishtowel. Let rise in a warm place for 1 hour, until the dough has doubled in size.
- Once doubled, punch the dough down and carefully divide the dough into 8 pieces (roughly 4oz/115g each).
Shaping the Bagels
- Shape each piece into a smooth, round ball. Now, take a dough ball, and press it gently against the countertop moving your hand and the ball in a circular motion pulling the dough into itself while reducing the pressure on top of the dough slightly until a perfect dough ball forms. Repeat with the rest of the dough.
- Gently press your finger into the center of each dough ball to form a ring. Stretch the ring to about 1/2 the diameter of the bagel (around 1 1/2 inches) and place on a lined cookie sheet. Repeat the same step with the remaining dough.
- Once more, repeat the process of shaping the bagels as they might have sprung back into shape. (Watch video for step by step!)
- After shaping the dough rounds and placing them on the cookie sheet, cover with cling wrap and a towel and allow to rest for 20 minutes.
Cooking the Bagels
- Meanwhile, preheat your oven to 425ºF (210ºC) and bring a large pot of water to a boil.
- Carefully place the bagels one by one into the water. Boil as many as you are comfortable with boiling. Let them boil there for 2 minutes, and then flip them over to boil for another 2 minutes. Boiling the bagel makes for that authentic chewy bread we love in a New York style bagel.
- Remove bagels and place them back on your lined cookie sheet. Egg wash one by one and top with the ingredients listed above or add your own flavor.
- Bake for about 20 minutes or until golden brown.
Storing Bagels
- So, bagels actually aren't at there very best straight from the oven. Leave them in an airtight container overnight at room temperature and the flavor and texture are significantly better (you will see). Enjoy within 3 days or freeze for up to 8 weeks.


Made it, loved it. Gemmmaaaaa! My husband and I love you and your recipes! We both are doctors, and are stuck in a very very rural part of India, during lockdown, but your recipes have turned out to be a Huge blessing for us, amidst the Covid 19 lockdown!
I get the developing of flavor over night, but there is nothing quite like a fresh warm bagel right out of the oven! I can’t wait to try making these as I’m a New Yorker. ????
Gemma you have changed my life!!! Every recipe I have made from you sight has been a huge success! My husband and kids think I’m a genius!
So I made you bagels last night and enjoyed them this morning. Amazing! They were perfect! My question is about add in’s. My husband loves cinnamon raisin and jalapeño cheddar. When would I add those extra ingredients in and also a rough idea on how much to add for the best flavor and dough consistency?
Just made these this evening and WOW! The house smells amazing. We made the everything bagel, white cheddar w/garlic, & cinnamon & sugar. We all can not wait till the morning. Thank you, thank you, thank you for all you do and for making your recipes so easy to make. My whole family just Loves you!!!
Hello, I haven’t posted here in a while. I hope you are doing well.
I did find the secret for 100% whole wheat fluffy bagels with this recipe! Here is a picture as proof, no extra ingredients. Ideally, whole wheat flour should be frozen or refrigerated to prevent bran decay. These bagels are made with freshly milled whole wheat flour. I would also like my other two pictures removed if possible, since the bagels are too flat.
I’m in the process of making this right now. I think anyone who doesn’t have a top-quality stand mixer should proceed with caution. I have the 7 qt pro-grade level Kitchen Aid and it’s working mightily to knead this dense dough. I’m stopping a few TBS short of adding all 3/4 of the extra cup because the health of my motor is more important than any one recipe. I can’t imagine that any mixer other than the top-of-the-line could handle this.
Another kneading technique that I discovered, which could be useful: During the initial 10 minutes of kneading, add only 1/2 cup flour. Then, let the dough rest for 20 minutes. After that, knead in the remaining 1/4 cup flour over a period of 10 minutes.
I noticed that whole wheat bagels rose higher as a result. I believe that if all the 3/4 cup flour is added at once, the extra flour “overwhelms” the dough, which makes the result too stiff. Adding the flour in stages produces a more elastic result. Cross-section:
Love this recipe! When time allows, I make a fresh bagel like this: I freeze half the batch by following the recipe just until that 2nd 20-minute rest. I freeze them before that last proof. Then when I want a fresh bagel, I lay one on a plate sprayed with nonstick oil and cover with plastic wrap (also sprayed with nonstick). In about three hours the bagel thaws and rises a bit. From there, I continue on with the recipe – boiling water and baking in my toaster oven (so as not to heat the big oven for one bagel).… Read more »
i love jalapeno cheese bagels how would i go about doing this
I wrote a post earlier stating I’ve made this recipe quite a few times but today I made them blueberry bagels instead of just plain as a special request.