This post may contain affiliate links. Please see my full disclosure for details.
Hi Bold Bakers!
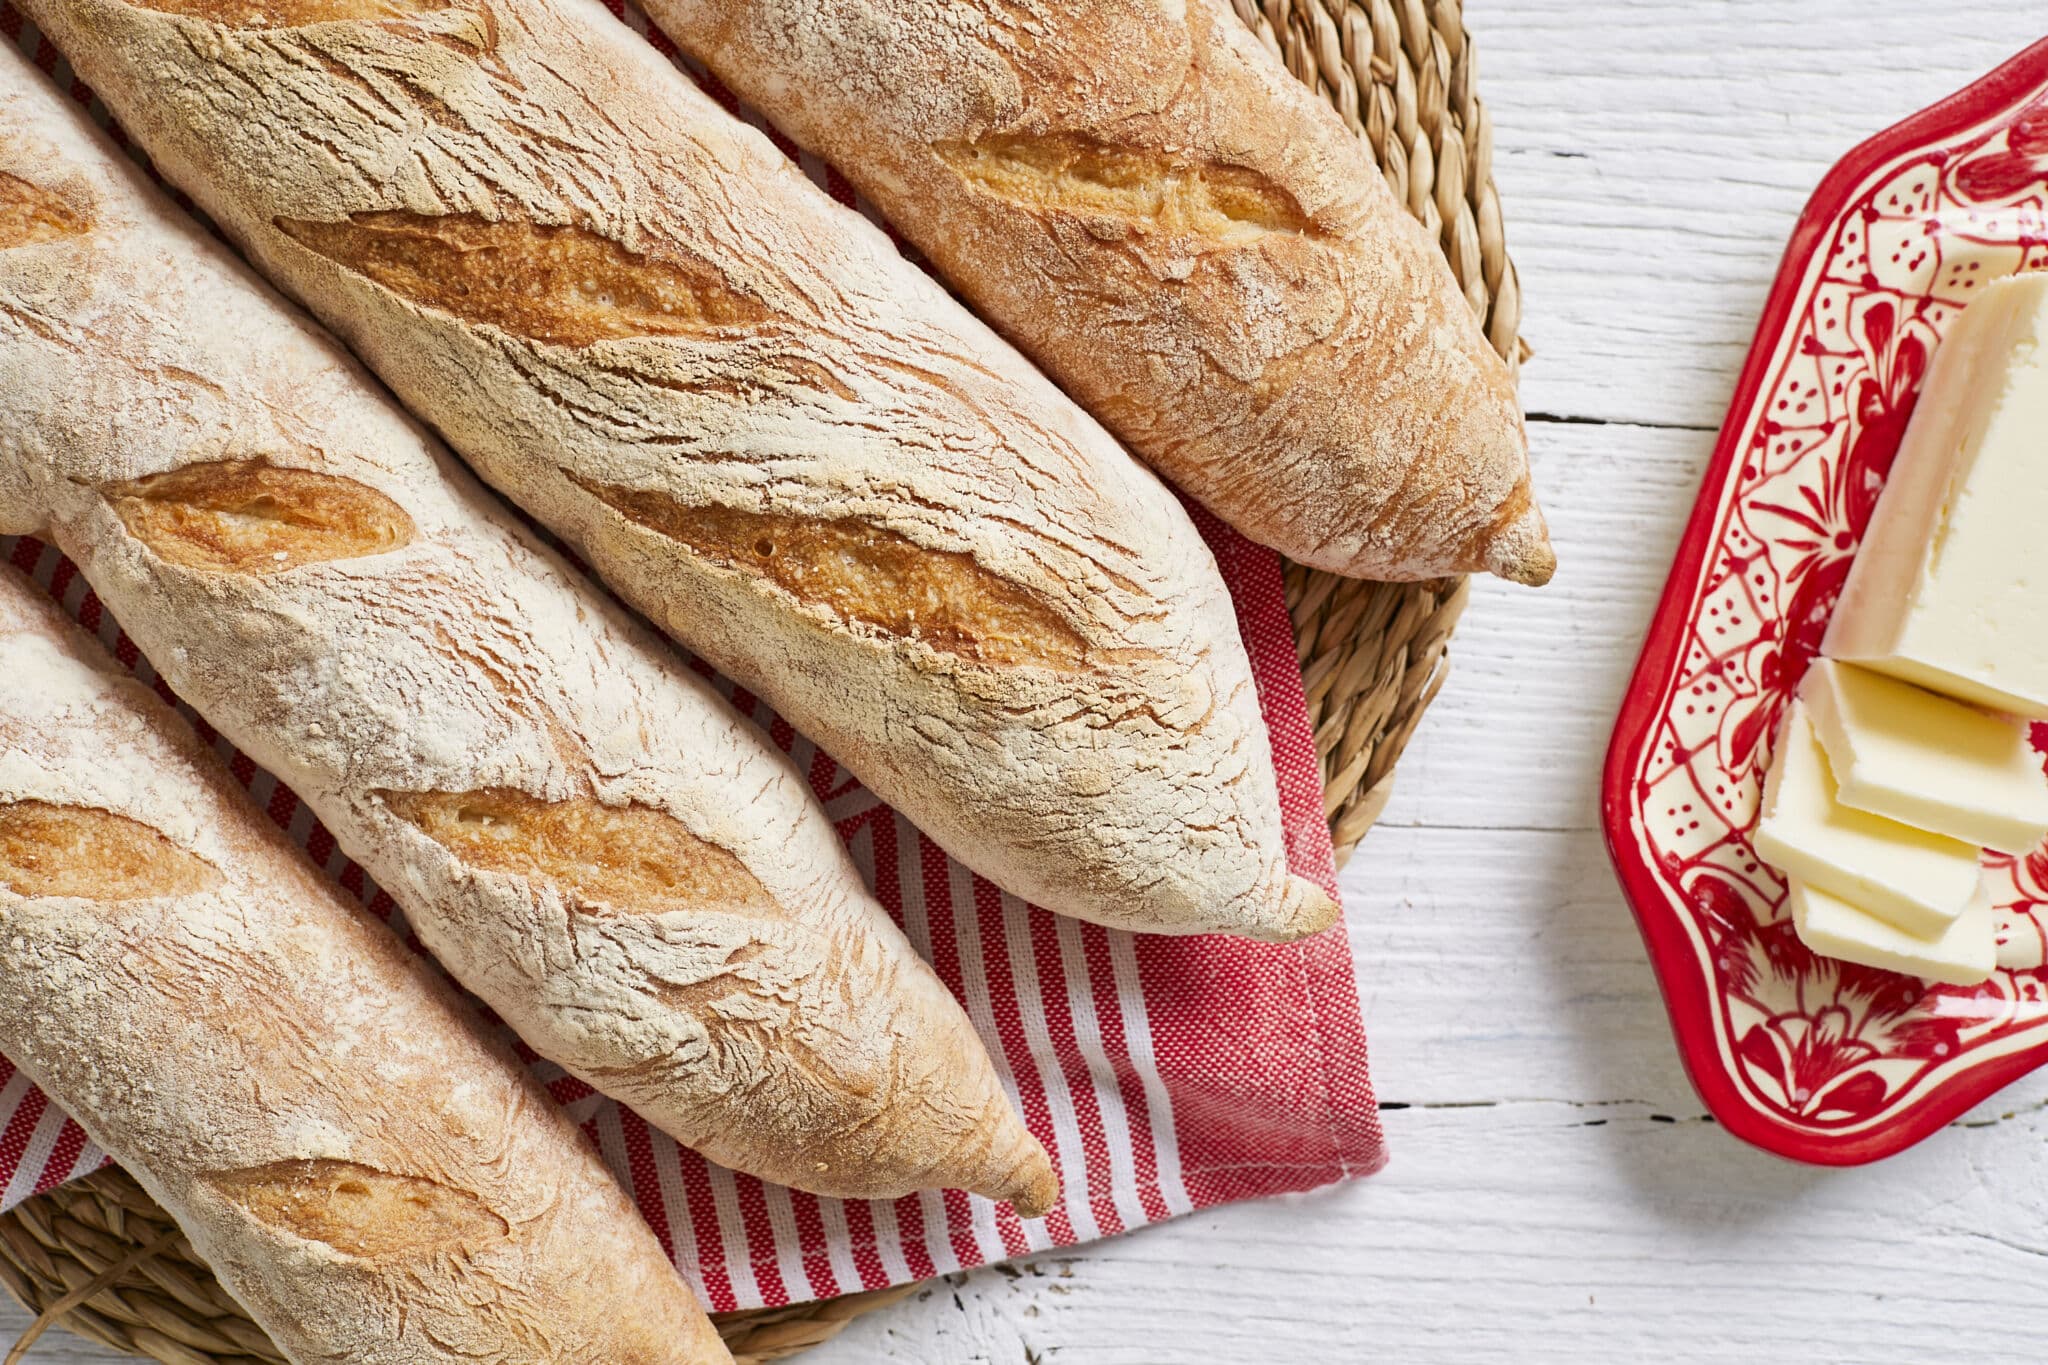
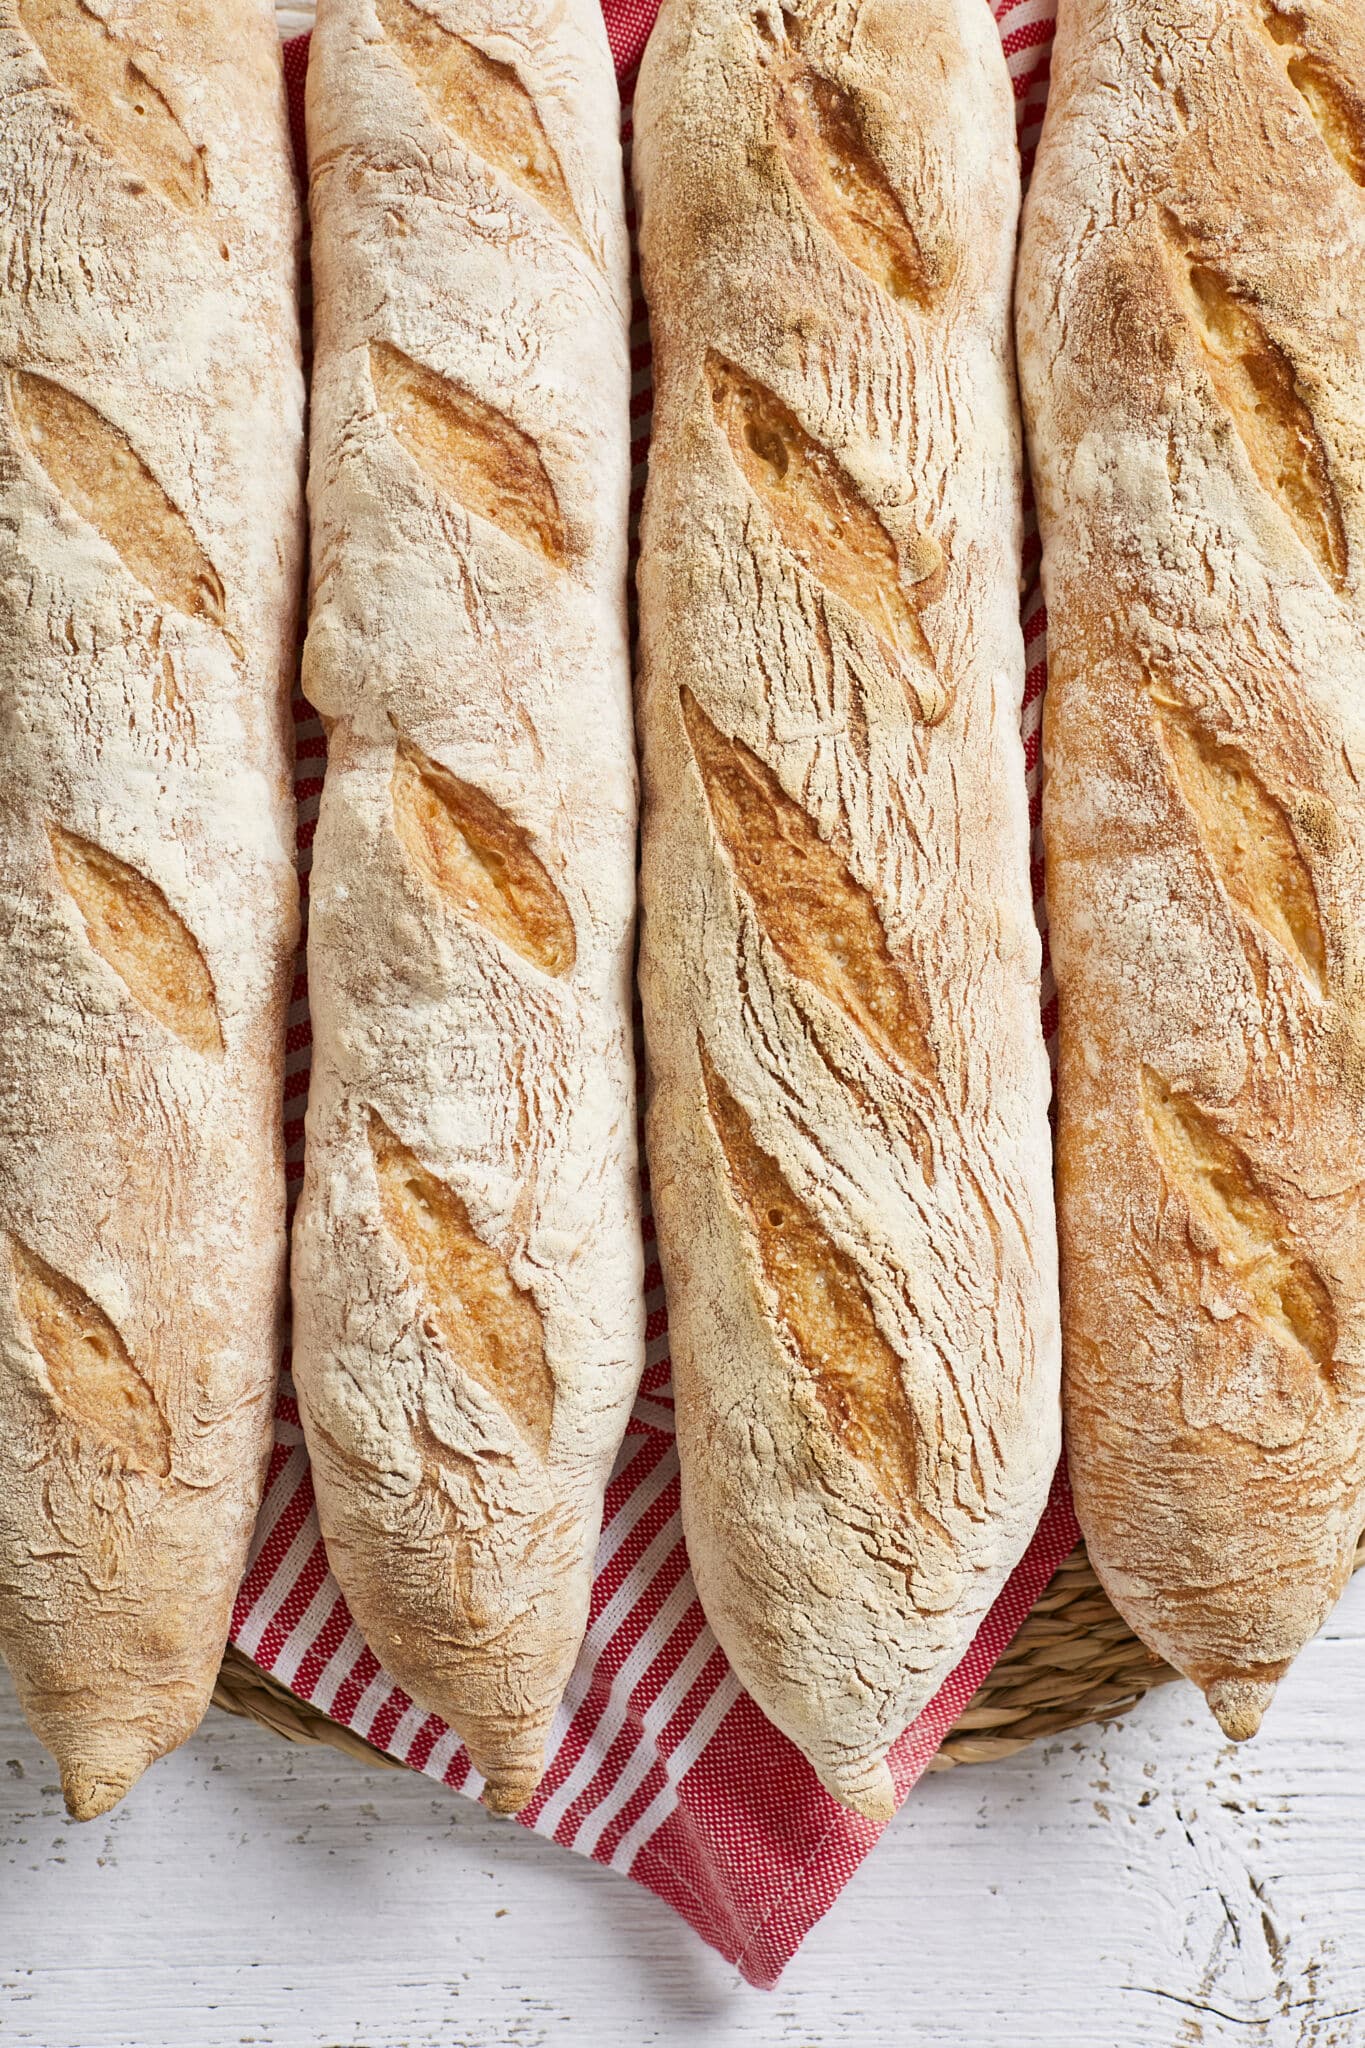
WHY YOU’LL LOVE THIS RECIPE: The Easiest No Knead Baguette recipe is here to surprise you! It brings you an artisanal long loaf that captures the essence of traditional French baguettes but with a straightforward no-knead process. The bread features a thin, lightly toasted, and crusty exterior that crackles upon biting, giving way to a tender, delightful chewable interior with an open and stunning lacy crumb.
Your long-awaited baguette bread is finally here! I researched before heading into the kitchen to make baguettes, focused on recipes and techniques separately. This recipe is a combination of Jim Lahey’s No Knead Small Baguettes, King Arthur’s shaping technique, and my many years of experience with making bread (which you can find with my dozens of bread recipes). I came up with this recipe which I think might be the simplest out there BUT still yields incredible results. I’ll let you be the judge…
Table of Contents
- What is a No Knead Baguette?
- Tools for No Knead Baguette
- Key Ingredients for No Knead Baguette and Why
- How to Make No Knead Baguette
- How to Store No Knead Baguette
- Q: Can I Use All-Purpose Flour for No-Knead Baguettes?
- Q: At What Stage Can I Refrigerate the Dough?
- Q: What Are the Best Ways to Use Baguettes?
- FAQs
- Gemma’s Pro Chef Tips
- More No-Knead Bread Recipes
What is a No Knead Baguette?

-
Baguette:
- The word baguette means “wand” or “stick”.
- A baguette is a type of elongated and cylindrical bread that originated in France, known for its crispy crust and soft, chewy inside. Its first record as a bread can trace back to 1920.
- The French bread law requires “traditional baguettes” to be made where they’re sold with four ingredients including wheat flour, water, salt, and yeast.
-
No Knead Baguette
(This also explains how a no knead baguette is different from a traditional baguette.)
-
- A no-knead baguette bread is a variation of the classic baguette that is made using a simplified method eliminating the need for extensive kneading.
- Traditional baguettes rely on kneading to connect protein and water to build the gluten network.
- In comparison, no knead baguettes in this recipe rely on extended fermentation.
- During this time, yeast works through a slow NATURAL biological reaction by feeding on the sugars in flour (and added sugar if applicable) to release carbon dioxide to make the dough rise. So it only needs a very small amount of yeast to get started.
- The bonus is that the long fermentation also releases alcohol to add profound flavors. Time does most of the job for you!
Tools for No Knead Baguette
- Measuring cups and measuring spoons
- Large mixing bowl
- Wooden spoon
- Shower cap, cling wrap, or clean kitchen towel (for covering the dough)
- Baking trays
Key Ingredients for No Knead Baguette and Why
-
Bread flour:
- Bread flour has 12%-14% protein, more than 8%-11% in all-purpose flour (plain flour).
- So bread flour can naturally and easily develop more gluten, resulting in a stronger and more elastic dough.
-
Salt:
- Salt enhances the flavor, prevents the dough from rising too fast, strengthens the gluten, improves the extensibility, and acts as a natural preservative to extend the bread’s shelf life.
-
Sugar:
Sugar not only adds a subtle sweetness to baguettes but also has a few more functions:
-
- Sugar activates the yeast to speed up the rising.
- Sugar feeds yeast, converting it into gas to make bread rise light and airy.
- Sugar reacts with the protein in bread flour through the Maillard reaction, contributing to the browning, a crust texture, and adding flavor complexity.
- Sugar helps to retain moisture in the dough for a tender crumb.
-
Instant yeast:
- Instant yeast can be put directly into the dry ingredients. Note to avoid direct contact with salt by mixing it with flour first so it won’t get deactivated.
-
Warm water:
- Lukewarm water activates and optimizes the growth of yeast.
- To tell whether the water is lukewarm, take a small amount of water and put your finger in it, if it feels close to your body temperature or slightly warmer, then it’s lukewarm water.
How to Make No Knead Baguette
The Day Before: making & proofing the dough
-
- In a large bowl, mix all ingredients together by adding water gradually until you get a slightly sticky dough. You can also use a stand mixer if you need to.
- Cover and let it sit on the counter (at around 68°F/20°C-74°F/23°C) for 12 to 18 hours, until the dough at least doubles in size with bubbles on the surface.

The Next Day: strengthening and proofing the dough
-
- Knock out the air by simply filing the dough over itself to the center. Divide the dough into 2 then shape each into a chunky rectangle by folding its sides to the center(see video). Proof the dough covered with seam side down for 60 minutes.
Shaping and Baking the No Knead Baguette
-
- Turn the dough seam side up. Bring the top side and then the bottom to the center of the dough, fold top to meet bottom by pushing down with your fingers to close up the seam.

-
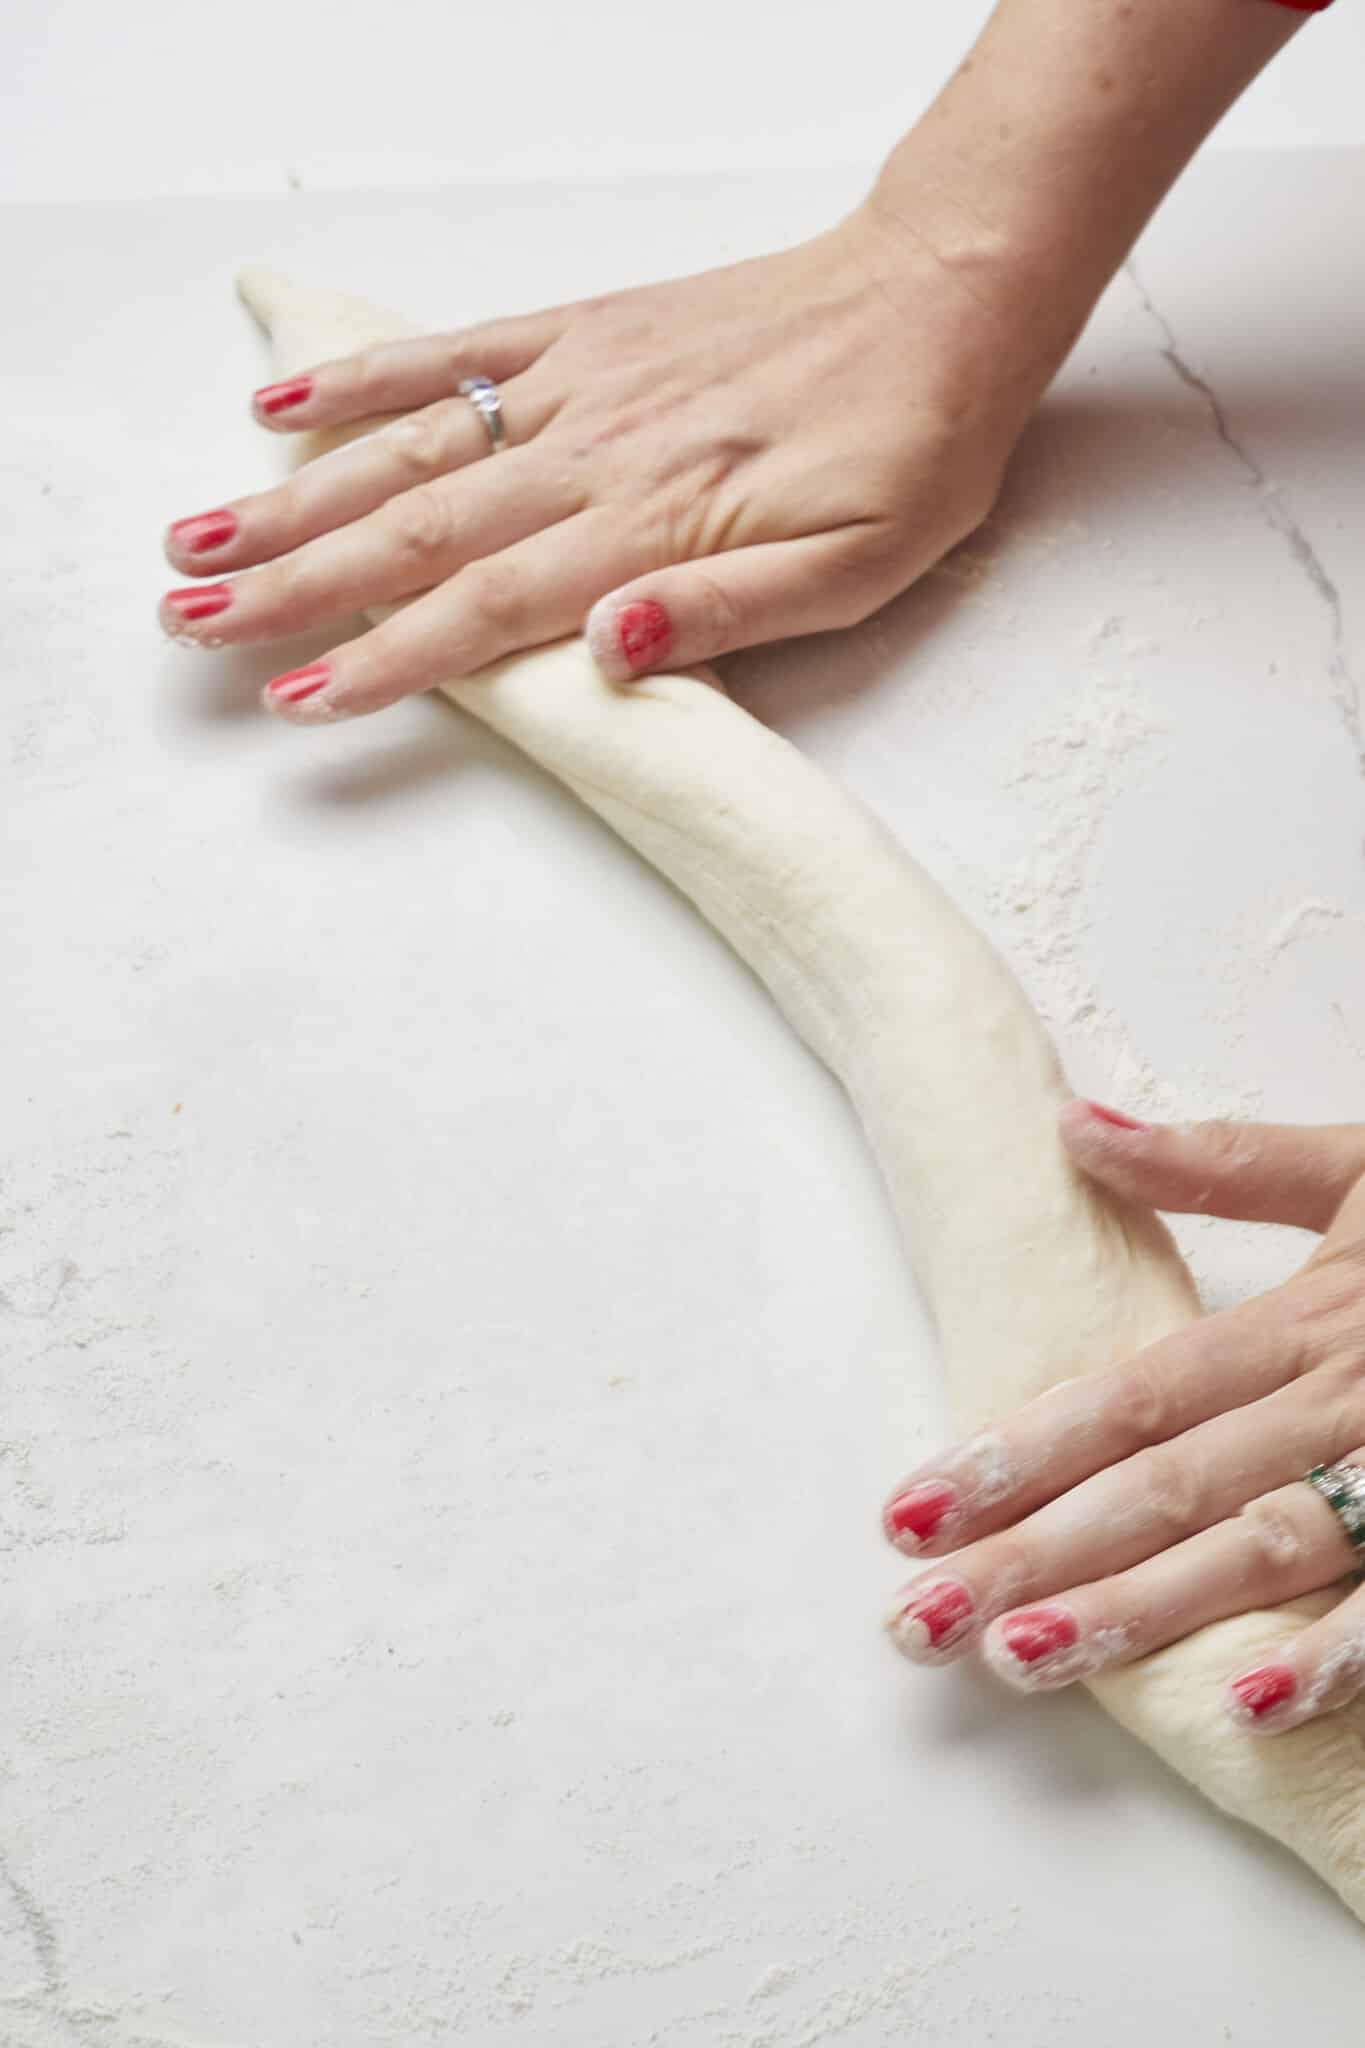
- Gently roll out your baguette to around 14 inches (35 cm) moving your hands away from each other. Note to put on more pressure to roll ends into points.
-
- Cover and proof the baguettes in the floured baking sheet for roughly 45 minutes to 1 hour until it does not spring back upon poking.
- Half an hour before the end of the second rise, preheat the oven to 450°F (225°C).
- Carefully stretch the baguettes to about 17 inches (43 cm) with seam side down. Score with a sharp knife for clean slits.


-
- Then bake baguettes for 20-25 minutes, until the crust is golden brown.
How to Store No Knead Baguette
- Store baked and completely-cooled baguettes at room temperature in a bag or airtight container for up to 3 days.
- The baked baguettes can also be frozen for up to 8 weeks.
Q: Can I Use All-Purpose Flour for No-Knead Baguettes?
A: Yes, but NOT recommended. Bread flour can develop a much better gluten structure than all-purpose flour (plain flour).
Q: At What Stage Can I Refrigerate the Dough?
A: You can refrigerate the dough after 2 hours of proofing at room temperature during fermentation to slow down the process and allow for a longer flavor development.
Or after 12-18 hours of proofing at room temperature, you can choose to put your dough in the fridge and use within 2 days.
Q: What Are the Best Ways to Use No Knead Baguettes?
A: Homemade bread is wonderful in any way!
Besides enjoying with soups or salads, you can make healthy sandwiches with baguettes, spread my Homemade Cream Cheese ( make Flavored Cream Cheese if you want), Homemade Butter, or Compound Butter on it.
It’s a great addition to a Charcuterie board and brings Bread Pudding or Over Night French Toast to the next level!
FAQs
-
Can I make no knead baguettes with sourdough starter?
Yes, you can adapt a no knead baguette recipe to incorporate a sourdough starter. Stay tuned for a sourdough baguette recipe!
-
Can I make no knead baguette with gluten-free flour(s)?
No. This is a yeast recipe which requires gluten to work with yeast to build the structure for the bread. Therefore, gluten-free flour(s) can’t work with this recipe.
Stay tuned for a gluten-free baguette recipe!
-
Can I add herbs or other flavorings to my no knead baguette?
Yes, you can incorporate herbs, garlic, cheese, or other flavorings after you’ve got a sticky dough for a customized baguette.
-
Can I incorporate whole grains into the no knead baguette?
Yes, you can substitute up to half of the flour with whole grain flours for added nutritional value and flavor.
-
Can I reduce or omit the salt content in the recipe?
You can adjust the salt content to your taste, but keep in mind that will affect its taste and elasticity.
-
Can I add steam to the oven for a better crust?
Yes, you can create steam in the oven by placing a pan of hot water at the bottom rack or using a spray bottle.
-
Can I make smaller or larger baguettes or into other forms?
Yes, you can adjust the size or shape of the baguettes based on personal preference. Smaller baguettes may require shorter baking times.
-
Can I use a wavy-shape baguette pan?
You can but the venting holes reduce the hot surface which will yield a less crispier bottom.

Gemma’s Pro Chef Tips
- Make sure your water is lukewarm when mixing your dough. You can gently warm it in the microwave or on the stovetop.
- I use instant yeast but if you are using active dry yeast then you will need to use a little less than ½ teaspoon and sponge it in your warm liquid before adding it to your flour.
- My recommendation for the bulk ferment is to do it for a minimum of 12 hours so it properly develops but I do suggest taking it as far as 18 hours for the best flavor and texture.
- I do not recommend freezing this dough raw. I have never had success with this.
More No-Knead Bread Recipes
- No-Knead Homemade English Muffins (No Oven Needed)
- Cinnamon Raisin Bread
- Homemade Soft Pretzels
- Gemma’s Best-Ever Cinnamon Rolls
- Best-Ever Pizza Dough Recipe
Try These Recipes!


Watch The Recipe Video!
The Easiest No Knead Baguette Recipe

Ingredients
- 3 cups (15 oz/426 g) bread flour
- 1 ½ teaspoons salt
- 1 teaspoon granulated sugar
- ¼ teaspoon instant yeast
- 1 ½ cups (12 fl oz/360 ml) lukewarm water
Instructions
The Day Before
- In a large bowl, stir together the flour, salt, sugar, and yeast. Add the water and, using a wooden spoon or your hand, mix until your dough comes together into a ball leaving no dry flour behind. The dough might be a little sticky which is ok.
- Cover the bowl and let it sit at room temperature for a minimum of 12 hours but up to 18. It's ready when the surface of the dough is dotted with bubbles and the dough has more than doubled in size. After 18 hours, you can continue the shaping and baking process, or place the dough in the fridge for up to 2 days.
The Next Day
- Generously dust your work surface with flour. Scrape the dough out of the bowl. Knock out the air by pulling the dough from the outside in towards the center for a few times (see video above for step-by-step directions).
- Divide the dough in 2 pieces, roughly 375 g (about 13 oz) each. Fold the dough inwards from the sides and pinch in the center. Bring the top of the dough towards the center and then the bottom (see video). The dough will resemble a chunky rectangle. This will make it easiest to shape later.
- Turn the dough over, seam side down on a floured surface and cover with cling wrap and a kitchen towel. Allow to proof on the counter for about 60 minutes.
Shaping and Baking the Baguette
- Place a kitchen towel on a flat baking tray and generously dust with flour. Set aside.
- Turn the dough over, seam side up. Bring the top side down to the center of the piece of dough and push down with your fingers to stick it. Now do the same with the bottom side bringing it into the center to meet the top piece of dough.
- Now using your fingers bring the top side of the dough down to meet the bottom side and press together to pinch the seam (see video).
- Turn the dough over on your counter and using both hands, gently roll out your baguette moving your hands away from each other. Once you get to the ends of the baguette, put on more pressure and roll the ends into points. The dough should measure around 14 inches (35 cm) at this stage.
- Gently place the dough on the towel, seam side up. If the dough is sticky, dust the top lightly with flour. Cover the baguettes gently with cling wrap and another kitchen towel on top. Set aside and proof for roughly 45 minutes to 1. (Note: Your dough is done proofing when you can gently poke it with your finger and it holds the impression. If it springs back, let it rise for another 15 minutes.)
- Half an hour before the end of the second rise, preheat the oven to 450°F (225°C), with a rack in the center. Line a baking tray with parchment.
- Carefully roll your proofed baguettes over one at a time. Gently lift and place on the baking tray, seam side down, giving a little stretch to the dough to lengthen the baguette to about 17 inches (43 cm). Straighten the baguette with your hand before scoring the bread with a sharp blade or knife (see video)
- Bake the baguettes for 20-25 minutes, until the crust is golden brown. Cool on the pan for at least 30 minutes before cutting and enjoying. Store at room temperature in a bag or airtight container for up to 3 days. The baguettes can also be frozen for up to 8 weeks.


Hi Gemma, I love this recipe and made it and it was awesome. My question is, do you have to divide into 2 or can I just make one?
Gemma that is our “Pastelillo” from Puerto Rico.
Gemma you did it again. So easy …..perfect baguettes. I doubled the recipe. Will definitely be making again. Theses will be eaten tomorrow but will freeze more so I always have on hand.
When would I add herbs (rosemary, basil, garlic?)
I wanted to double the recipe but accidentally quadrupled it so now it looks like a bakery in my kitchen 😂😂😂. The bread is absolutely delicious and I’m so glad I watched the video 3 times
4 thats the inside, Remember do not know basically nothing of bread making, its ugly I know but I am learning see, Thanks Gemma.
Easy, crunchy crust and delicious! Thank you
Hi Gemma I’m trying to get bigger air bubbles in my baguettes I’m going to try your recipe looks promising just one question how come you don’t use any steam…..thank you
Just made your no knead baguette recipe. So easy and so delicious. Just have to work on shaping them a bit better.
‘Generously dust your work surface with flour’
Do I have to use Bread flour or can I use Plain flour ?