
This post may contain affiliate links. Please see my full disclosure for details.
Hi Bold Bakers!
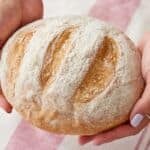
WHY YOU’LL LOVE THIS RECIPE: My fluffy Brioche Hamburger Buns are soft inside, lightly sweet, and strong enough to hold even the juiciest burger without falling apart. Once you make them yourself, there’s no going back!
- Soft & Buttery Crumb: Enriched with eggs and butter, these buns bake up incredibly tender with that signature brioche richness.
- Perfect for Juicy Burgers: Light yet sturdy, they hold their shape beautifully—no soggy bottoms, even with loaded fillings.
- Bakery-Style Finish: Golden, glossy tops with a delicate sweetness that elevates any burger night.
- Tested to Perfection: After multiple rounds of testing, I’ve dialed in the exact method for soft, fluffy buns every time.
- Make-Ahead Friendly: Prep the dough in advance and chill overnight, or freeze baked buns so you’re always ready for grilling season.
- Versatile & Crowd-Pleasing: Use them for burgers, sliders, sandwiches, or even breakfast buns with butter and jam. They’re as flexible as they are delicious.
I’ve tested this brioche hamburger bun recipe again and again to get the perfect balance of flavor and texture. What makes my homemade brioche buns so much better? It’s the freshness, the rich buttery flavor, and that tender crumb you just can’t get from a store-bought pack. Plus, these buns bake up with that beautiful golden, glossy finish that instantly makes any burger feel next level. For more bun ideas, check out my Homemade Hot Dog Buns, 1-Hour Hamburger Buns, and 1-Hour Quick Dinner Rolls.
IMPORTANT NOTE: This recipe was improved and updated on 5/7/2026, to include a NEW step-by-step tutorial video, NEW photography, explanations and substitutes of key ingredients, make-ahead and storage instructions, answers to the most frequently asked questions, and Pro Chef Tips.

What Makes Homemade Brioche Hamburger Buns So Good for Burgers?
Brioche is an enriched dough made with eggs, butter, and milk, which gives it a soft, tender crumb and a rich, slightly sweet flavor. That balance is exactly what makes it perfect for burgers—it complements savory fillings while still being sturdy enough to hold everything together.
Unlike standard buns, brioche burger buns have a light, airy structure that absorbs juices without becoming soggy, making every bite soft, flavorful, and satisfying.
Tools You Need
- Measuring cups
- Measuring spoons
- Measuring jugs
- Stand mixer with dough hook
- Mixing bowl
- Spatula or bench scraper
- Baking sheet
- Parchment paper
- Plastic wrap or reusable cover (like a shower cap)
- Pastry brush
Key Ingredients
All-Purpose Flour
- All-purpose flour provides the structure for the dough, allowing the buns to rise properly while staying strong enough to support juicy burger fillings without collapsing.
- The flour create a soft, tender crumb with just enough chew for that classic brioche texture.
- Substitute: Note that using bread flour will get a chewier texture. Or replace up to 50% with whole wheat flour for a denser, nuttier bun (adjust liquid slightly).
Granulated Sugar
- Granulated sugar adds a subtle sweetness that complements savory burger fillings.
- Feeds the yeast and promotes a beautifully golden crust during baking.
- Substitute: Use honey, maple syrup, or agave for a slightly different flavor (reduce liquid slightly if using liquid sweeteners).
Instant Yeast
- Instant yeast leavens the dough by producing carbon dioxide, creating a light, airy texture and helping the buns rise efficiently.
- Contributes to flavor development during proofing.
- Substitute: For every 1 teaspoon of instant yeast, use 1 ¼ teaspoons active dry yeast.
- Bloom in the milk for 5–10 minutes until foamy before adding.
Salt
- Salt enhances overall flavor and balances the slight sweetness of the dough.
- Strengthens the gluten network, improving elasticity and structure.
Eggs
- Eggs add richness, moisture, and structure to the dough.
- The yolks contribute to the soft crumb and give the buns their characteristic golden color.
- Substitute: Use flax or chia eggs for a vegan option (the buns will be less rich and slightly denser).
Whole Milk
- Whole milk adds moisture and fat, enriching the dough and creating a soft, tender crumb.
- Supports proper gluten development for structure.
- Substitute: Use unsweetened almond, oat, or soy milk for a dairy-free version.
Butter
- Butter enriches the dough with richness and flavor, creating that signature soft, tender brioche crumb.
- Helps improve moisture and overall texture.
- I prefer salted butter for extra flavor but unsalted butter will also work.
- Substitute: Use plant-based butter for a dairy-free option (texture may vary slightly).
Egg Wash
- Egg wash is brushed on before baking to create a shiny, golden-brown crust.
- Enhances the bakery-style appearance of the buns.
- Substitute: Use milk, cream, or plant-based milk for a softer, less glossy finish.
Sesame Seeds (Optional)
- Sesame seeds add a subtle nutty flavor and a slight crunch on top.
- Give the buns that classic burger bun look.
- Substitute: Leave plain or use poppy seeds, everything seasoning, or oats for variation.
How to Make Brioche Hamburger Buns
To Make the Brioche Buns Dough
- Add dry ingredients: In the bowl of a stand mixer fitted with the paddle attachment, add the flour, sugar, yeast, and salt.
- Whisk wet ingredients: In a measuring jug, whisk together the eggs and milk.

- Combine and mix: Pour the wet mixture into the dry ingredients and mix on medium speed until the dough comes together, about 4 minutes.

- Add butter gradually: With the mixer on medium-low speed, add the butter gradually, 1 tablespoon (½ oz/14 g) at a time. Continue to knead the dough for another 6–8 minutes or until it clears the sides of the bowl. This is a soft, shaggy dough.

To Proof the Brioche Buns Dough
- First proof: Place the dough into a greased bowl, cover bowl with plastic and a kitchen towel and allow to proof at room temperature for 1.5–2 hours, or until doubled in size. Optional chill: Brioche benefits from being chilled so the butter gets cold. After proofing you can put it in the fridge for a minimum of 2 hours or up to 2 days.

To Shape the Brioche Buns
- Divide dough: Divide the dough into 6 (roughly 3 ¼ oz/95 g) pieces. Shape each piece on a lightly floured work surface into a smooth ball and place them on your prepared baking sheet with seam side down. Second proof: Cover dough balls loosely with cling wrap and allow to rise for about 60 minutes or until doubled in size.

- Preheat oven: Towards the end of the proofing time preheat the oven to 375°F (190°C). Line a baking tray with parchment paper and set aside. Egg wash and top: Brush the buns with egg wash and sprinkle with sesame seeds.

- Bake: Bake for 20–22 minutes, or until golden brown.

- Serve and store: Enjoy with your favorite hamburger ingredients! Store any leftover buns in an air-tight container at room temperature for up to 2 days or in the freezer for up to 2 months.
FULL (PRINTABLE) RECIPE BELOW!
Gemma’s Pro Chef Tips
- Temperature Management: Keep your ingredients, flour, and eggs cold to start, as the long mixing process generates heat.
- Use quality butter: Use high-quality butter for the best flavor and consistent salinity.
- Get the butter just right (The “Goldilocks” Butter): Your butter should be pliable—soft enough that a finger leaves an indentation—but not warm or greasy. This ensures it incorporates properly without melting and making the dough greasy. If it’s too cold, it will stay in chunks; if it’s too warm, it will separate and make the dough oily.
- Use a stand mixer: Brioche requires intense, long-duration kneading to develop the gluten needed to hold high fat. A stand mixer with a dough hook is highly recommended over hand kneading.
- Build strength first: Knead the flour, eggs, and liquid until they form a smooth, elastic ball before adding any butter. This gives the gluten a head start.
- Hold back liquid: While making your dough, don’t be afraid to hold back on the liquid. You can always add more, but you can’t take it back.
- Add butter gradually: Do not add all the butter at once. Add it tablespoon by tablespoon, allowing each piece to be fully incorporated into the dough before adding more.
- Don’t add extra flour: The dough will be very sticky. Avoid adding more flour while kneading, as this will result in a dense loaf instead of a fluffy one.
- Chill if needed: Don’t Fear the Fridge. If the dough exceeds 77–80°F during mixing, the butter may “break” and leak out. If the dough looks shiny or greasy, stop and refrigerate the bowl for 15 minutes before continuing.
- Cold fermentation is key: Always give your dough a chill, anywhere from at least 2–12 hours in the refrigerator. This cold rest solidifies the butter, making the sticky dough easier to handle while also developing deeper flavor.
- Cover properly: A shower cap works great as a cover for proofing bread dough. Instead of plastic wrap, the shower cap is a reusable tool that keeps air from drying out your dough.
- Don’t rush the rise: Enriched doughs rise more slowly than lean doughs. The second rise after shaping can take 2–3 hours depending on your kitchen temperature. Avoid using a warm oven “proof” setting for enriched dough.
- Adjust size as needed: To make sliders, divide into smaller pieces, around 2 1/2 oz each.
- Add whole wheat if desired: Feel free to introduce some whole wheat flour to this dough for more fiber.
- Freeze for later: These buns can be kept in the freezer for up to 2 months so there’s no reason not to make these ahead for the long summer months.
Make Ahead and Storage Instructions
- Make-ahead dough (best method): After mixing and kneading, cover and refrigerate the dough for at least 2 hours or up to 2 days. This cold fermentation improves flavor, firms up the butter, and makes the dough much easier to shape.
- Shape from cold: You can shape the buns straight from the fridge while the dough is cold and firm. This helps maintain structure and prevents sticking.
- Second proof at room temperature: After shaping, let the buns rise at room temperature until fully puffy and doubled. This may take longer than usual (often 2–3 hours), especially if the dough is cold—don’t rush this step.
- Avoid warm proofing shortcuts: Do not use a warm oven or proof setting for enriched dough, as it can melt the butter and affect texture.
- Bake fresh or same day: For the best texture, bake once the buns are fully proofed and enjoy the same day for maximum softness.
- Room temperature storage: Store baked buns in an airtight container for up to 2 days. Keep them sealed well to prevent drying out.
- Reheat to refresh: Warm buns briefly in a low oven to bring back their soft, fresh texture before serving.
- Freeze baked buns: Once completely cooled, freeze buns in an airtight container for up to 2 months. Thaw at room temperature and warm before serving.
- Freeze raw shaped buns: For the freshest result, I do not recommend doing so.
FAQs
Why did my brioche bun recipe turn out dense?
This usually happens from under-kneading, adding too much flour, or not allowing enough proofing time. The dough should be soft and fully risen before baking.
Why did my buns dry out the next day?
Brioche contains butter and eggs, so it can dry quickly. Store airtight and warm slightly before serving to restore softness.
Can I make slider buns instead?
Yes! Divide into smaller portions (about 2–2.5 oz) and reduce bake time slightly.
Can I make this without a stand mixer?
Yes, but kneading by hand will take longer. Aim for a smooth, elastic dough.
Can I freeze brioche buns?
Absolutely. Freeze once cooled, then thaw and warm before serving.
More Brioche Dough Recipes
- Brioche Bread Recipe
- Dessert Pizza (No-Knead Brioche Dough)
- The Perfect Brioche French Toast
- Butter and Jam Bread Pudding Recipe
- French Toast Sticks
IMPORTANT NOTE: This recipe was improved and updated on 5/7/2026, to include a NEW step-by-step tutorial video, NEW photography, explanations and substitutes of key ingredients, make-ahead and storage instructions, answers to the most frequently asked questions, and Pro Chef Tips.
Try These Recipes!


Watch The Recipe Video!
Brioche Hamburger Buns

Ingredients
- 2¼ cups (11 oz/319 g) all-purpose flour
- 2 tablespoons granulated sugar
- 1 teaspoon instant dry yeast
- 1 teaspoon salt
- 2 large eggs, cold
- ½ cup (4 fl oz/113 ml) whole milk, cold
- ¼ cup (2 oz/57 g) butter , softened
- egg wash
- sesame seeds , for garnish
Instructions
To Make the Brioche Buns Dough
- In the bowl of a stand mixer fitted with the hook attachment, add the flour, sugar, yeast, and salt.
- In a measuring jug, whisk together the eggs and milk.
- Pour the wet mixture into the dry ingredients and mix on medium speed until the dough comes together, about 4 minutes.
- With the mixer on medium low speed, add the butter gradually, 1 tablespoon ( ½ oz/14 g) at a time. Continue to knead the dough for another 6-8 minutes or until it clears the sides of the bowl. This is a soft, shaggy dough.
To Proof the Brioche Buns Dough
- Place the dough into a greased bowl, cover the bowl with plastic and a kitchen towel and allow to proof at room temperature for 1.5 - 2 hours, or until doubled in size. Brioche benefits from being chilled so the butter gets colds. After proofing you can put it in the fridge for a minimum of 2 hours or up to 2 days.
To Shape the Brioche Buns
- Divide the dough into 6 (roughly 3 ¼ oz/95 g) pieces. Shape each piece into a smooth ball and place them on your prepared baking sheet. Cover loosely with cling wrap and allow to rise for about 60 minutes or until doubled in size.
- Towards the end of the proofing time preheat the oven to 375°F (190°C). Line a baking tray with parchment paper and set aside. Brush the buns with egg wash and sprinkle with sesame seeds.
- Bake for 20-22 minutes, or until golden brown.
- Enjoy with your favorite hamburger ingredients! Store any leftover buns in an air-tight container at room temperature for up to 2 days or in the freezer for up to 2 months.
Recipe Notes
- Temperature Management: Keep your ingredients, flour, and eggs cold to start, as the long mixing process generates heat.
- Use quality butter: Use High-Quality Butter for the best flavor and consistent salinity.
- Get the butter just right (The "Goldilocks" Butter): Your butter should be pliable—soft enough that a finger leaves an indentation—but not warm or greasy. This ensures it incorporates properly without melting and making the dough greasy. If it's too cold, it will stay in chunks; if it's too warm, it will separate and make the dough oily.
- Use a stand mixer: Brioche requires intense, long-duration kneading to develop the gluten needed to hold high fat. A stand mixer with a dough hook is highly recommended over hand kneading.
- Build strength first: Knead the flour, eggs, and liquid until they form a smooth, elastic ball before adding any butter. This gives the gluten a head start.
- Hold back liquid: While making your dough, don’t be afraid to hold back on the liquid. You can always add more, but you can’t take it back.
- Add butter gradually: Do not add all the butter at once. Add it tablespoon by tablespoon, allowing each piece to be fully incorporated into the dough before adding more.
- Don’t add extra flour: The dough will be very sticky. Avoid adding more flour while kneading, as this will result in a dense loaf instead of a fluffy one.
- Chill if needed: Don't Fear the Fridge. If the dough exceeds 77–80°F during mixing, the butter may "break" and leak out. If the dough looks shiny or greasy, stop and refrigerate the bowl for 15 minutes before continuing.
- Cold fermentation is key: Always give your dough a chill, anywhere from at least 2–12 hours in the refrigerator. This cold rest solidifies the butter, making the sticky dough easier to handle while also developing deeper flavor.
- Cover properly: A shower cap works great as a cover for proofing bread dough. Instead of plastic wrap, the shower cap is a reusable tool that keeps air from drying out your dough.
- Don’t rush the rise: Enriched doughs rise more slowly than lean doughs. The second rise after shaping can take 2–3 hours depending on your kitchen temperature. Avoid using a warm oven “proof” setting for enriched dough.
- Adjust size as needed: To make sliders, divide into smaller pieces, around 2 1/2 oz each.
- Add whole wheat if desired: Feel free to introduce some whole wheat flour to this dough for more fiber.
- Freeze for later: These buns can be kept in the freezer for up to 2 months so there’s no reason not to make these ahead for the long summer months.


Amazing! Normally I don’t write reviews but this came out amazing. So soft and fluffy. And as a 14 year old it was super easy and super simple. Thank you!
The milk 225ml is wrong….
This recipe is good except the kneading time was way off for me. “Shaggy” is also not how I would describe what the fully kneaded dough should be like. It should be clearing the bowl and needs to be able to withstand some modest tugging if you want something that can reasonably shape into a bun, and that will hold a 1/3 lb burger and toppings. For me that took about 20 minutes. The good news is it’s basically impossible to over-knead something like this and it did come together eventually and make very good buns.
Love it! I’ve customized these with different flours–ww, etc., but what I really enjoy is the brioche sweetness and fluffiness. Full disclosure: totally stole the idea from another baker of briefly resting the tops on a clean wet cloth and dipping them in the seeds, as an alternative to egg wash.
Gemma – I love your recipes! Can I use a sourdough starter instead of yeast? I only have it on hand and shop once a week. Thanks!
Hi Gemma…thank you for this great recipe. I followed your recipe exactly and they turned out wonderful and delicious. I stored some in a plastic bag in the fridge, some in a plastic bag on the countertop, and froze some. The ones that were stored or frozen and not eaten the same day became very dry and crumbly although they still tasted great. Can you tell me what would cause this since they were perfect the first day?
Hi Gemma, thank you so much for this recipe! I will definitely try it out and tell you how it goes. You have been making my quarantine so much more fun and better. One quick question though, can we substitute the butter in for olive oil or avocado oil. I would like to double the recipe but that is a lot of butter, and using oil would be a healthier alternative. Please let me know if that will work or not.
This recipe works great! My rolls came out perfect on the first try. I did chill dough overnight-well worth it
Hi Gemma. I’m writing from Windsor Canada. Just wanted you to know how much I loved the hamburger buns. This was my first time baking these and I have to tell you I was a little worried. The dough looked and felt so different, that I wasn’t sure if they would come out. Well I don’t think I could have made them any better. I also used 4 inch baking rings to make sure they would at least look good. Sorry I get a little long winded. Love this recipe.
I did not think this recipe would work for me as I don’t have a stand mixer. I read the advice not to do this but I used my kitchenaid hand mixer with dough hooks, cautious not to burn the motor/overheat the dough. And wow, they turned out amazing and soft inside. Perfect recipe.