This post may contain affiliate links. Please see my full disclosure for details.
Hi Bold Bakers!
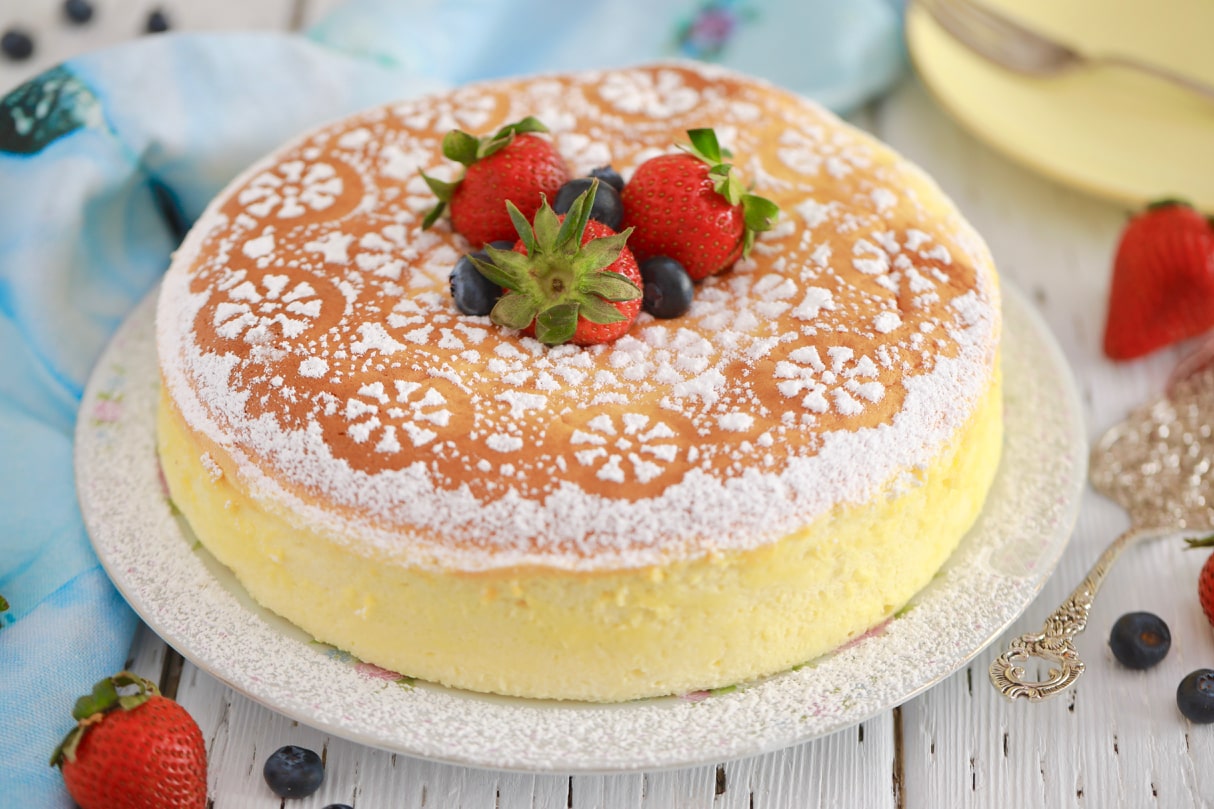
Whatever you know and love about cheesecake is about to change after you try my Japanese Cheesecake recipe! Think cheesecake but with the volume on high. Think “not just impressive,” but pro level. Think rich, creamy taste and light fluffy texture, but to the absolute max.
What is Japanese Cheesecake?
Japanese bakers have refashioned one of my most beloved desserts and somehow made it even better. Japanese Cheesecake (otherwise called a “Japanese cotton cheesecake” or “jiggly cheesecake”) maintains the same tangy sweetness of the popular American dessert but is known for its signature ultra-fluffy texture and custard-like wobbliness.

What makes this cheesecake jiggly?
The not-so-secret secret to my fluffy cheesecake is plain ol’ meringue. Yep, you read that right. Instead of mixing whole eggs into cream cheese, sugar and heavy cream, separate your eggs and whip the them into a glorious glossy meringue. Just at the point when your meringue is done, gently fold it into your warm mixture of melted cream cheese, eggs, sugar, flour, milk and cornstarch. This introduction of the meringue into the cheesecake mixture adds loads of structure and air into your Japanese Cheesecake. Through the baking process, the meringue will set into a tall and fluffy cake that requires no crust, no special toppings, and no bells and whistles. My cheesecake is that impressive on its own!

How to avoid a cracked cheesecake
While this recipe is truly fool-proof, I understand that these steps may be a bit of a departure for those that are used to American cheesecake recipes. That being said, here are things you can do to ensure your Japanese Cheesecake comes out perfectly every time:
- First off, LIBERALLY grease and line your tin as this will ensure you can get the delicate cheesecake. Secondly, it’s essential that you make sure to properly make the meringue mixture to give the cheesecake its texture.
- The next thing you need to do to buy insurance is baking the cheesecake in a water bath. This means baking the cheesecake in a large tin with boiling hot water.* Water creates steam around the cake, keeps it super moist, and helps it rise like a souffle – this is exactly what you want.
- The baking temperature plays a really important role. In the instructions for this recipe, I explain that you start the cheesecake at 400 degrees then lower to the temperature 320 degrees after 18 minutes. It is vital to the success of this cheesecake that you do this exactly on time – definitely a step you’ll want to use your timer for!
- Precisely 12 minutes after lowering the temperature, turn off the oven and crack open the door. Leave the cheesecake in the oven for 30 minutes exactly. The purpose of this is to allow the baking process to stop gradually. Your cheesecake will continue cooking on the outside from the residual heat while the inside of the cake remains creamy and custard-like. This also ensures the top of the cheesecake doesn’t crack from the shock of the temperature change or from the moisture in the air that would be caused by taking it right out of the oven.

I promise that your Japanese cheesecake will look and taste like it was made by a pro if you follow all of these steps. Have no fear Bold Bakers, you’ve got this!
For more incredible cheesecake recipes check out my:
Try These Recipes!


Watch The Recipe Video!
Japanese Cheesecake

Ingredients
- 1 cup (8oz/225g) cream cheese
- 4 tablespoons/60g/2ozs butter
- 7 tablespoons/105g/3.5ozs milk
- 6 large eggs , separated
- 1 ½ tablespoons/22ml lemon juice
- 2 teaspoons/10ml vanilla extract
- ¾ cup (6oz/170g) granulated sugar, divided
- ¾ cup (3 3/4oz/105g) cake flour
- 2 ½ tablespoons corn starch
- ¼ teaspoon salt
- ¼ teaspoon cream of tartar
Instructions
- Grease and line an 8-inch waterproof/leakproof springform tin. A 9-inch round cake pan will also work. To ensure it is water-proof you can wrap the outside of the pan closely with tinfoil. Line a deep baking tray with kitchen cloth. The baking tray has to be larger than the springform tin. You are creating a water bath to bake your cheesecake in. You want to have everything ready to go so you can bake off your cheesecake straight away.
- Melt together the cream cheese, butter and milk in the microwave for roughly 1 1/2 minutes. Whisk the mix until there are no more lumps.
- Next, whisk in the egg yolk, lemon juice, vanilla extract and half the sugar.
- Place a sieve over the bowl and add in the cake flour, corn starch and salt and sieve into the cream cheese mix. Whisk in the dry ingredients until there are no more lumps. Set aside.
- Using a stand mixer or hand mixer, whip the egg whites with the whisk attachment on medium speed. When the meringue starts to take shape, add the cream of tartar. Once thick and at soft peak stage, slowly add the remaining sugar. Whip until meringue turns glossy, has increased in volume and holds a stiff peak.
- Using a thin edged metal spoon, take 1/3 of meringue and fold it into the cream cheese batter to loosen the mixture. Cut and fold the meringue swiftly but gently to minimize deflation of the meringue. Fold in the remaining meringue until blended. The resulting batter should be light and airy at this point .
- Pour the cheesecake batter into the prepared cake pan. Place the cake pan in the larger dish then place both in the oven. Pour boiling hot water into the water bath until about halfway up the sides of the cake pan. Be careful not to splash water into the batter.
- Bake on the bottom rack in a preheated 400oF (200oC) oven for 18min, then lower to 320oF (160oC) for 12 mins only. Then turn off the oven and open the door of the oven slightly for 30 minutes only. Then remove from the oven completely to cool at room temp.
- Turn out the cheesecake from the pan onto a cake plate and serve. Store in the fridge in an airtight container for up to 3 days.


Mine was a flop. Middle was SO runny… bottom wasn’t done… and I’m a bawling mess… I followed this recipe to the letter. I dont understand what went wrong.
Hi Gemma, I tried baking this Japanese cheesecake and followed your ingredients and instructions to the “T”. Unfortunately, the cake was only cooked on the top and the inside was uncooked. I was pretty disappointed. What do you think went wrong? The cake rose after 18 minutes at 200C. However after lowering the heat to 160C for baking time of 12 minutes and leaving the oven door ajar for 30 minutes after that did not result in the cake being thoroughly cooked. Appreciate your feedback. Thank you.
Hi there, it is best not to fiddle with a recipe. 1 cup (8oz/225g) cream cheese 4 tablespoons butter 7 tablespoons milk 6 large eggs, separated 1 ½ tablespoon lemon juice 2 teaspoons vanilla extract ¾ cup (6oz/170g) granulated sugar, divided ¾ cup (3 3/4oz/105g) cake flour 2 ½ tablespoons corn starch ¼ teaspoon salt ¼ teaspoon cream of tartar This is what you need for this one if you change the value of one ingredient you change every ingredient, the size of the pan and then bake time. If you decide to do it then it is math, to… Read more »
Hi Gemma, I’m not a professional cook, but I have 50 years of experience as a cook and baker. This was my first time with this kind of recipe. I think that all recipes, no matter where you live or what machinery/utensils you use will not turn out exactly like the original baker. It’s a question of practice, patience and TLC (very important ingredient)! Mine didn’t turn out exactly like yours, but it tasted great! I’ll keep repeating.Thanks for sharing all your knowledge! You’re super! ????
Hi Gemma, need help. Im so excited to try this for my daughter’s 25th month on Dec2. However, my springform tin is 24cm and my round cake pan is only 7 inches. Please advice which is better to use and how will I adjust the baking time. Thanks a lot in advance.
Gemma, after reading so many comments saying the cake was under baked, I had to wonder if the oven temperature dropped too much when it the cake went into the oven. The instructions say to put the cake and the large baking pan in the oven and then fill the pan with hot water. Keeping the oven door open for so long is sure to drop the temperature significantly. Just a thought.
Hello Gemma! I just made your Japanese cheesecake for the first time and it was a success! Thank you so much for your foolproof recipe! It was delicious and the texture is super light and moist! I used only 140 grams of sugar and it worked perfectly for our taste buds. Totally like what I remembered from a Japanese restaurant! Love your recipes! Many thanks again!
I halved the recipe because I wanted to make 4-ounce ramekin cheesecakes. I was able to make seven. Because I could only bake up to four at a time, I decided to try different baking times. For the first batch I reduced the baking times by two minutes each. I had to take them out right away instead of letting them sit in the open oven because they were already quite browned on top. They were more cakey, but still tasted like cheesecake! The second batch I reduced the baking times by five minutes each. The texture was much better,… Read more »
Followed the recipe “to a t” but having troubles having baking it all the way through. It’s still delicious and though my troubleshooting has resulted in possible overbaking and ruining the “fluffiness” (though what ruined the fluff is still up in the air…), it was still edible and the new texture wasn’t bad. It’s not too sweet and makes a delightful breakfast/tea bread. It’s not a bad recipe but the way it cooks definitely puts a damper on things. I’m going to try out a few more baking time/temp combos… I tried this a couple times… For those experiencing the… Read more »
It’s taken some practice but I think I’m getting the hang of it. I struggled with a springform but a regular cake pan seems to be helping. My first one wasn’t done in the middle, wasn’t brown on top, and was dense on the bottom. I blame cooking times and my foil not being high enough to prevent water from getting in the springform. Second one was done all the way through but was dense on the bottom, again due to the foil leaking. However I did use near-boiling water for the water bath before putting it in the oven… Read more »
Tried this at the weekend after seeing one on Bake Off. Was absolutely lush. Thank God you can freeze it otherwise I’m in danger of consuming my own body weight it’s so nice. Complete convert from the New York version!