
This post may contain affiliate links. Please see my full disclosure for details.
Hi Bold Bakers!
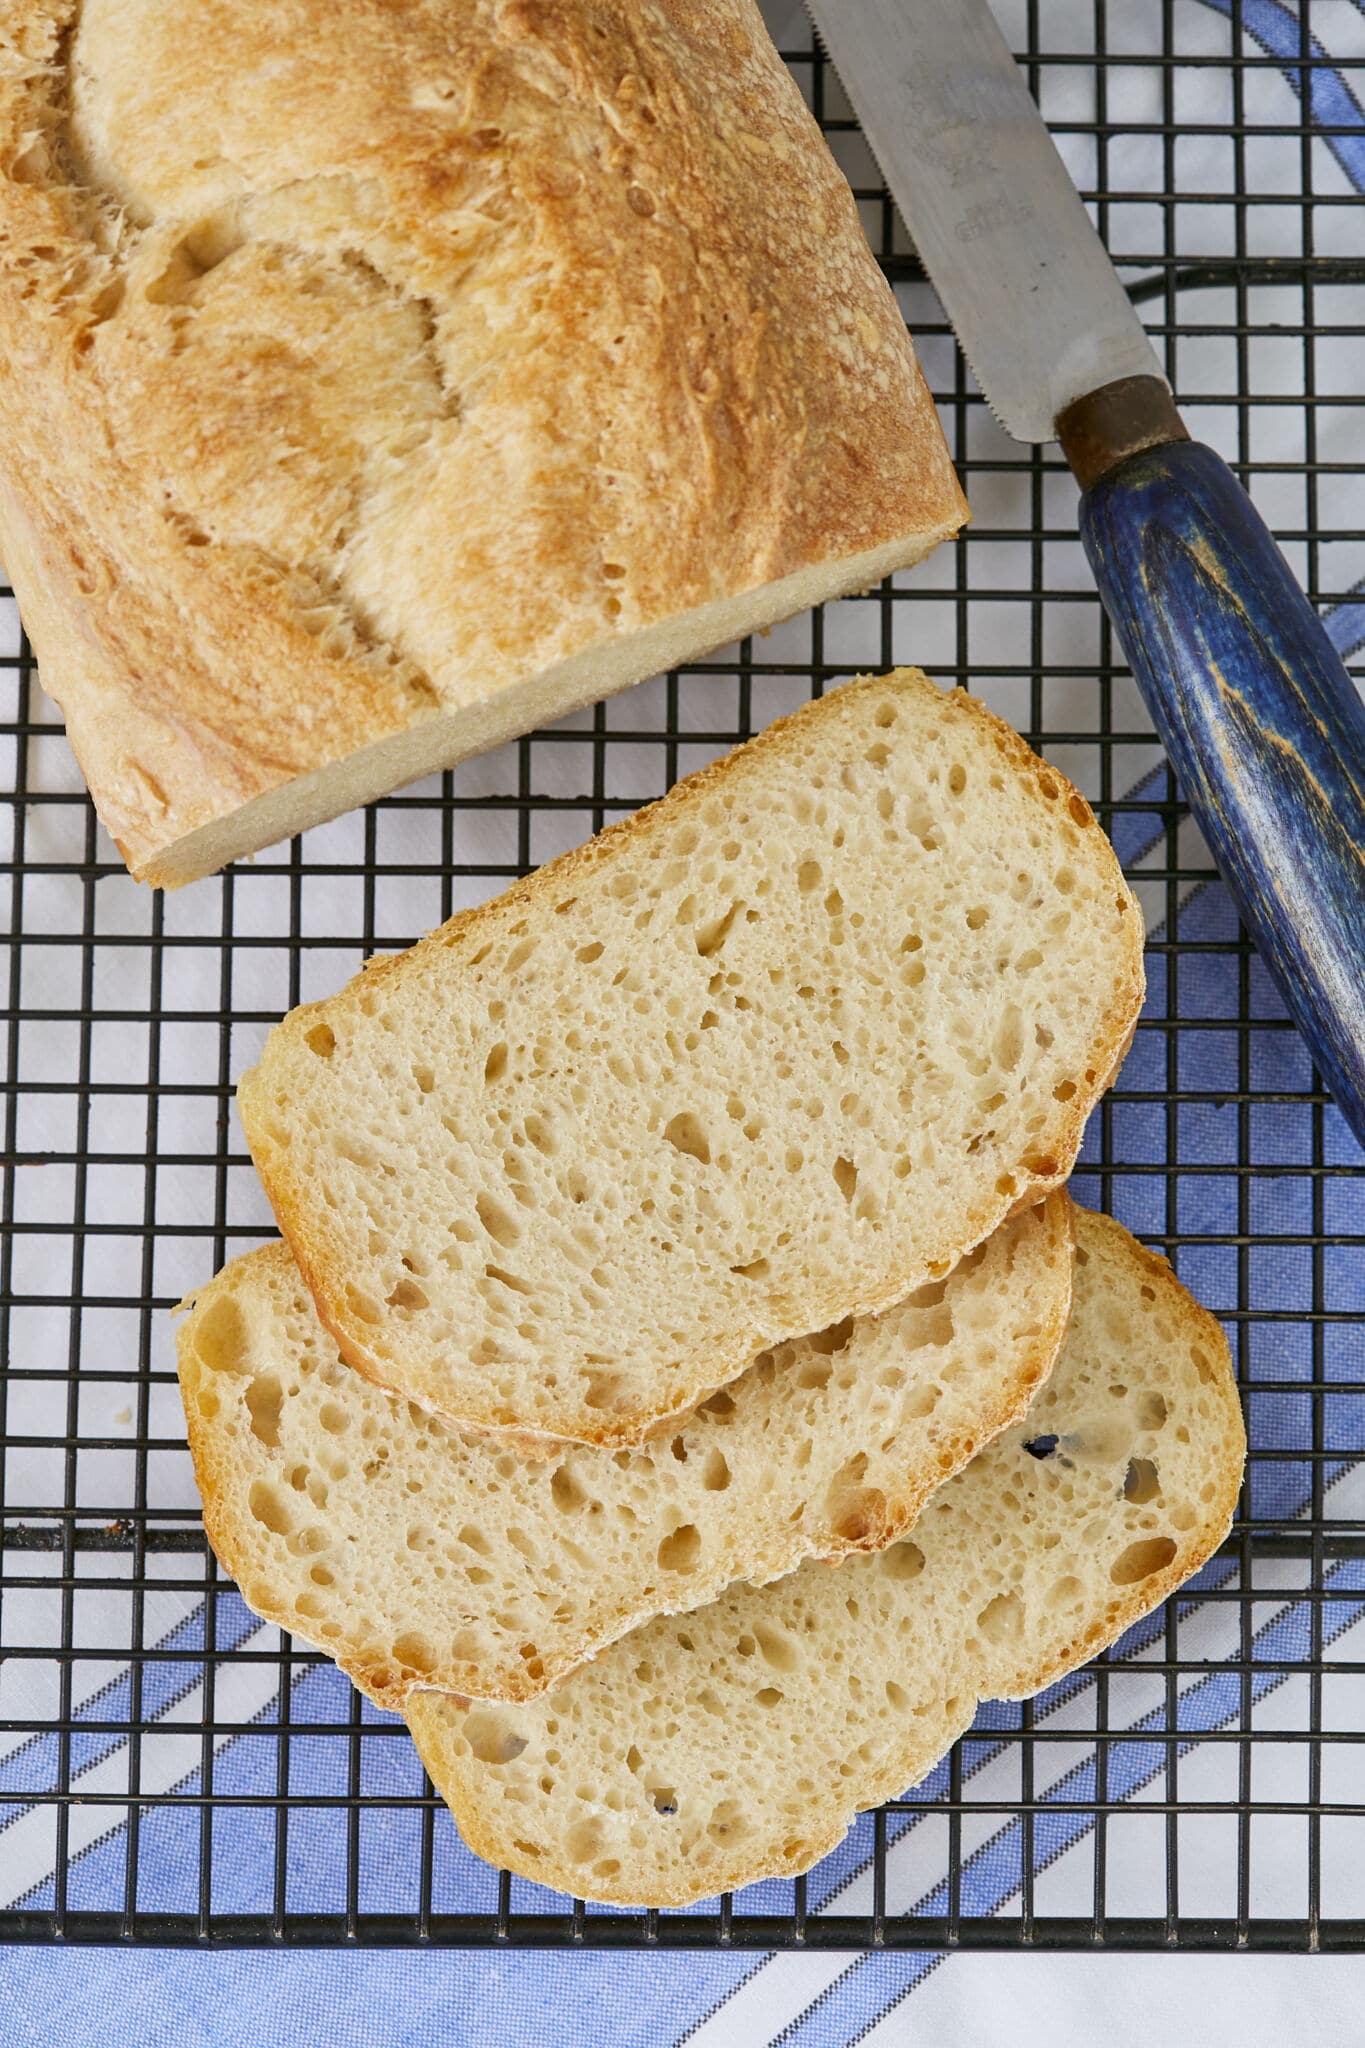
WHY YOU’LL LOVE THIS RECIPE: This 5-Ingredient No-Knead Sandwich Bread is the loaf that quietly replaced store-bought in our house. It’s the one my son reaches for first when he wants a PB&J—soft, sturdy, and dependable every time. With minimal hands-on work and just pantry staples, this bread delivers a golden crust and a tender, even crumb that feels far more special than its simple method suggests.
If you love easy, time-driven doughs like my Bakery-Style No-Knead Ciabatta Bread, The Easiest No-Knead Baguette, or even something sweet like Easy Cinnamon Rolls Recipe (No knead), this recipe will feel right at home in your kitchen. I adore the ease of this dough and how versatile it is.
- Effortless Method: No kneading, no mixer, and very little active time—just mix the dough and let time do the work for you.
- Pantry-Staple Ingredients: Made with only 5 affordable basics you likely already have, with no preservatives or unnecessary additives.
- Perfect for Sandwiches: Bakes into a soft yet sturdy loaf that slices cleanly and holds everything from peanut butter and jam to savory fillings.
- Endlessly Adaptable: Lovely as-is, but also a blank canvas for grated cheese, toasted nuts, dried fruit, herbs, or a simple whole wheat swap.
Bold Bakers Loved This!
“I did exactly as instructed. And OMG this bread was awesome it lasted gone in a half our my family loved it. I started it Saturday night. It was ready for our Sunday dinner. I will be making this over and over! This was my first time ever making bread came out perfect
Thanks so much for this recipe :^)” — Bridget
“OMG! I do not think I will ever buy bread again! What a lovely bread this is. I am having a piece right now toasted. Thank you for this recipe!” — Susan C.
“Amazing recipe! So easy, and surprisingly fun and liberating! This may have been my first time baking a bread other than banana, monkey, or soda. I made a half-batch as a mini loaf. I intend to experiment for a slightly less crunchy crust. All-purpose flour, yeast, salt, and water… Back to basics in the best of ways!” — Kelly L
IMPORTANT NOTE: This recipe was improved and updated on 1/4/2026, to include make-ahead and storage instructions, what to serve this bread with, answers to the most frequently asked questions, and Pro Chef Tips.
Table of Contents
- Tools You Need
- Key Ingredients and Why
- How to Make 5-Ingredient No-Knead Sandwich Bread
- Gemma’s Pro Chef Tips
- Make Ahead and Storage Instructions
- What to Serve With
- FAQs
- More No Knead Bread Recipes
Tools You Need
- Measuring cups and measuring spoons
- Large mixing bowl
- Wooden spoon or hand whisk
- 9×5-inch (23×12½ cm) loaf pan

Key Ingredients and Why
-
Bread flour
- Bread flour has a high protein content of 12%-14% to naturally and easily develop more gluten and retain more air, resulting in a stronger and more elastic dough.
- Hence bread flour is essential for supporting the rise of the bread and creating a more airy structure.
- The extra protein also contributes to a slightly nutty taste.
-
All-purpose flour
- Comparatively, all-purpose flour (plain flour) has a protein content of 8%-11%.
- Less gluten makes the dough more pliable than using 100% bread flour and helps with a softer and more tender crumb.
- All-purpose flour offers a mild and neutral flavor.
(The differences explain why both bread flour and all-purpose flour are used in the recipe at the same time. The combination of bread flour and all-purpose flour allows bakers to achieve a balance of perfect characteristics with improved texture, flavor and structure. )
-
Salt
- Salt enhances the flavor, prevents the dough from rising too fast, strengthens the gluten, improves the extensibility, and acts as a natural preservative to extend the bread’s shelf life.
-
Yeast
- Instant yeast can be put directly into the dry ingredients. Note to avoid direct contact with salt by mixing it with flour first so it won’t get deactivated.
- If preferred, for each teaspoon of instant yeast, use 1 ¼ teaspoons of active dry yeast instead. Bring the liquid in your recipe to blood temperature and mix in active dry yeast. Let it sit at room temperature for roughly 5 minutes until foam forms on top. Mix the mixture with remaining ingredients and continue per the instructions.
-
Warm Water
- Lukewarm water activates and optimizes the growth of yeast.
- To tell whether the water is lukewarm, take a small amount of water and put your finger in it, if it feels close to your body temperature or slightly warmer, then it’s lukewarm water.
How to Make No-Knead Sandwich Bread
The Day Before
- Mix Dry Ingredients: In a large bowl, combine the bread flour, all-purpose flour, salt, and yeast by hand. You can also use a rubber spatula.
- Add Water: Stir in the lukewarm water until a loose, shaggy dough forms.
- Bulk Ferment (first rise): Cover tightly with plastic wrap and let rise at room temperature for 12–18 hours, until bubbly and well-developed. (After 18 hours, use immediately or refrigerate for up to 2 days.)
The Next Day
- Prepare the Pan: Butter a 9×5-inch (23×12½ cm) loaf pan and set aside.
- Deflate the Dough: Gently knock the air out of the dough and transfer it to a lightly floured surface.

- Shape the Loaf: Press the dough into an 8×12-inch (20×30 cm) rectangle, fold it in thirds like a letter, then place seam-side down into the prepared pan.

- Final Proof: Cover and let rise in a warm place until doubled in size, about 1½–2 hours. Toward the end of proofing, preheat the oven to 450°F (230°C).
- Score the Top: Lightly dust the top of the dough with flour and score down the center with a sharp knife.

- Bake Until Golden: Bake for 35–40 minutes, until the top is a deep golden brown.
- Cool Completely: Remove from the pan and cool on a cooling rack fully before slicing.
FULL (PRINTABLE) RECIPE BELOW!
Gemma’s Pro Chef Tips
- Double with Ease: This recipe can be easily doubled to make two loaves—perfect for freezing or sharing.
- Maximize Flavor: Let the dough ferment for the full 18 hours whenever possible for the best flavor and texture.
- Add Seeds for Texture: Stir in ½ cup (2½ oz/71 g) sesame or sunflower seeds when mixing the dough for a heartier loaf.
- Use the Fridge Wisely: After the 18-hour bulk ferment, the dough can be refrigerated for up to 2 days. Just note that cold dough will take longer to proof in the loaf pan.
- Be Patient with Proofing: If your dough is cold, allow extra time during the final rise—it should double in size and hold a light finger indentation when ready to bake.
- Sourdough version: Try my Perfectly Crusty Sourdough Bread if you want a sourdough version.
Make Ahead and Storage Guidance
- Cool Completely First: Always let the bread cool fully on a wire rack before storing to prevent sogginess.
- Store at Room Temperature: Keep the loaf in an airtight container for up to 4 days.
- Freeze for Longer Storage: Slice the whole loaf and freeze up to 8 weeks. Toast or warm slices as needed.
What to Serve With This Bread
- Classic Sandwiches: PB&J, turkey and cheese, ham and Swiss, or roast beef.
- Open-Faced Toasts: Avocado, smoked salmon with cream cheese, or tomato and mozzarella.
- Dips & Spreads: Hummus, spinach artichoke dip, or creamy cheese spread.
- Soup Pairings: Tomato, mushroom, chicken noodle, or butternut squash soup.
- Butter & Jam: Fresh homemade butter or your favorite fruit jam adds classic sweetness. Try my Butter & Jam Bread Pudding for a cozy twist. Or enjoy it with my 7 Easy Compound Butter.
- Cream Cheese: Softened plain or whipped cream cheese is silky and tangy, perfect on its own or paired with jam. (Bigger Bolder Baking Cream Cheese Guide)
- Nutella or Cookiebutter: Rich spreads like Homemade Nutella or Homemade Cookie Butters make an indulgent topping for thick slices.
- Breakfast & Brunch: French toast or open-faced egg sandwiches.
- Snack & Side Ideas: Sliders, grilled sandwiches, paninis, or cubed for salads and soups.
FAQs
What’s the difference between no-knead sandwich bread and traditional sandwich bread?
- Traditional sandwich bread relies on kneading to connect protein and water to build the gluten network with an even crumb.
- No-knead sandwich bread relies on extended fermentation, creating irregular air pockets.
- Yeast works slowly, feeding on the sugars in flour to release carbon dioxide and naturally raise the dough.
- Long fermentation also releases alcohol, adding depth and flavor—time does most of the work.
What’s the difference between no-knead sandwich bread and no-knead artisan bread?
- No-knead sandwich bread is baked in a rectangular loaf pan to create uniform slices with a soft, tender crumb that holds fillings well.
- Artisan bread is often baked on an open tray or pizza stone, with a chewier crust and a more open, airy crumb.
- Artisan bread is typically enjoyed on its own or with cheeses, dips, olive oil, or spreads.
Can I make no-knead sandwich loaves with gluten-free flour(s)?
- No, this yeast recipe requires gluten to build structure.
- For gluten-free alternatives, try my Keto and Gluten-Free Bread Recipe or Hearty No-Yeast Bread Recipe.
Can I add herbs or other flavorings?
- Yes, add herbs, garlic, cheese, or other flavorings after the dough has formed for a customized loaf.
Can I incorporate whole wheat flour?
- Replace up to half of the all-purpose flour with whole wheat flour for extra nutrition and flavor.
- Avoid using more than 50%, or the loaf may turn out heavy and dense.
Can I reduce or omit the salt?
- Yes, adjust salt to taste.
- Keep in mind that less salt can result in less flavor and a softer chew.
Can I freeze the raw dough?
- Yes, freeze after bulk fermentation in an oiled bag or container.
- Defrost at room temperature, knock out the air, shape, and allow to proof before baking.

More No Knead Bread Recipes
- The Easiest No Knead Baguette
- No-Knead Homemade English Muffins
- Bakery-Style No-Knead Ciabatta Bread
- No-Knead Best-Ever Cinnamon Rolls
- Baked No-Knead Donuts
IMPORTANT NOTE: This recipe was improved and updated on 1/4/2026, to include make-ahead and storage instructions, what to serve this bread with, answers to the most frequently asked questions, and Pro Chef Tips.
Try These Recipes!


Watch The Recipe Video!
Easy No-Knead Sandwich Bread (5 Ingredients)

Ingredients
- 1¾ cups (8¾ oz/247 g) bread flour
- 1½ cups (7½ oz/213 g) all-purpose flour
- 1½ teaspoons salt
- 1 teaspoon instant yeast
- 1½ cups (12 fl oz/360 ml) water , lukewarm
Instructions
The Day Before
- In a large bowl, mix together the bread flour, all-purpose flour, salt and yeast.
- Stir in the water until a loose, shaggy dough has formed.
- Cover with plastic wrap and let rise at room temperature for a minimum of 12 hours but up to 18 hours. (After the 18 hours you can use it or put it in the fridge for up to 2 days)
The Next Day
- Butter a 9x5-inch (23x12½ cm) loaf pan. Set aside.
- Knock the air out of the dough and transfer to a floured surface.
- Using your hands, shape into an 8x12-inch (20x30 cm) rectangle. Starting at an 8-inch (20 cm) edge, fold in thirds like a letter, then place, seam side down into the prepared loaf pan.
- Cover and let rise until doubled in size, 1 ½ - 2 hours. Towards the end of the rise time, preheat the oven to 450°F (230°C).
- Dust the loaf with a bit of flour and score down the center with a sharp knife.
- Bake for 35-40 minutes, until the top of the loaf is a deep golden brown. Let cool completely before slicing.
- This bread is best enjoyed fresh, but you can store any leftovers in an airtight container at room temperature for up to 4 days. It also can be sliced and frozen for up to 8 weeks.
Recipe Notes
- Double with Ease: This recipe can be easily doubled to make two loaves—perfect for freezing or sharing.
- Maximize Flavor: Let the dough ferment for the full 18 hours whenever possible for the best flavor and texture.
- Add Seeds for Texture: Stir in ½ cup (2½ oz/71 g) sesame or sunflower seeds when mixing the dough for a heartier loaf.
- Use the Fridge Wisely: After the 18-hour bulk ferment, the dough can be refrigerated for up to 2 days. Just note that cold dough will take longer to proof in the loaf pan.
- Be Patient with Proofing: If your dough is cold, allow extra time during the final rise—it should double in size and hold a light finger indentation when ready to bake.


I did it, yea me! I followed the very easy instructions. It smells and looks fabulous. My husband stopped painting the house to come in and see what smelled so good. I am making spaghetti and meatsauce with Italian sausage for dinner and this heavenly bread will be a great accompaniment.
Hi Gemma, I’d like to add walnuts and dried cranberries to this recipe. May I know when do I add that and how long do I proof it before sending it for baking. Also, the max temperature of my oven is 200 degrees C, your recipe calls for 230 degrees C with a baking time of 35-40mins. If I bake it at 200 degrees C, how long do I need to extend the baking time? Appreciate your respond. Thanks
I have made this twice now. First time weighing the flour and the second time measuring using cups. Both times I have left for the 18 hours and then proofed for 2 hours. The dough is still very sticky. I try pushing it down like you suggest to see if proofed as it has doubled in size but it just sticks to my finger and seems quite wet. I did cook it anyway and it tasted amazing but didn’t seem as dense as yours
Don’t know where I went wrong. My dough was very wet. I added over a 1/4 cup of additional flour and it was still wet. So, I put saran wrap over it to see if it would rise. It did a bit but then just sank. I still perservered and waited 18 hours. Then this morning, I added more flour as it was still too wet to take out of the bowl. I got it out and punched it down, folded in thirds. Let rise for 2 hours. Still too wet. My finger stuck when doing the touch test to… Read more »
I did exactly as instructed
And OMG this bread was awesome it lasted gone in a half our my family loved it
I started it Saturday night
It was ready for our Sunday dinner
I will be making this over and over
This was my first time ever making bread came out perfect
Thanks so much for this recipe :^)
Sincerely, Bridget
Hi, my dough just ended up being really wet still?
OMG! I do not think I will ever buy bread again! What a lovely bread this is. I am having a piece right now toasted. Thank you for this recipe!
This bread is the best ever! I make it over and over in double batches and it’s gone so fast, thank you for an amazing easy recipe Gemma!
Hi Gemma, thank you for all your amazing recipes. I have been making bread for a while now but this is the best and easiest. I love it for toast but find that it can go very hard when toasted although it tastes great. What am I doing wrong? Thank you, Cath
I forgot salt! It’s been in the bowl overnight for 18 hours. Can I go ahead and bake it?