This post may contain affiliate links. Please see my full disclosure for details.
Hi Bold Bakers!
IN THIS ARTICLE: You’re going to learn a simple and beautiful way to decorate holiday cookies as snowflakes using royal icing. You’ll also find links to my Gingerbread Cookies, my Best-Ever Sugar Cookies, and more.
For the sake of keeping things easy, festive, and time-saving, we’re going to get right into it. If you’re looking for ways to decorate your holiday cookies or Christmas cookies, you’ve come to the right place. My Simple Snowflake Cookie Decorating method is going to get you the results you need in no time at all. But first, here’s a little context.
Cookies To Use
First off, what kind of cookies should you be baking for this holiday cookie decorating method? Simple — any cookie that will hold up to a snowflake cookie cutter. That means cookies that are just the right amount of crisp, not too soft, and not too chewy. I recommend something like my Gingerbread Cookies or my Best-Ever Sugar Cookies.
Want to know a little secret, though? If you don’t have a snowflake cookie cutter, or just prefer a basic round cookie, you totally can use soft or chewy cookies as well. Nobody is stopping you, you’ll just have to make the design smaller to fit onto the circle canvas instead of conforming to the arms of the cut-out snowflake. Go ahead and try it on my Chewy Sugar Cookies or Soft Sugar Cookies if you want!

The Right Icing For The Job
For this technique, it’s best to use my royal icing recipe. Don’t get this confused with royal icing you use for cakes — they’re not the same! You’ll want to use royal icing as it hardens beautifully — it’s what all those fancy cookie decorators you see on social media and TV use! It’s the ideal effect.
Oh, and if you want to, just add food coloring to your royal icing to make whatever color best matches your artistic vision. If you want green snowflakes, I’m not going to stop you.
What You Need To Make Snowflake Cookies
- 1 recipe of Gingerbread Cookie Dough or Sugar Cookie Dough
- 1 recipe of Royal Icing
- White sprinkles, sanding sugar, or dragees
- Special equipment: large (3 or 4-inch/8-10cm) snowflake cookie cutter, piping bag fitted with a small round writing tip
How To Make Your Snowflake Cookies

Real quick, I’m going to go through the whole process here — but really, you can follow whichever cookie recipe you choose and adhere to those baking instructions. Here’s how you bake and then decorate your snowflake cookies:
- Preheat the oven to 350°F and line two baking sheets with parchment paper. Set aside.
- On a floured surface, roll out the cookie dough to 1/4 inch (5mm) thick, cut out as many snowflakes as you can, and place on the prepared baking sheets, about 1-inch (3cm) apart.
- Bake the cookies for 10-12 minutes, rotating the pans halfway through, until the surface looks dry. Transfer the cookies on the wire racks to cool completely.
- Once completely cool, place the cookies on a work surface or baking sheet.
- Set up bowls of sprinkles, sanding sugar, or dragees nearby.
- Place a small amount of royal icing in your piping bag and check the consistency by piping a line of icing onto a plate. It should pipe smoothly and hold its shape. If it is too thick and doesn’t pipe smoothly, stir in a few drops of water and test again. If it runs, stir in a teaspoon or two of powdered sugar and test again.
- Once the consistency is correct, you can go ahead and fill your piping bag.
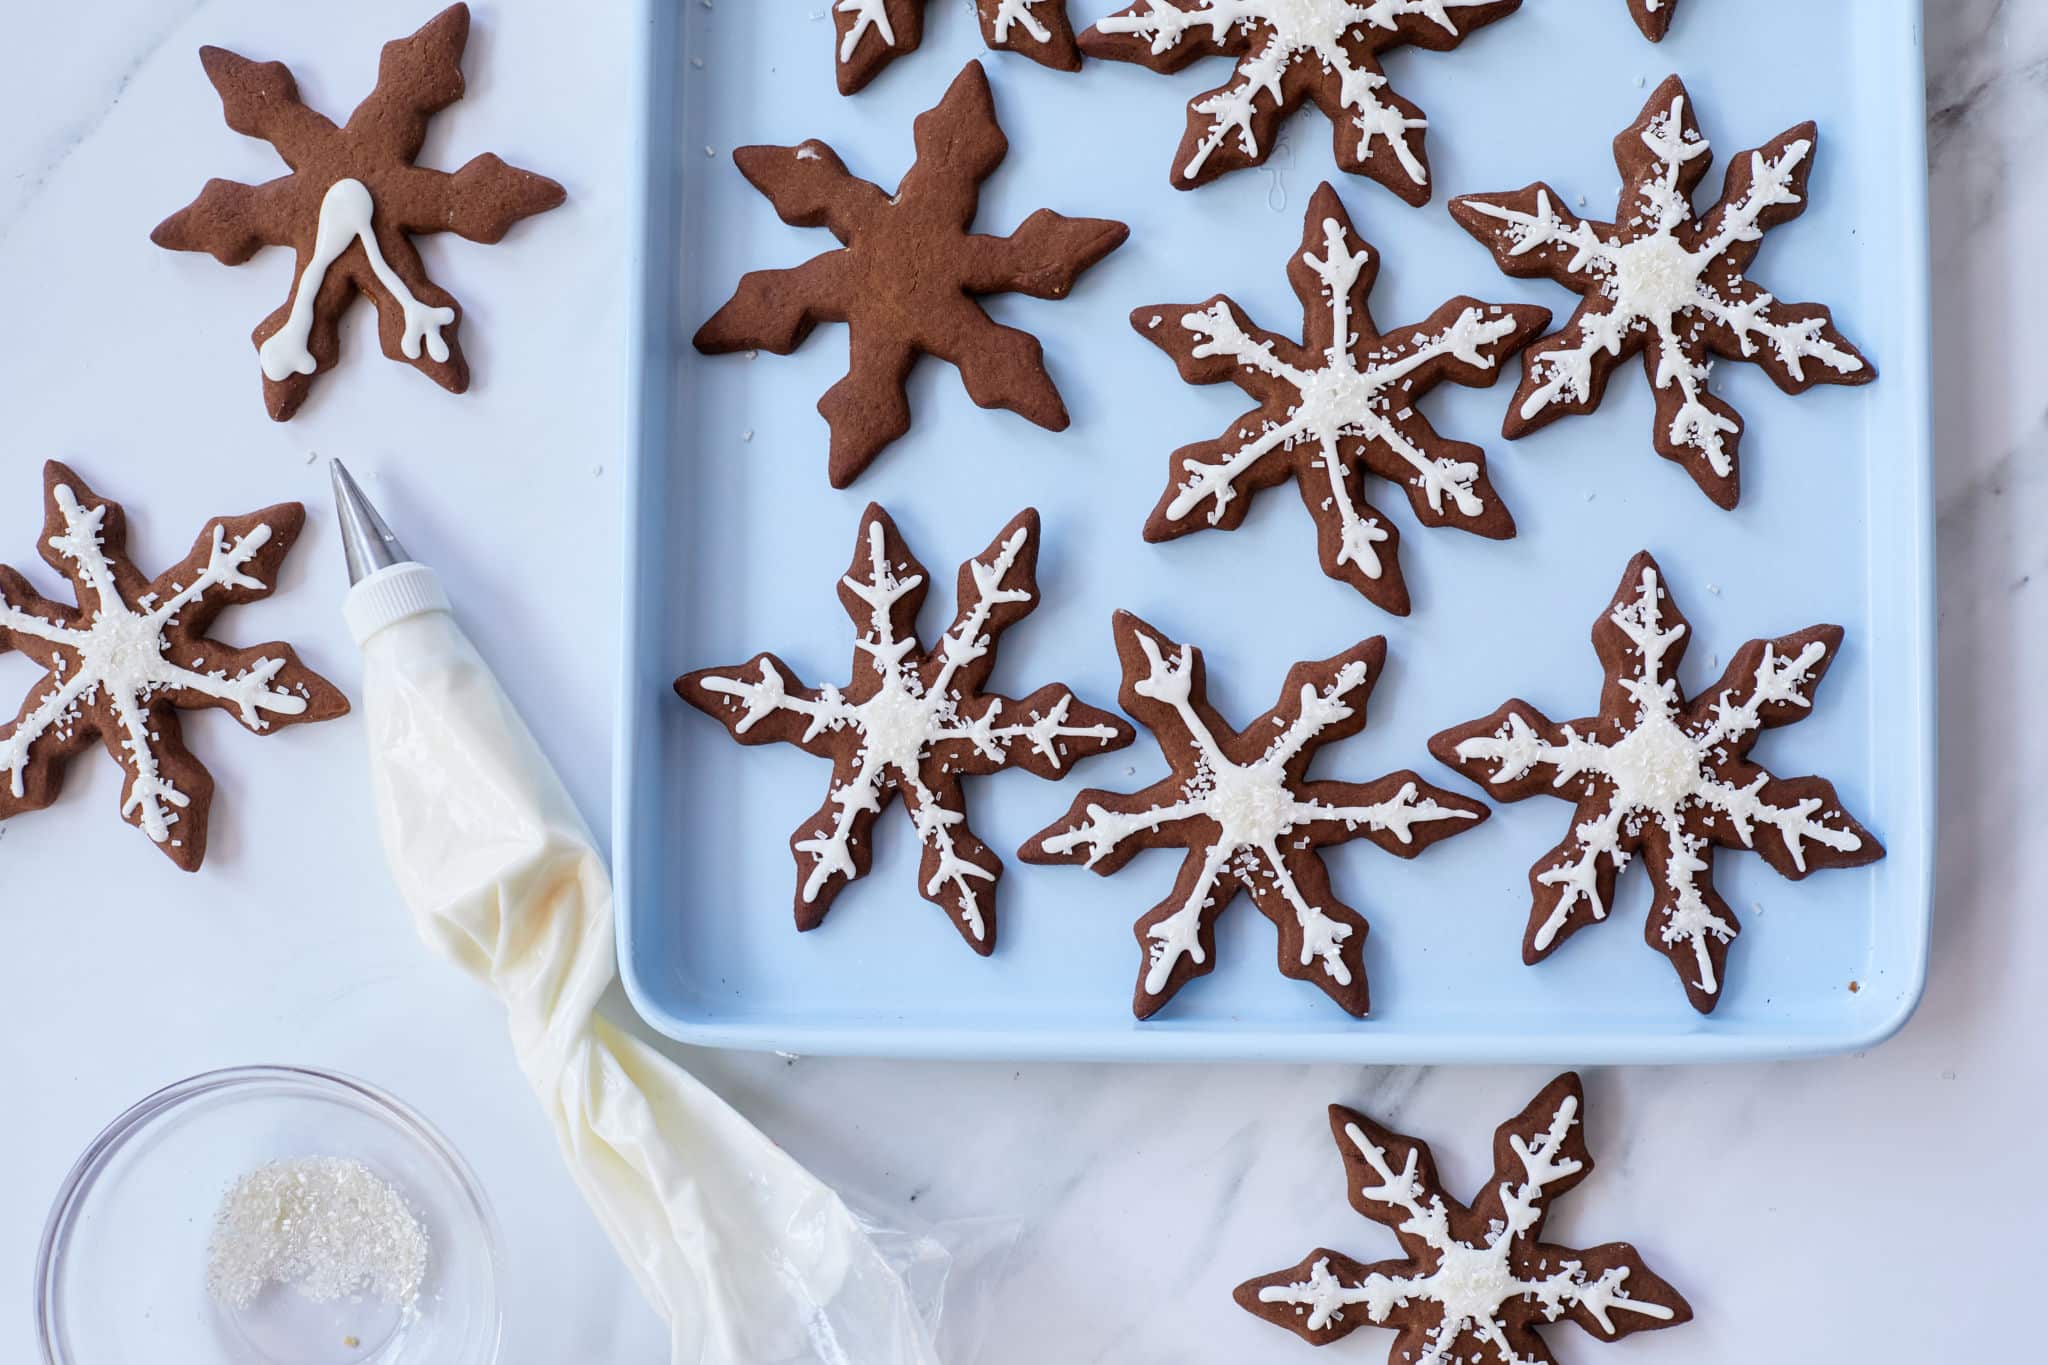
- Working with one cookie at a time, pipe a large dot of icing in the center of the snowflake. Then, from the dot, pipe a line of icing down the center of each arm of the snowflake. Pipe a few small v-shaped branching details from the centerline of the icing arms to the edge of the cookie.
- Finally, before the icing has been set, add sprinkles, sanding sugar, or dragees to the cookie. Set aside while you decorate the remaining cookies.
- Allow the icing to dry completely before storing the cookies in an airtight container at room temperature for up to 3 days.
Tips For Decorating Holiday Cookies
- If you don’t have a snowflake cookie cutter, you can always use a round cutter and draw a snowflake design on the cookie using my directions!
- You can use my other roll and bake sugar cookies for these cookies if you prefer!
- Shortbread cookies are also a great choice for cookie decorating.
- Royal icing can be colored with a few drops of food coloring if you wish.
- Cut a small hole in the center of these cookies before baking — when done and decorated, place some ribbon through the hole and hang it on your tree!
- Use these snowflake cookies to make a Christmas cookie wreath!

Shipping Cookies
If you’re curious as to how to ship your holiday cookies — including these gorgeous snowflake cookies you just made — then check out my Guide To Shipping Cookies!
‘Tis The Season (For More Cookies!)
Have you seen my two new cookie lists? Check out The Top 10 Classic Christmas Cookies and the Top Holiday Cookies of 2021!
And don’t forget to buy my Bigger Bolder Baking Cookbook — it makes the perfect gift!
Plus, SUBSCRIBE NOW to the Bold Baking Academy for exclusive in-depth baking courses, The Baking Concierge™, and the Bold Baking Academy Community!
Get More Articles!


Simple Snowflake Cookie Decorating Guide

Ingredients
- 1 batch of gingerbread cookie dough
- 1 batch of royal icing
- White sprinkles (sanding sugar or dragees)
Instructions
- Preheat the oven to 350°F and line two baking sheets with parchment paper. Set aside.
- On a floured surface, roll out the cookie dough to 1/4 inch (5mm) thick, cut out as many snowflakes as you can, and place on the prepared baking sheets, about 1-inch (3cm) apart.
- Bake the cookies for 10-12 minutes, rotating the pans halfway through, until the surface looks dry. Transfer the cookies on the wire racks to cool completely.
- Once completely cool, place the cookies on a work surface or baking sheet.
- Set up bowls of sprinkles, sanding sugar, or dragees nearby.
- Place a small amount of royal icing in your piping bag and check the consistency by piping a line of icing onto a plate. It should pipe smoothly and hold its shape. If it is too thick and doesn’t pipe smoothly, stir in a few drops of water and test again. If it runs, stir in a teaspoon or two of powdered sugar and test again.
- Once the consistency is correct, you can go ahead and fill your piping bag.
- Working with one cookie at a time, pipe a large dot of icing in the center of the snowflake. Then, from the dot, pipe a line of icing down the center of each arm of the snowflake. Pipe a few small v-shaped branching details from the centerline of the icing arms to the edge of the cookie.
- Finally, before the icing has been set, add sprinkles, sanding sugar, or dragees to the cookie. Set aside while you decorate the remaining cookies.
- Allow the icing to dry completely before storing the cookies in an airtight container at room temperature for up to 3 days.

