
This post may contain affiliate links. Please see my full disclosure for details.
Hi Bold Bakers!
WHY YOU’LL LOVE THIS RECIPE: This Chocolate Chip Cookie Cake is everything you crave in a dessert—chewy, soft, and generously filled with creamy buttercream frosting. It’s a homemade treat that stands out and is sure to impress at any gatherings.
- Chewy & Soft Texture: The perfect balance of chewy and soft in every bite.
- Generous Buttercream Filling: Rich, velvety buttercream frosting that makes each layer irresistible.
- Better than Store-Bought: Fresh, homemade flavor that beats any store-bought cake or cookie.
- Perfect for Any Celebration: A showstopper for birthdays, parties, or just because!
This cookie cake recipe holds a special place in my heart. Back in my 20s, I worked as a pastry chef at a Michelin-starred restaurant in San Francisco. The cookies we made were an absolute hit—so popular with both customers and the staff that we would bake them constantly. I remember the joy on people’s faces when they bit into those warm, chewy cookies. They quickly became one of the restaurant’s signature treats.
After years of perfecting this recipe, I kept it safe in my notebook, knowing it was something truly special. In 2013, I decided to turn those beloved cookies into a giant cookie cake. It was an instant favorite, and I’ve made it countless times for birthdays and celebrations since. Now, 11 years later, I’ve updated the recipe to make it easier for you to recreate at home.
Bold Bakers Loved This!
“I just made this for my boyfriend’s birthday and it was a huge hit! It was what he wanted and everyone couldn’t stop raving about it!” –Chloe
“Both the chewy texture on the outside and the soft gooey part on the inside are spot on! The flavor was irresistible!” — Lucy
“It looks amazing and so did it taste!” — Michelle
IMPORTANT NOTE: This recipe was updated on 2/27/2025, to include a NEW step-by-step tutorial video, NEW step-by-step photography, explanations, and substitutes of key ingredients, Make-ahead and storage instructions, answers to the most frequently asked questions, and Pro Chef Tips.
Table of Contents
- What is a Cookie Cake?
- Tools You Need
- Key Ingredients and Substitutes
- How to Make a Homemade Cookie Cake
- Gemma’s Pro Chef Tips
- Make-Ahead and Storage Instructions
- Creative Toppings
- More Layered Chocolate Cake
What is a Homemade Cookie Cake?
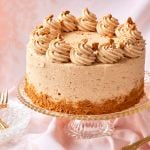
A cookie cake is a delicious dessert that combines the rich, chewy texture of a cookie with the indulgence of a cake. It’s giant chocolate chip cookies baked in large round cake pans, usually frosted, and perfect for sharing at celebrations. Here’s what makes it so special:
- Chewy & Soft: The cookie cake has the same chewy texture as a classic cookie but with a larger, cake-like form.
- Layered with Frosting: Often topped or layered with creamy frosting, adding sweetness and richness to every bite.
- Perfect for Sharing: Its large size makes it perfect for gatherings, birthdays, and celebrations.
- Customization Friendly: You can add a variety of mix-ins, toppings, or flavors to personalize your cookie cake.
Tools You Need
- Measuring cups
- Measuring spoons
- Measuring jug
- Mixing bowls
- Whisks
- 4 9-inch c pans or a round cake pans
- Parchment paper
- Oven (or toaster oven)
Key Ingredients and Substitutes
")
Butter
- Provides moisture, richness, and flavor, helping to achieve that chewy texture. I prefer salted butter but unsalted butter will also work.
- Substitute: You can use margarine, vegetable oil, or coconut oil as a substitute, though the flavor and texture may vary.
Granulated Sugar
- Adds sweetness and helps with the structure and texture of the cookie cake. Both dark and light brown sugar will work.
- Substitute: You can use brown sugar for a deeper flavor, or a sugar substitute like Stevia or monk fruit if needed.
Brown Sugar
- Contributes to the moisture and chewy texture due to the molasses content.
- Substitute: You can make your own brown sugar using my recipe. Or use granulated sugar or coconut sugar, though the texture may be less chewy.
Eggs
- Bind the ingredients together, help with structure, and contribute to the cake’s moistness.
- Substitute: Flax eggs, chia eggs, or aquafaba (the liquid from canned chickpeas) are great egg alternatives for a vegan option.
Vanilla Extract
- Adds a warm, sweet flavor to the cookie cake.
- Substitute: You can use Vanilla Bean Paste instead.
All-Purpose Flour
- All-purpose flour has a protein content of 9-11%, which gives this carrot loaf structure and a slight chew with a soft crumb.
- Substitute: You can use a Gluten-free flour blend, Easy Almond Flour Baking Mix, or oat flour, though the texture may change slightly.
Baking Soda
- Helps the cookie cake rise slightly and provides the soft, chewytexture.
Salt
- Enhances the sweetness and balances the flavors.
Chocolate Chips (or Chopped Chocolate)
- Adds pockets of melty, gooey chocolate that make the cookie cake extra indulgent.
- Substitute: You can use semi-sweet chocolate chips, white chocolate, butterscotch chips, or any other type of candy or nuts like M&Ms or chopped peanut butter cups.
Buttercream Frosting
- Provides a sweet, creamy topping to the cookie cake, adding richness and a smooth texture.
- Substitute: Cream cheese frosting, whipped cream, or even ganache can be used for a different flavor profile.
How to Make the Best Cookie Cake
Make the Cookie Layers
- Prep: Preheat the oven to 350°F (180°C) Fan assist. Butter and line four 9-inch (23 cm) cake pans. Set aside.
- Cream butter with sugar: In the bowl of a stand mixer fitted with a paddle attachment (or with a handheld electric mixer and a large bowl), cream together the butter, granulated sugar, and brown sugar on high for about 2 – 3 minutes.
- Add eggs: On medium-low speed, add the eggs one at a time until combined, followed by the vanilla.
- Mix dry ingredients: In a large bowl, whisk together the flour, baking soda and salt.
- Combine: Add in the flour mixture until just combined, and lastly, fold in the chopped chocolate.

- Shape: Divide the dough (about 21 oz/600 g per pan) and press to the edges in an even layer in each prepared cake pan. Top with M&Ms, if using, pressing them slightly into the dough.
- Bake: Bake the cookie layers for about 18 – 20 minutes until the edges are golden brown. Be careful not to overtake the cookie, they should be slightly doughy.
- Cool: Let cool in the pans for 15 minutes, then invert onto a wire rack to cool completely.

Assemble the Cookie Cake
- First, choose the best-looking cookie to be the very top of your masterpiece and set aside.
- Place one of the remaining layers on a serving plate and pipe or spread about ¾ cup (6 oz/170 g) of Best Ever Vanilla Buttercream Frosting onto the cookie. Continue layering cookies and frosting. Top with your best-looking cookie. Leave the sides and top unfrosted to show contrast.
- Serve with a big glass of milk.

Gemma’s Pro Chef Tips
- Four Layers: This cookie cake has four layers, baked in four pans. If you only have two pans, you can bake the layers in two batches.
- Alternative Baking Method: You can also pat the cookie dough into 9-inch (23 cm) circles and bake them on parchment-lined sheet pans.
- Don’t Overbake: Be careful not to overbake the cookie layers. They will firm up as they cool, and if overbaked, they may become too crunchy to cut.
- Cool Completely Before Frosting: Make sure the cookies are completely cool before frosting.
- Buttercream Options: You can substitute vanilla buttercream with Best Ever Chocolate Buttercream for a different flavor.
- Avoid Refrigerated Frosting: Don’t frost with buttercream that needs refrigeration (like cream cheese frosting) as it will make the cookie layers too hard to cut.
- Baking with a Fan: I updated this recipe for fan-assisted ovens. If you don’t have a fan, bake only two trays at a time, and note that your bake time may vary.
- Chocolate Choice: I use chocolate bars, but good-quality chocolate chips can be used as well.
- Make-Ahead Dough: Make the dough up to two days in advance and store it in the pans in the fridge. Allow it to sit at room temperature for 90 minutes before baking.
- Best Fresh: Like any freshly baked, gooey chocolate chip cookie, this cake is best eaten within two days.
- Buttercream Prep: You can make the buttercream up to 3 days in advance.

Make-Ahead and Storage Instructions
Dough:
- Refrigerate: You can refrigerate the dough for up to 2 days. Be sure to store it in an airtight container or wrap it tightly in plastic wrap.
- Freeze: If you need to store the dough for a longer period, freeze it for up to 3 months. Wrap it tightly in plastic wrap and foil, then thaw in the fridge overnight or let the dough sit at room temperature for about 90 minutes before baking.
Baked Cookie Cake:
Once assembled, the cookie cake can be stored at room temperature, covered, for up to 1 day. It’s best enjoyed fresh but will still taste delicious for a couple of days.
Buttercream:
You can prepare the buttercream up to 3 days in advance. Store it in an airtight container in the fridge. Before using, let it come to room temperature and rewhip if needed.
Freezing:
If you need to store the cookie cake longer, you can freeze the individual cookie layers. Wrap each layer tightly in plastic wrap and then foil, and freeze for up to 3 months. When ready to serve, let the layers thaw at room temperature before frosting and assembling.
Creative Toppings
- Vanilla Ice Cream: A classic choice that complements the richness of the cookie cake.
- Chocolate or Fudge Ice Cream: Perfect for chocolate lovers, it enhances the dessert’s flavor.
- Mint Chocolate Chip: A refreshing contrast to the sweet, buttery cookie cake.
- Caramel Swirl: Adds a smooth, sweet richness that pairs perfectly with the cookie layers.
- Cookie Dough Ice Cream: For even more of a cookie experience, this flavor is an indulgent match.
More Layered Chocolate Cake
- Best-Ever ChocolateCake with Whipped Ganache
- Rich German Chocolate Cake
- Beyond Moist Vegan Chocolate Cake
- Best-Ever Chocolate and Orange Cake
- 10-Minute Easy Chocolate Cake
IMPORTANT NOTE: This recipe was updated on 2/27/2025, to include a NEW step-by-step tutorial video, NEW step-by-step photography, explanations, and substitutes of key ingredients, Make-ahead and storage instructions, answers to the most frequently asked questions, and Pro Chef Tips.
Try These Recipes!


Watch The Recipe Video!
Chocolate Chip Cookie Cake Recipe

Ingredients
- 2 cups (16 oz/454 g) butter, softened
- 1 ¾ cups (14 oz/385 g) granulated sugar
- 1 ¾ cups (10 ½ oz/298 g) dark brown sugar (not packed)
- 3 large eggs, at room temperature
- 1 tablespoon vanilla extract
- 6 ½ cups (32 ½ oz/923 g) all-purpose flour
- 1 tablespoon baking soda
- 1 ½ teaspoons salt
- 2 ⅔ cups (16 oz/455 g) bittersweet chocolate, chopped
- ¾ cup (4 oz/115 g) M&M's, optional
- 1 recipe Best Ever Vanilla Buttercream Frosting
Instructions
Make the Cookie Layers
- Preheat the oven to 350°F (180°C) Fan assist. Butter and line four 9-inch (23 cm) cake pans. Set aside.
- In the bowl of a stand mixer fitted with a paddle attachment (or with a handheld electric mixer and a large bowl), cream together the butter, granulated sugar and brown sugar on high for about 2 - 3 minutes.
- On medium-low speed, add the eggs one at a time until combined, followed by the vanilla.
- In a large bowl, mix together the flour, baking soda and salt.
- Add in the flour mixture until just combined, and lastly, fold in the chopped chocolate.
- Divide the dough among the cake pans (about 21 oz/600 g per pan) and press to the edges in an even layer. Top with M&Ms, if using, pressing them slightly into the dough.
- Bake the cookie layers for about 18 - 20 minutes. Be careful not to overtake the cookie, they should be slightly doughy.
- Let cool in the pans for 15 minutes, then invert onto a wire rack to cool completely.
Assemble the Cookie Cake
- First, choose the best looking cookie to be the very top of your masterpiece and set aside.
- Place one of the remaining layers on a serving plate and spread about ¾ cup (6 oz/170 g) of Best Ever Vanilla Buttercream Frosting onto the cookie. Continue layering cookies and frosting. Top with your best looking cookie. Leave the sides and top unfrosted to show contrast.
- Enjoy straight away or cover and store at room temperature for up to 2 days. Serve with a big glass of milk.
Recipe Notes
Gemma’s Pro Chef Tips
- Four Layers: This cookie cake has four layers, baked in four pans. If you only have two pans, you can bake the layers in two batches.
- Alternative Baking Method: You can also pat the cookie dough into 9-inch (23 cm) circles and bake them on parchment-lined sheet pans.
- Don’t Overbake: Be careful not to overbake the cookie layers. They will firm up as they cool, and if overbaked, they may become too crunchy to cut.
- Cool Completely Before Frosting: Make sure the cookies are completely cool before frosting.
- Buttercream Options: You can substitute vanilla buttercream with Best Ever Chocolate Buttercream for a different flavor.
- Avoid Refrigerated Frosting: Don’t frost with buttercream that needs refrigeration (like cream cheese frosting) as it will make the cookie layers too hard to cut.
- Baking with a Fan: I updated this recipe for fan-assisted ovens. If you don’t have a fan, bake only two trays at a time, and note that your bake time may vary.
- Chocolate Choice: I use chocolate bars, but good-quality chocolate chips can be used as well.
- Make-Ahead Dough: Make the dough up to two days in advance and store it in the pans in the fridge. Allow it to sit at room temperature for 90 minutes before baking.
- Best Fresh: Like any freshly baked, gooey chocolate chip cookie, this cake is best eaten within two days.
- Buttercream Prep: You can make the buttercream up to 3 days in advance.


This worked perfectly and was amazing! Thank you! Why this is 4 rather than 5 stars: I reduced the sugar amount on my own which turned out amazing! But I think recipes should begin with less. Also the frosting- I had to use a little over half the suggested sugar amount, which tells me the recipe would have been way too, unnecessarily sweet for my family. Also I feel like you have to watch your YouTube to get the tips and tricks on how to bake this well, lots of those tips are not on the written recipe which is… Read more »
We absolutely love this recipe. Crunchy and chewy at the same time. Delecious!