This post may contain affiliate links. Please see my full disclosure for details.
Hi Bold Bakers!
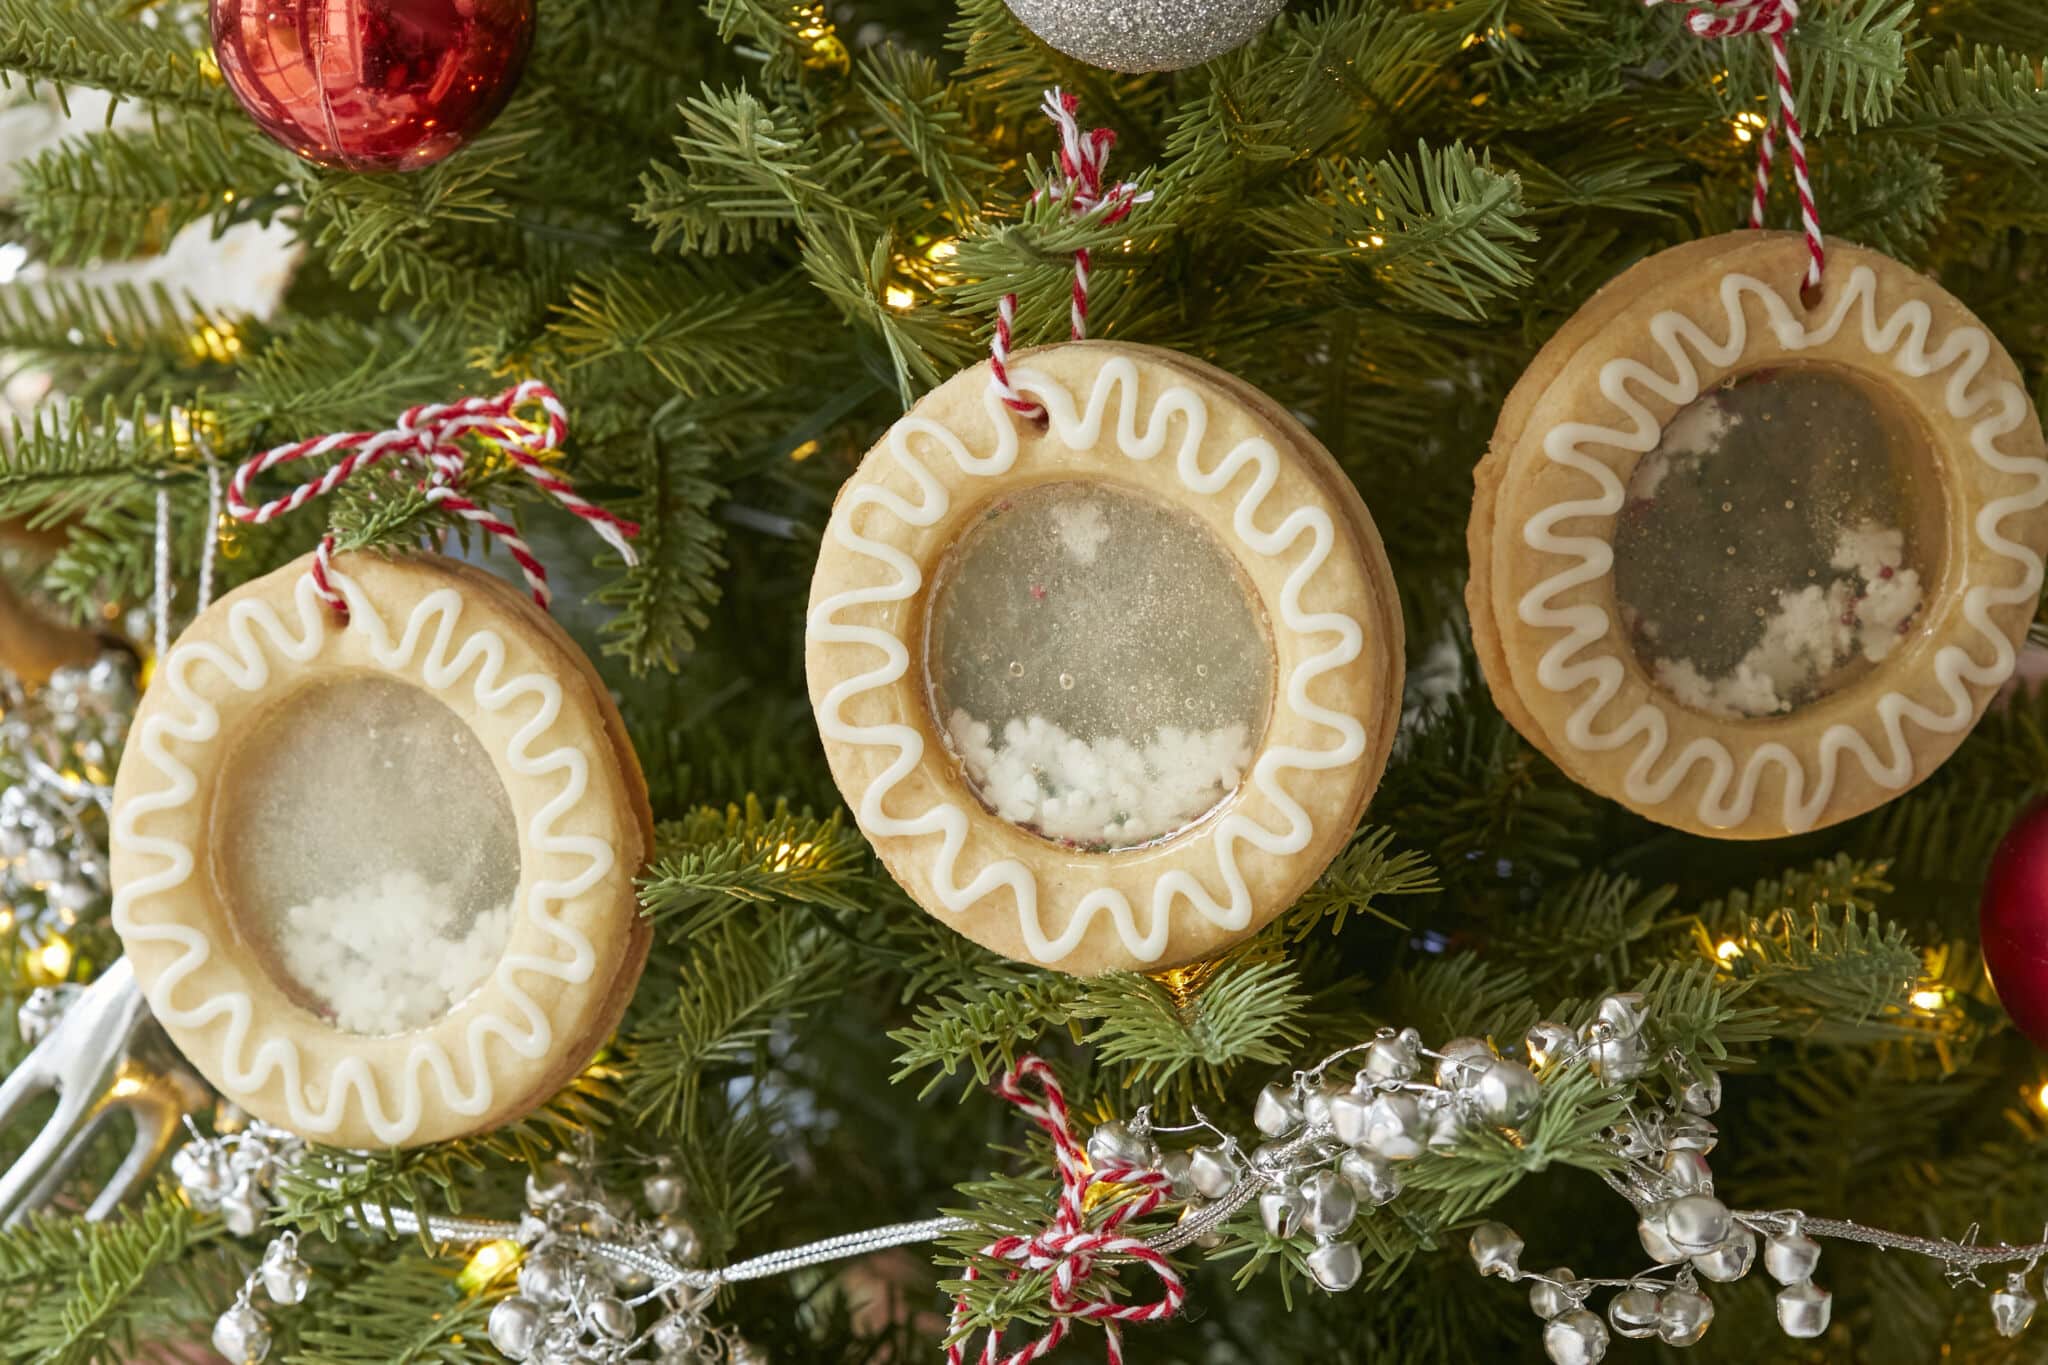
WHY YOU’LL LOVE THIS RECIPE: Magical Snow Globe Cookies add a wholesome sweetness and festive shine to your holiday decor. These whimsical snow globes go beyond the average decorated holiday treat—they’re cookie art! With my step-by-step instructions and effortless shortcuts, you’ll be crafting homemade ornaments that you’ll be proud to hang on your tree.
- Crispy Irish shortbread are creatively decked out in snow-white icing. The clever filling forms a lustrous center, adding to your home’s joyful holiday glow.
- While the process may seem intricate, don’t worry! Each step is actually a breeze, and you’ll love the charming results.
Everyone, including kids, will love creating holiday wonderment with these snow globe-shaped shortbread ornaments, and we have more enchanting and delicious recipes from a party-ready Snow Globe Cake, to kid-pleasing Giant Single-Serving Christmas Cookies, to Frozen Whipped Cream, which transforms an everyday mug hot chocolate into a celebration.
Table of Contents
- What Are Snow Globe Cookies?
- Tools You Need
- Key Ingredients and Why
- How to Make Snow Globe Cookies
- Can I Make Snow Globe Cookies in Advance?
- How to Store Snow Globe Cookies
- FAQs
- Gemma’s Pro Chef Tips
- More Holiday Shortbread Cookie Recipes

What Are Snow Globe Cookies?
- Snow Globe Cookies are holiday decorations made from shortbread cookie rings (butterier and more crumbly than sugar cookies) held together with icing and filled with a clear, hardened sugar middle and sprinkles.
- Making a hole in the cookies’ tops before baking makes it easy to string them with twine, ribbon, or yarn and hang them on the Christmas tree.
- Using sugar glass, also known as confectionary glass or candy glass, in baked goods is a form of cooking artistry that became popular in the 1800s. Traditionally, sugar is melted and then hardened into glass-like discs, strands, or molded shapes. Here, we’re using melted candies as a timesaving alternative.
Tools You Need
- Stand mixer with a paddle attachment (optional) or a hand-held mixer
- Food processor
- Mixing bowl
- Measuring cups and measuring spoons
- Cookie sheets and parchment paper
- Rolling pin
- 3 1/2-inch cookie cutter and 2 1/2-inch cookie cutter
- Wooden skewer
- Toothpicks
- Cookie spatula
- Whisk
- Piping bag with a tiny round tip
- Kitchen twine or ribbon
Key Ingredients and Why
-
Butter
- Butter adds flavor, softness, and moisture to baked goods.
- Make sure to soften before using. You’ll know it is at the right temperature when you push the butter with your finger, and it makes an indent, but your finger doesn’t easily squish right through.
-
Granulated sugar
- Granulated sugar adds sweetness to your cookies and contributes to the dough’s structure
-
All-purpose flour
- All-purpose flour typically has a protein content of 8-11%, making it perfect for these shortbread cookies so that they aren’t too chewy or elastic.
-
Salt
- Salt is crucial for bringing out all the flavors of the shortbread.
-
Clear, hard candy (like Fox’s Glacier Mints or Perugina Glacia Mints)
- Using candy is a quick and easy way to mimic sugar glass. It melts quickly and has a fast set time.
- Any clear, hard candy will work there.
-
Powdered sugar
- Powdered sugar, also known as confectioners’ sugar or icing sugar, gives the cookie icing its sweetness and bright white color.
- Using powdered sugar, made by grinding sugar with a small amount of cornstarch, gives this icing a smooth texture, ideal for piping and spreading.
-
Corn syrup
- The amount of corn syrup in this recipe is minimal, but it’s crucial to include it, as corn syrup acts as a binder here. It holds the powdered sugar and whole milk together in a smooth, cohesive mixture.
- The corn syrup also makes the icing glossy and stabilizes it so the color stays bright. It also adds a note of mild sweetness.
-
Milk
- Whole milk makes the icing pleasantly creamy but still easily pipeable and spreadable.
-
Holiday sprinkles
- Snowflake white sprinkles are natural here, and add some colorful sprinkles as highlights.
How to Make Snow Globe Cookies
-
Prepare the Cookies
- Make the cookie dough: Cream the butter, sugar, vanilla, and salt until fluffy. Add the flour gradually until combined. Shape the dough into a disc and refrigerate for at least an hour. Pulse the candy in a food processor until finely ground.
- Shape the cookie dough: Roll out chilled dough to a ⅛-inch (3mm) thickness. Use a 3 1/2-inch round cookie cutter to cut out 16 circles. Place eight cookies on a parchment-lined cookie sheet, and use the 2 1/2-inch round cookie cutter to cut smaller circles in the center of the cookies. Use the skewer to poke a small hole in each cookie.
- Bake the cookie dough: Bake the cookies on parchment-paper lined sheets at 325°F (165°C) fan assist for five minutes.
-
Add the candy center
- Add 1 tablespoon of ground candy to the cookie centers.
-
Finish baking
- Bake the candies with the candy centers for 5 minutes more, until the cookies are lightly golden and the candy is melted.
- Roll out and cut eight more 3 1/2-inch circles and cut out 2 1/2-inch circles from the centers. Bake this batch without adding the candy, as these will be the middle layer. Continue cutting and baking until you have enough rings for 12 cookies in total: 24 filled with a candy center and 12 without filling.

- Make the icing and assemble:
- In a small bowl, whisk the 2 1/2 cups (20 oz/600 g) confectioners’ sugar, milk, and corn syrup until smooth and put in a piping bag.
- (See recipe for detailed assembly instructions) To make a Snow Globe Cookie, take one candy-filled cookie and use icing to sandwich it with an empty cookie ring. Add sprinkles to the center, and then use icing to sandwich another candy-filled cookie on top.
- Pipe icing around the ring to decorate, and when the cookies are completely dry, thread with twine or ribbon.

Can I Make Snow Globe Cookies in Advance?
Yes, you can make Snow Globe Cookies in advance.
-
- Make the dough, flatten it into a disc, wrap it well, or put it in an airtight container, and keep it in the fridge for up to two days.
- You can also wrap the dough well and freeze it for up to three weeks. Let it defrost in the fridge overnight before using.
How to Store Snow Globe Cookies
It’s safe to keep these Snow Globe Cookies on your tree as decoration for six to eight weeks.
FAQs
- Are Snow Globe Cookies edible?
- While these cookies are edible (and it can be fun to eat a snow globe!), they are designed with the intention of being an ornament.
- For something delicious, bake a batch of plain shortbread (without the melted candy) and decorate with the icing.
- Can I make these without a food processor?
- Place candies in a sturdy plastic bag, and crush with a mallet or rolling pin.
- Freezing the candies first may make them easier to crush.

Gemma’s Pro Chef Tips
- Once you have cut out your cookie rings, check that the rings are as round as possible before baking. Sometimes, cutting and transferring the cookies can warp the rings a bit, making them hard to match up when assembling.
- This cookie dough gets a bit difficult to handle when it warms up. Roll out a small portion at a time to keep the dough cooler, and after you cut out the big circles, you can place the trays in the refrigerator to firm up the dough before cutting out the center circles.
- When piping the icing to sandwich the cookies, be sure to use enough that there are no gaps between the rings, or you will have escaping sprinkles!
- Try making your own Homemade Sprinkles for a truly handmade treat!
More Holiday Shortbread Cookie Recipes
- Irish Shortbread Christmas Tree Cookies
- Homemade Walker’s Scottish Shortbread Cookies
- Perfected Millionaire’s Shortbread
- Butter Pecan Shortbread Cookies
- Cranberry Orange Shortbread
Try These Recipes!


How to Make Snow Globe Cookies

Ingredients
For the Cookie
- 1½ cups (12 oz/341 g) butter, at room temperature
- 1 cup (8 oz/225 g) granulated sugar, plus extra for sprinkling
- 1 teaspoon pure vanilla extract
- ¼ teaspoon salt
- 3½ cups (17½ oz/497 g) all-purpose flour
- About 10 oz/284 g clear hard candy (like glacier mints)
For the Icing
- 2½ cups (10 oz/ 284 g) powdered sugar, sifted
- 1½ tablespoons corn syrup
- 2-3 tablespoons milk
- Sprinkles for filling the globes
- Butcher twine, thin cord or ribbon, for hanging the cookies.
Instructions
Make the Cookie Dough
- In a stand mixer fitted with a paddle attachment (or with a medium bowl and handheld electric mixer), cream the butter, sugar, vanilla extract and salt together for 3-4 minutes, until light and fluffy.
- Turn the mixer to low and gradually add in the flour until well combined. Shape the dough into a disc, wrap with plastic wrap and refrigerate for an hour or until firm.
- Next, place the unwrapped hard candy in a food processor and pulse until the candy is powdered. Transfer to a bowl and set aside.
- When ready to bake, preheat the oven to 325°F (165°C) fan assist and line two cookie sheets with parchment paper. Set aside.
- On a lightly floured surface, roll out the dough to ⅛-inch (3mm) thick and cut 16 circles using a 3½ -inch (9cm) cutter. You can gather and re-roll scraps. Arrange 8 cookies on each cookie sheet, slightly staggered.
- Using a 2½-inch (6 cm) round cutter, cut out the center of each cookie. (Save these scraps for rolling more cookies.) Then, use the flat end of a wooden skewer to poke a hole in each of the cookie rings.
- Bake the cookies for 5 minutes, until they are barely set. Then, while keeping the cookies in the oven, carefully scoop 1 tablespoon of crushed candy in the cut-out centers of each cookie.
- Continue to bake for about 5 more minutes, until the cookie is lightly golden and the candy has melted, spread through the center and is bubbling. Watch carefully so that that candy doesn’t begin to brown.
- Before removing the cookies from the oven, check that the candy has spread to the inside edges of the cookie. If there are any gaps, you can use a wooden skewer to push the candy to the edges. Let the cookies cool completely on the baking sheets before moving them.
- Cut 8 more cookie rings of the same size with the centers removed just like above. Poke a hole in the ring with the wooden skewer and bake these on a parchment lined cookie sheet until they are done. (These center rings will not have any melted candy in the middle.) You will now have enough to make 8 snow globe cookies.
- Roll and cut any remaining dough and gather scraps and bake as directed in the steps above. For each snow globe you will need two rings filled with melted candy (sugar glass) and one ring without candy. You should be able to get 12 more cookie rings. Fill only 8 of these cookies with candy and bake the remaining 4 rings without candy.
Make the Icing
- In a medium bowl, whisk the powdered sugar, corn syrup and 2 tablespoons of milk together until smooth. Check the consistency – it should be pourable but stay where it is placed without spreading. If need be, add a touch more milk, a few drops at a time, until the correct consistency is reached. If it is too runny, add a touch more powdered sugar. Place the icing in a piping bag fitted with a very small round tip.
Assemble the Cookies
- First, match up your cookies. For each globe, you will need two cookies with sugar glass and one ring for the center without. Try to align the cookies by the skewer hole and see which rings most closely fit together. Use a toothpick to gently tap out any skewer holes that may have closed a bit during baking.
- For each cookie, turn one of the sugar glass cookies upside down and pipe a few lines of icing around the cookie. Using a toothpick to help you align the holes, sandwich the cookie ring without the sugar glass onto the piped cookie.
- Add about 2-3 teaspoons of sprinkles to the center, then pipe a few lines of icing into the center ring and sandwich the second sugar glass cookie on top, enclosing the sprinkles. Make sure to use the toothpick to align all three holes.
- Finally, pipe any decorations you choose on the cookie. If you wish to pipe the other side, wait for 2 hours until the cookie is completely dry and set before flipping the cookie over to decorate the other side.
- Once completely dry and set, push a thin ribbon or cord through the holes in the cookies and tie a loop so you can hang your ornament on your tree. These cookies will keep for 6-8 weeks.

