This post may contain affiliate links. Please see my full disclosure for details.
Hi Bold Bakers!
Hi Bold Bakers!
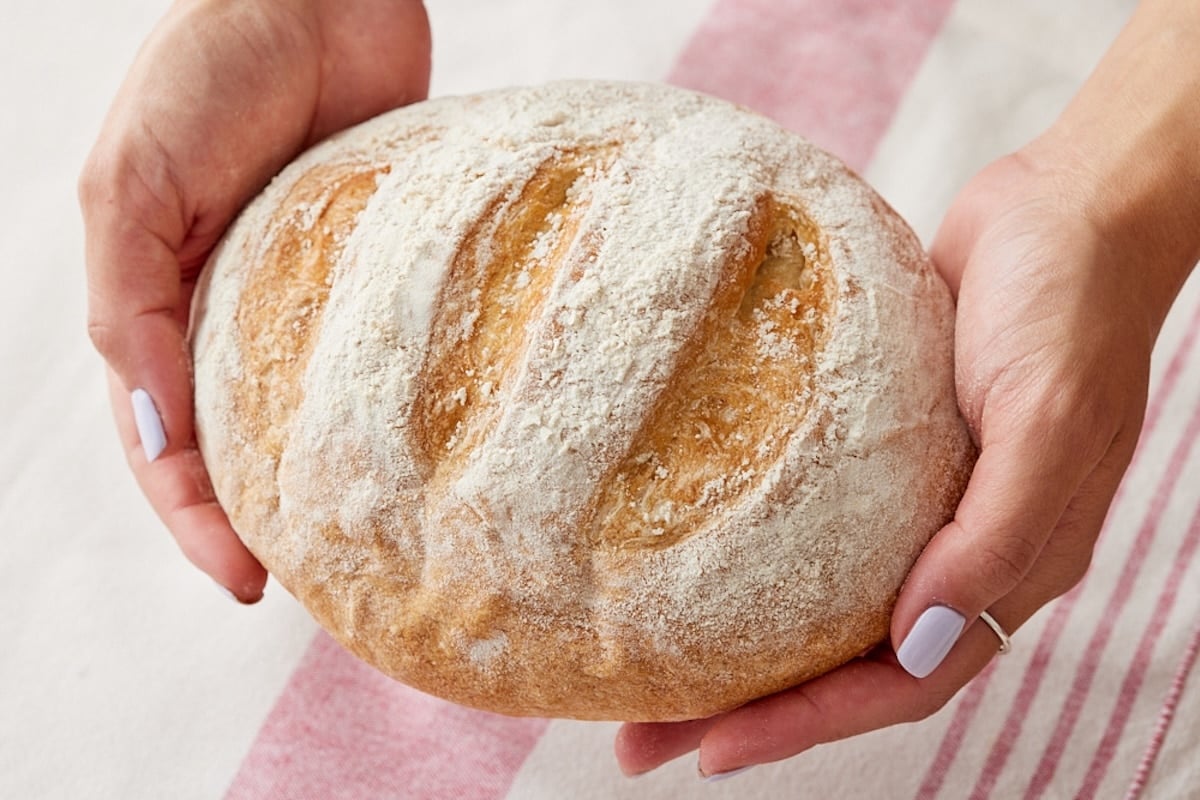
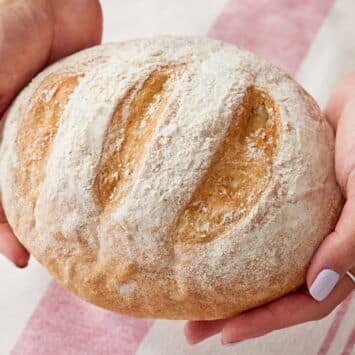
WHY YOU’LL LOVE THIS RECIPE: My essential Small Loaf Crusty Bread is the perfect easy homemade bread recipe for 1 or 2 people. This rustic loaf tastes just like bakery bread, but it’s simple enough for any home baker to make.
- Chewy, artisan quality: The same fabulous texture and rustic flavor.
- Beautiful, crackly crust: Baking the bread in a Dutch oven creates steam, and it is the secret to its irresistible crust.
- Perfect for beginners: This easy, no-knead bread recipe requires minimal hands-on work—no experience or special techniques or equipment needed.
- Simple ingredients: You only need 5 pantry staples to create this impressive homemade loaf.
- Small-batch convenience! With four servings, this mini bread is the perfect size for smaller households, gifting, weeknight meals, or any time you want fresh bread without waste.
I’m passionate about breadmaking, and one of my goals when starting Bigger Bolder Baking was to encourage home bakers to discover how easy and rewarding it is to make fresh bread from scratch. This Small Loaf Crusty Bread is the perfect way to start. I developed this Small Loaf Crusty Bread recipe to give you a quicker, more manageable loaf with all the chewy texture and deep flavor of a big loaf.
My top tip for you here is to wet your hands when handling the dough. This is a high-hydration dough, which gives the bread its wonderfully chewy texture and airiness, but it also means the dough will feel sticky. Damp hands will make shaping easier and will prevent frustration. For more rustic loaf recipes, check out my Seeded Bread, Chocolate Sourdough Bread, and Same-Day Sourdough Bread.
Table of Contents
- What is Small Loaf Crusty Bread?
- Tools You Need
- Key Ingredients and Substitutes
- How to Make Small Loaf Crusty Bread
- Gemma’s Pro Chef Tips
- Make-Ahead And Storage Instructions
- How to Serve Small Loaf Crusty Bread
- FAQs
- More Bread Recipes

What is Small Loaf Crusty Bread?
Small Loaf Crusty Bread is an artisan-style loaf with a crisp golden-brown crust and an airy, chewy interior, made from a handful of simple ingredients. This small-batch bread is baked in a Dutch oven to trap steam, creating a beautifully crackly crust. This type of rustic bread has been baked throughout Europe for centuries, and my recipe makes it approachable and manageable for home bakers.
Tools You Need
- Mixing bowls
- Measuring spoons
- Measuring cups
- Glass measuring jug
- Kitchen scale (optional)
- Wooden spoon
- Spatula
- Dutch oven
- Parchment paper
- Knife
- Wire cooling rack
Key Ingredients and Substitutes

Bread flour
- Bread flour provides structure in this small bread.
- Importantly, bread flour has a higher protein content (11 to 14%)than all-purpose flour (9 to 11%), which gives it stronger gluten development for a chewy, airy texture in this small bread/mini bread.
- Substitute: For a heartier texture, you can replace half of the bread flour with whole wheat flour.
Instant yeast
- Instant yeast ferments the dough, producing carbon dioxide that creates an airy texture.
- Importantly, the fermentation contributes to flavor development.
- Substitute: If you only have active dry yeast, increase the amount to 1 teaspoon.
- Combine the warm water and honey from the recipe in a small bowl and proof the yeast there until foamy (about 10 minutes), then combine with the dry ingredients.
Salt
- Salt adds flavor and keeps the one loaf of bread recipe from tasting flat.
- Importantly, salt strengthens the gluten in this mini bread, creating a better crumb and crust texture.
Warm water
- Warm water gives this high-hydration dough moisture and contributes to an open crumb and chewiness.
- Use lukewarm or “blood temperature” liquid. Cold liquid will slow the rise. The liquid should be warm to the touch, but not hot, or it could kill the yeast.
- Substitute: For a softer loaf, you can replace the water with milk.
Honey
- Honey adds a subtle sweetness to the Dutch oven crusty bread.
- Importantly, honey feeds the yeast.
- Additionally, honey aids in browning.
- Substitute: Use the same amount of maple syrup or molasses (molasses will give a deeper flavor).
How to Make Small Loaf Crusty Bread
Make the Small Loaf Crusty Bread Dough and Bulk Ferment
- Combine the dry ingredients. In a large bowl, mix together the flour, yeast, and salt.
- Finish the dough. Combine the water and honey, then pour into the dry ingredients and mix with a spatula until a shaggy, sticky dough forms.

- Let rise until doubled. Transfer to a lightly oiled bowl, cover, and let rise in a warm place until doubled in size, about 2 hours.

Shape and Proof the Small Loaf Crusty Bread Dough
- Place dough on a floured surface. Turn the dough out onto a lightly floured surface.
- Stretch and fold the dough. Using damp hands, stretch and fold the edges of the dough into the center, then turn out onto a lightly floured surface and shape into a tight ball.

- Let rise again. Line a small Dutch oven with parchment and place the dough seam-side down inside. Place on the lid and let rise again until puffy, about 45 minutes.

Bake and Serve the Small Loaf Crusty Bread
- Prepare to bake: Towards the end of the rise, preheat the oven to 425°F (220°C).
- Score the loaf: Score the top of the loaf with a sharp knife, then place the lid back on.

- Bake the bread: Bake in the preheated oven for 20 minutes.
- Lower the temperature and finish baking: Lower the temperature to 400°F (200°C), remove the lid, and bake for 20 minutes more, or until deep golden brown.

- Cool before slicing: Transfer to a wire rack and cool completely before slicing.
FULL (PRINTABLE) RECIPE BELOW!
Gemma’s Pro Chef Tips
- Use active yeast if you prefer. This recipe uses instant yeast, which doesn’t need to be proofed. If you only have active dry yeast, increase the amount to 1 teaspoon. Combine the warm water and honey from the recipe in a small bowl and proof the yeast there until foamy (about 10 minutes), then combine with the dry ingredients.
- Use lukewarm water. Cold liquid will slow the rise, and if your water is too hot, it could kill the yeast. The liquid should be warm to the touch (blood temperature).
- Mix yeast and flour first. To ensure that your bread rises well, mix the instant yeast with the flour first. This prevents the yeast from directly contacting the salt, which can deactivate the yeast.
- Wet your hands first. This is a high-hydration dough. It should be quite sticky, so wet your hands before handling the dough to prevent it from sticking to your fingers.
- Strengthen the loaf. A high-hydration dough rises faster but has a weaker structure. To strengthen the loaf and improve the rise, after the first series of stretch-and-folds, cover and let it rise until doubled. Then stretch, fold, and shape for a second proof before baking.
- Use a kitchen scale if possible. A kitchen scale gives the most accurate measurements and helps create consistent bread dough every time.
- A longer rise elevates texture and flavor. Alternatively, for an even better texture and complex flavor (and if time permits), after the 2-hour bulk fermentation, refrigerate the dough overnight, then shape and proof the next day.
- Use a light touch. Avoid overhandling the dough to preserve the air bubbles created during fermentation.
- Don’t skip scoring. Scoring the top of the loaf helps control how the bread expands in the oven and gives it its classic look.
- Use a Dutch oven to create steam. This gives the bread its superior crust and chewy crumb. If you don’t have a Dutch oven, bake the bread on a parchment-covered baking sheet and cover with a large, oven-safe bowl for the first 20 minutes.
- Line with parchment. Use a piece of parchment to make the transfer easier and prevent sticking to the Dutch oven. This helps give the bread its airy, chewy crumb.
- Cool before cutting. Fresh bread continues to set as it cools, and it needs to cool completely on the counter before slicing. Slicing the bread too soon can result in a gummy center and a denser texture.

Make-Ahead And Storage Instructions
Make-ahead tips
- For an even better texture, refrigerate the dough overnight after the 2-hour bulk fermentation, then shape and proof the next day.
How to store leftovers
- Store leftovers in an airtight container at room temperature for up to three days (the flavor develops even more as you store it).
- For longer storage, place slices or a whole loaf in a freezer-safe container or a freezer bag, and freeze for up to two months.
- Defrost at room temperature for 2 hours before eating.
- You can also put frozen slices directly in the toaster.
How to Serve Small Loaf Crusty Bread
- Serve this small loaf of bread with Maple Pecan Compound Butter or Sundried Tomato Compound Butter.
- Toast slices and spread with Strawberry Jam, Raspberry Jam, or Orange Marmalade.
- This bread is perfect for sandwiches or savory toasts, from a simple grilled cheese to avocado toast.
- Crusty bread is the perfect base for garlic bread. Top with garlic butter, herbs, and Parmesan cheese and broil.
- Enjoy simply with butter and a bit of flaky sea salt.
- This small loaf is charming as part of a cheese or charcuterie board.
- Start the day off with eggs and a couple of slices of this crusty loaf, or spread a slice with almond butter.
- A warm loaf is perfect with soup or chili.
- Use day-old slices to make French toast.
- Cube leftover bread and make croutons or homemade breadcrumbs.
FAQs
Can I make this bread gluten-free?
- Unfortunately, this bread recipe can’t be made gluten-free. It requires gluten to work with yeast to build the bread’s structure.
- For great gluten-free bread recipes, see my Keto and Gluten-Free Bread Recipe and Hearty No Yeast Bread Recipe.
Can I make this bread without a Dutch oven?
- Yes, you can make this bread without a Dutch oven.
- The steam helps create the crisp, crackly crust, so if you don’t have a Dutch oven, place the shaped dough on a parchment-covered sheet pan.
- Place a large, oven-safe bowl (stainless steel #304 or #430) on top of the loaf for the first 20 minutes, then remove the bowl when you lower the oven temperature for the remainder of the baking time.
- Note that the bread may differ from bread made in a Dutch oven.
How can I ensure that my no-knead Dutch oven bread rises well?
- To make sure your no-knead Dutch oven bread rises well, mix the instant yeast with the flour first to avoid direct contact with salt, which can deactivate the yeast.
- Be sure to bake your bread in a hot oven. Preheat your oven for 15 minutes before baking. A hot oven will give the bread the best rise and create steam, which can help with the rise.
More Bread Recipes
- No-Knead Whole-Wheat Bread
- Chocolate No-Knead Bread
- Seeded Bread Recipe
- Same Day Sourdough Bread
- Perfect Homemade White Bread
Try These Recipes!


Watch The Recipe Video!
Small Loaf Crusty Bread
Ingredients
- 1 ½ cups (7 ½ oz/213 g) bread flour
- ¾ teaspoon instant yeast
- ¾ teaspoon salt
- ⅔ cup (5 fl oz/160 ml) plus 1 tablespoon warm water
- 1 teaspoon honey
Instructions
To Make the Small Loaf Crusty Bread Dough and Bulk Ferment
- In a large bowl, mix together the flour, yeast, and salt.
- In a small jug, combine the water and honey, then pour into the dry ingredients and mix with a spatula until a shaggy, sticky dough forms.
- Transfer to a lightly oiled bowl, cover, and let rise in a warm place until doubled, about 2 hours.
To Shape and Proof the Small Loaf Crusty Bread Dough
- Using damp hands, stretch and fold the edges into the center (about 4-5 times), then turn out onto a lightly floured surface and shape into a ball.
- Line a small Dutch oven with parchment and place the dough seam-side down inside. Place on the lid and let it rise again until puffy, about 45 minutes.
To Bake the Small Loaf Crusty Bread
- Towards the end of the rise, preheat the oven to 425°F (220°C).
- Score the top of the loaf with a sharp knife then place the lid back on.
- Bake for 20 minutes. Then lower the temperature to 400°F (200°C), remove the lid and bake for an additional 20 minutes, or until deep golden brown.
- Transfer to a wire rack and cool completely before slicing.
To Serve and Store the Small Loaf Crusty Bread
- Enjoy with butter, jam, or alongside soups and stews. Store leftovers in an airtight container at room temperature for up to 3 days.
Recipe Notes
- Use active yeast if you prefer. This recipe uses instant yeast, which doesn’t need to be proofed. If you only have active dry yeast, increase the amount to 1 teaspoon. Combine the warm water and honey from the recipe in a small bowl and proof the yeast there until foamy (about 10 minutes), then combine with the dry ingredients.
- Wet your hands first. This is a high-hydration dough. It should be quite sticky, so wet your hands before handling the dough to prevent it from sticking to your fingers.
- Strengthen the loaf. A high-hydration dough rises faster but has a weaker structure. To strengthen the loaf and improve the rise, after the first series of stretch-and-folds, cover and let the bread rise until doubled. Then stretch, fold, and shape for a second proof before baking.
- Use a kitchen scale if possible. A kitchen scale gives the most accurate measurements and helps create consistent bread dough every time.
- A longer rise elevates texture and flavor. Alternatively, for an even better texture and complex flavor (and if time permits), after the 2-hour bulk fermentation, refrigerate the dough overnight, then shape and proof the next day.
- Use a light touch. Avoid overhandling the dough to preserve the air bubbles created during fermentation.
- Don't skip scoring. Scoring the top of the loaf helps control how the bread expands in the oven and gives it its classic look.
- Line with parchment. Use a piece of parchment to make the transfer easier and prevent sticking to the Dutch oven. This helps give the bread its airy, chewy crumb.
- Cool before cutting. Fresh bread continues to set as it cools, and it needs to cool completely on the counter before slicing. Slicing the bread too soon can result in a gummy center and a denser texture.


Very happy that it is a small recipe so no wasting. I just baked normal, no dutch oven or bowl.
Can you do this in a bread maker?
We have a small family so this small batch of bread works great for us! I did a few modifications.. after the 2hr proof, i put it in the fridge to cold ferment overnight for more flavour. Also added in some dried rosemary and minced garlic into the dough during the folding process, left it to rest for 45mins and baked it! The results was a delicious crusty and cute loaf of bread 🙂
Can I bake this in my croc pot or electric frying pan . Thank you
Hi Gemma, A new baker at 68, loving all your wonderful recipes and adding them to my to do list. My small loaf turned into a flat bread. I followed the recipe to the letter, initial proofing took place in the oven on the proof setting. The bread did rise but prior to the Dutch oven proofing I just had a heck of a time forming a rigid round loaf. After the second proofing it did enlarge a bit more but became flat. I scored and baked it. It came out as flat as it went in, but had a… Read more »
What size dutch oven was used/ would you suggest? I only have a Breville smartoven so small batches of everything is all I can do. Any advice /suggestions would be greatly appreciated. Fantastic job on all your videos, to the point great information! 💖🇨🇦
Hi Gemma, I was wondering if you could bake this bread in a 9 x 5 loaf pan?
Do you have to use bread flour or is there a way to convert regular all purpose flour to bread flour?
I followed this recipe to the letter. I am experienced bread baker and needed a quick and easy loaf so I tried this. It was perfect up until I scored it. It completely deflated. I baked it anyway thinking it would puff up again but it didn’t. So I have a flat bread that tastes good, lol! Will try again and just not score it to see if that makes a difference.
The bread is easy to make, incredibly tasty and has a wonderfully airy texture. I didn’t even get a chance to photograph it sliced because it was so delicious, we ate it just as it was, even without butter😋